by Contributed | Dec 12, 2020 | Technology
This article is contributed. See the original author and article here.
Update: Saturday, 12 December 2020 15:17 UTC
We continue to investigate issues within Activity Logs. Some customers may experience failures while querying API’s in Azure Activity Logs. Our initial findings indicate that the problem began at 12/11 ~12:30 UTC. We currently have no estimate for resolution.
- Work Around: None
- Next Update: Before 12/12 19:30 UTC
-Sandeep
by Contributed | Dec 12, 2020 | Technology
This article is contributed. See the original author and article here.
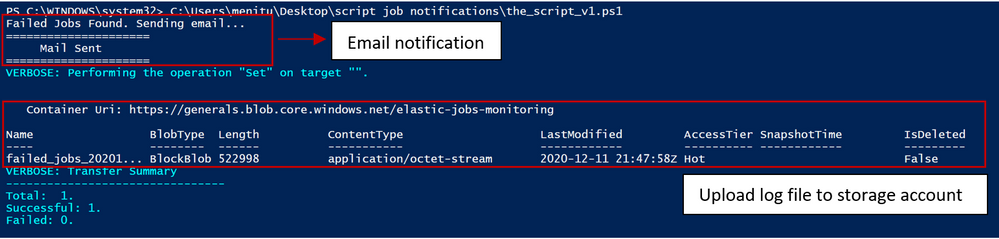
Alerts can be sent for any particular state of an elastic job. In this article, we discuss the case of ‘Failed’ jobs, however the solution can be easily extended to other scenarios. The script can be executed on client machines in background on a schedule or in Azure Automation Runbook. If failed jobs are identified, email notifications are sent, with an attachment of a log file containing only the failed jobs.
Elastic Jobs are currently in public preview and the monitoring capabilities are resuming for now to ad-hoc executions of T-SQL / PowerShell commands to retrieve the elastic job execution status, with no embedded option for sending alerts in case of a job failure.
This need has been addressed through a PowerShell script that filters job executions based on their status and sends the output to a log file, that is further sent as an attachment in a notification email and in the same time the log file is stored in an Azure Storage Account for further reference.
script output when executed on client machine
The jobs are filtered with the below T-SQL, that can be modified as per the requirements:
SELECT * FROM jobs.job_executions WHERE lifecycle = 'Failed' ORDER BY start_time DESC
Other possible values for job execution states are Created, InProgress, WaitingForRetry, Succeeded, SucceededWithSkipped, Failed, TimedOut, Canceled, Skipped and WaitingForChildJobExecutions.
Generated log file:
 log file snippet
Save log file to storage account:
# Get key to storage account
$acctKey = (Get-AzStorageAccountKey -Name generals -ResourceGroupName general).Value[0]

# Map to the reports BLOB context
$storageContext = New-AzStorageContext -StorageAccountName $StorageAccountName -StorageAccountKey $acctKey

# Copy the file to the storage account
Set-AzStorageBlobContent -File $output_file -Container StorageContainerName -BlobType "Block" -Context $storageContext -Verbose
 save log to storage account
The email functionality can be leveraged through any Simple Mail Transfer Protocol server. The proposed script is using smtp.mail.yahoo.com on port 587.
 email notification alert
How to run and automate alerts
As elastic jobs can be scheduled to run on a regular basis from both PowerShell and T-SQL, so our alert script can. Depending on the desired deployment type you choose, there are several options. For any of the below options, you have to set the required parameters in the script: Insert SQL Server Details, Credentials & SMTP server details:
$server = '.database.windows.net' # Set the name of the server
$jobDB = ''   # Set the name of the job database you wish to test
$user = '' # Set the login username you wish to use
$passw = '' # Set the login password you wish to use
$FromEmail = 'xxxxxxxxxxxx@yahoo.com' # "from" field's account must match the smtp server domain
$FromEmailPassw = '' # use app/server access token - it works with account passw
$ToEmail = 'xxxxxxxxxxxx@yyyyy.com'
$SMTPServer = "smtp.mail.yahoo.com" #insert SMTP server
$SMTPPort = "587" # or port 465
$StorageAccountName = ''
$StorageContainerName = ''
OPTION#1
Run the script on schedule in background on client machine
In order to run it you need to:
Open Windows PowerShell ISE in Administrator mode
Open a New Script window
Paste the content in script window
Run it
If failed jobs are found, an alert email will be triggered and the log file containing details on the failed jobs will be attached to the email and either saved locally or sent to a storage account. The result of the script can be followed in the output window.
To run the script in background on a schedule, you can use the following commands:
##  =========================================================================
##                Schedule Commands for Client Machines
##  =========================================================================
## To schedule script execution in background, please see below options

#insert parameter values
$script = 'script.ps1' # insert script path
$Time= 'MM/DD/YYYY HH:MM' # insert desired start time for schedule
$jobName = 'Job1'#insert desired job name


# display all scheduled jobs
Get-ScheduledJob

# add new job to run at schedule
Register-ScheduledJob -Name $jobName -FilePath $script -Trigger (New-JobTrigger -Once -At $Time `
    -RepetitionInterval (New-TimeSpan -Minutes 1) -RepetitionDuration ([TimeSpan]::MaxValue))

# command to remove a scheduled job
Unregister-ScheduledJob $jobName
OPTION#2
Run the script from Azure Runbook
- Create a new Automation Account as described here and make sure you choose “YES” for option “Create Azure Run As Account”.
- Import the following Azure Modules by browsing the gallery:
Az.Accounts (≥ 2.2.2)
Az.Storage
Az.Automation
 browse gallery – add module
- Create a runbook to run the script and make sure you choose Powershell runbook type.
 add a runbook
- Add the following login section when connecting from a Runbook
##  =========================================================================
##             Login when running from a Runbook
##  =========================================================================
## Enable this code section when running from Azure Runbook
## Get the connection "AzureRunAsConnection" when run from automation account

$connection = Get-AutomationConnection -Name AzureRunAsConnection
Connect-AzAccount `
    -ServicePrincipal `
    -Tenant $connection.TenantID `
    -ApplicationId $connection.ApplicationID `
    -CertificateThumbprint $connection.CertificateThumbprint

"Login successful..."
 schedule task
Note: Script execution can be monitored in the portal and alerts can be set for any script execution failure.
 job execution monitor
The script can be found in the following Git repository. This project welcomes contributions and suggestions.
by Contributed | Dec 11, 2020 | Technology
This article is contributed. See the original author and article here.
The rise of virtual education has led to sweeping changes in how students are taught. A lot of computer science lessons can be run with only small changes thanks to the cloud – Azure Lab Services can provide virtual machines with developer tooling, or GitHub Codespaces can replace the physical lab setups that Universities used to use.
One area that has limitations is the Internet of Things. You can’t move small microcontrollers or small board computers to the cloud, posting devices is expensive and leads to support issues that often can only be resolved by posting the device back, and asking students to purchase devices is problematic as this can be expensive for a group of students who may already be paying many thousands of dollars for tuition, and in some cases not feasible due to shipping or customs issues.
Although it is impossible to re-create an IoT lab fully in a virtual setting, it is possible to make devices like Raspberry Pi’s available over the internet, either from a University campus, or even from the Lecturers home (given enough upload bandwidth), and these can then be connected to microcontrollers to program these if needed. There are plenty of solutions to do this that involve opening SSH ports over the internet, but these are not the most secure as you have to have a public SSH port open.
One novel way that increases security is using Azure IoT Hub device streams.
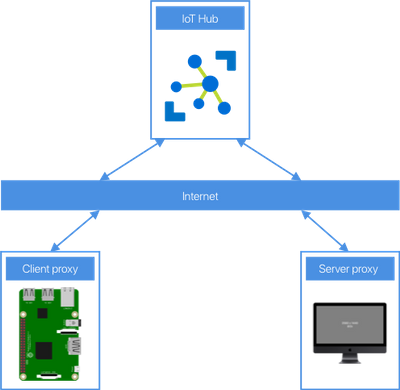
Use device streams to proxy an SSH connection
Device streams provide secure two-way TCP tunnels via standard HTTPS connections – allowing devices to bypass firewalls and other network considerations, and avoid having SSH ports open over the internet, but still have security via IoT Hub.
You can then run server code on your local device to emulate SSH, and it can forward the connection to a device stream via IoT Hub, which streams to the client IoT device which is running client code to listen to the requests over the stream and redirect them to the local SSH port, and stream back the results, essentially using very thin proxies.
Although the Pi is connected to an IoT Hub to stream the SSH commands, it can still connect to another IoT Hub for IoT development, and run services like Azure IoT Edge. From a users perspective, it’s the same as SSHing into the Pi – they connect an SSH session to the local proxy using a different port, and that logs them into the Pi. Behind the scenes the IoT Hub device streams make it work, but to the user, it’s as if they connected natively.
The full process for how to set this up, as well as all the code you need to build and run the proxy is available as one of our Lab Guides as part of the Microsoft IoT Curriculum resources. Check out the instructions and try it out.
github.com/microsoft/iot-curriculum/blob/main/educator-guides/lab-guides/virtual-iot-lab/iot-hub-ssh-virtual-lab.md

by Contributed | Dec 11, 2020 | Technology
This article is contributed. See the original author and article here.
Trusted data leads to trusted business insights. Ensuring trust in data goes hand-in-hand with making data easily discoverable. One of the ways to do this is by providing data consumers insight into the data’s lineage – where data came from and what transformations it has undergone.
Data lineage in Azure Purview helps organizations to understand the data supply chain, from raw data in hybrid data stores, to business insights in Power BI. Azure Purview’s turnkey integrations with Azure Data Factory, Power BI, Azure Data Share and other Azure Data Services automatically push lineage to Purview Data Map.
Azure Purview also supports Apache Atlas Lineage APIs that can be used to access and update custom lineage in Purview Data Map. Hook & Bridge support from Apache Atlas can also be used to easily push lineage from the Hadoop ecosystem.
Figure 1: Data lineage can be collected from various data systems
Azure Purview can stitch lineage across on-prem, multi-cloud and other platforms
Enterprise data estate contains data systems performing extraction, transformation/load, reporting, ML (machine learning) and so on. The goal of lineage feature in Purview is to capture the data linkage at each data transformation to help answer technical and business questions.
For instance, Purview’s lineage functionality will help capture the data movement and transformation stages such as the one described below.
- Data Factory would copy data from on-prem/raw zone to a landing zone in the cloud.
- Data processing systems like Synapse, Databricks would process and transform data from landing zone to Curated zone(staging) using notebooks or job definition.
- Data Warehouse systems then process the data from staging to dimensional models for optimal query performance and aggregation.
Data Analytics and reporting systems will consume the datasets and process through their meta model to create a BI (Business Intelligence) Dashboard, ML experiments etc
Root cause analysis scenarios
Azure Purview can help data asset owners troubleshoot a dataset or report containing incorrect data because of upstream issues. Data owners can use Azure Purview lineage as a central tool to understand upstream process failures and be informed about the reasons for discrepancies in their data sources.

Figure 2: Azure Purview lineage capability showing troubleshooting steps for a possible issue with Power BI report
Impact analysis scenarios
Data producers can use Azure Purview lineage to evaluate the downstream impact of changes made to their datasets. Lineage can be used as a central platform to know all the consumers of their datasets and understand the impact of any changes to their dependent datasets and reports. For instance, data engineers can evaluate the downstream impact for a deprecating column in a table or change in data type of a column. The data engineers can use Purview lineage to understand the number data assets potentially impacted by the schema changes of an upstream table. The column level lineage precisely points to the specific data assets that are impacted.

Figure 3: Azure Purview lineage capability showing the impact analysis for an upstream change
Lineage sources
Azure Purview can connect with Azure Data Factory, Azure Data Share, Power BI to collect lineage currently. In the coming months many more data systems such as Synapse Analytics, Teradata, SQL Server and so on will be able to connect with Azure Purview for lineage collection.
Call to Action
We are looking forward to hearing, how Azure Purview helped perform troubleshooting and impact analysis of your data pipelines with the native lineage experiences.
- Create an Azure Purview account now and start understanding your data supply chain from raw data to business insights with free scanning for all your SQL Server on-premises and Power BI online
- Start by connecting a Data Factory or Data Share account to push lineage.
- Scan a Power BI tenant to see lineage in Purview. Use managed identity (MSI) authentication to set up a scan of a Power BI tenant
- Learn more on lineage user guide.
by Contributed | Dec 11, 2020 | Technology
This article is contributed. See the original author and article here.
Azure Sphere OS version 20.12 Update 1 is now available in the Retail Eval feed. This release fixes an Ethernet connection issue for devices with both Wi-Fi and Ethernet enabled. In some cases, upon rebooting the device the Ethernet link-up appeared to be down when it is connected to a network.
This update will not restart the 20.12 evaluation period. The Retail feed will continue to deliver OS version 20.10 until we publish the final 20.12 release next week.
For more information on Azure Sphere OS feeds and setting up an evaluation device group, see Azure Sphere OS feeds.
For self-help technical inquiries, please visit Microsoft Q&A or Stack Overflow. If you require technical support and have a support plan, please submit a support ticket in Microsoft Azure Support or work with your Microsoft Technical Account Manager. If you would like to purchase a support plan, please explore the Azure support plans.

Recent Comments