This article is contributed. See the original author and article here.
This session focuses on Machine Learning and the integration of Azure Machine Learning and PyTorch Lightning, as well as learning more about Natural Language Processing.
This session speakers are:
Aaron (Ari) Bornstein – an Senior Cloud Advocate, specializing in AI and ML, he collaborates with the Israeli Hi-Tech Community, to solve real world problems with game changing technologies that are then documented, open sourced, and shared with the rest of the world.
Tal Baumel – a PhD graduate from the Computer Science department at Ben Gurion University. Tal worked on the Natural Language Processing Project under the supervision of Professor Michael Elhadad – focusing on automatic summarization. Tal is now working as a data scientist for Microsoft on Conversation Intelligence in Dynamics 365 Sales Insights.
Watch the video here:
Resources from the session
Resource
URL
Training Your First Distributed PyTorch Lightning Model with Azure ML
This article is contributed. See the original author and article here.
It might be snowing in parts of the Northern Hemisphere, but we won’t let that stop us from sharing Azure news with you. News covered this week includes: New Azure Portal updates for November 2020, Azure Resource Manager template support for Azure file share backup, How to use Windows Admin Center on-premises to manage Azure Windows Server VMs, Multiple new features for Azure VPN Gateway now Generally Available, and our Microsoft Learn Module of the Week.
Azure Portal for November 2020
Two new updates have been applied to the Azure portal which include:
Resource moving: the ability to navigate to a resource group and move resources to another region. The ability to add missing dependencies, customize destination properties, and track the progress of moves are also now available.
Filter pills: bring further consistency to the filtering experience while also making it WCAG 2.1 compliant and fully accessible
Azure Resource Manager (ARM) provides a powerful way to manage infrastructure through declarative templates. Azure Backup now supports configuring backup for existing Azure file shares via ARM templates. This enables organizations to backup existing file shares by specifying the vault and backup policy details in a JSON file which is deployable via using the Azure portal, CLI or Powershell.
Managing Azure Windows Server VMs via On-Premises Windows Admin Center
Currently the Windows Admin Center (WAC) add-in for the Azure Portal is in preview and it might be a while before the feature becomes generally available. Sonia Cuff and Orin Thomas share steps to spin up a WAC gateway server instance on a local VM, configure Windows Server’s built in Azure Network Adapter as a VPN connection.
The following new Azure VPN Gateway features have recently been announced as generally available:
Custom IPsec/IKE policy with DPD timeout: Setting IKE DPD (Dead Peer Detection) timeout allows organizations to adjust the IKE session timeout value based on their connection latency and traffic conditions to minimize unnecessary tunnel disconnect.
FQDN support for site-to-site VPN: Organizations without static public IP addresses can now connect to Azure VPN gateways leveraging dynamic DNS services and their Fully Qualified Domain Name (FQDN). Azure VPN gateways will automatically resolve and update VPN targets to establish IPsec/IKE connections.
APIPA support for BGP speaker:Organizations with legacy VPN routers and Amazon Web Service (AWS) VGW, Google Cloud Platform (GCP) VPN which use Automatic Private IP Addressing (APIPA) addresses as their Border Gateway Protocol (BGP) speaker IP addresses are now supported and can establish BGP sessions with Azure VPN gateways using APIPA (169.254.x.x) addresses.
Community Events
Festive Tech Calendar – New content from different communities and people around the globe for the month of December
Introduction to Cloud Adoption Framework – Sarah Lean investigates Microsoft’s Cloud Adoption Framework offering and what is available for organizations to take advantage of
Patch and Switch – It has been a fortnight, so Rick Claus and Joey Snow are back for another episode.
MS Learn Module of the Week
Implement Windows Server hybrid cloud management, monitoring, and security
Looking to addresses problems related to managing, monitoring, and securing a hybrid environment? This learning path provides insight on how to manage and maintain hybrid Azure and on-premises workloads.
Let us know in the comments below if there are any news items you would like to see covered in next week show. Az Update streams live every Friday so be sure to catch the next episode and join us in the live chat.
This article is contributed. See the original author and article here.
Overview
This document covers the step by step procedure to set up and configure SAP on Oracle ASM (Oracle Linux 8.2 /Oracle 19c) on Azure . As this setup involves a large number of steps, it is very easy to miss or misconfigure ,that may result in errors/issues ,which could be very cumbersome to resolve. Hence these steps are covered here in detail. Since we are talking about the Oracle ASM install, scope of this document is restricted to SAP DB instance install.
High Level Process Flow :
Create VMs
Patch OS and pre-install
Create disks
Setup ASM
DB Install with SWPM
Oracle software installation
SBP Oracle DB instance
SBP Oracle Grid
Confirm patching successful + run Oracle Enterprise Manager
Deploy Linux VMs
via Azure portal
Create a Resource Group
Create a Virtual network
Use the Virtual Network create above
Create Virtual Machine 1 for App server . Virtual Machine 2 for ASCS server, Virtual Machine 3 for DB server .Use at least Oracle Linux 8.0 image from azure marketplace image gallery. In this example Oracle Linux 8.2 image is used.
via Azure CLI
1. Login to Azure
az login
Create a resource group
az group create –name oraasmtestrg –location <location>
Create a folder for user oracle and change the owner:
mkdir /oracle
chown oracle:oinstall /oracle
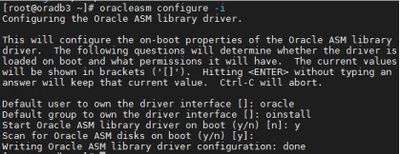
Setting up the Oracle ASM library driver involves defining the default user (oracle) and default group (oinstall) as well as configuring the drive to start on boot (choose y) and to scan for disks on boot (choose y). You need to answer the prompts from the following command:
# oracleasm configure -i
The output of this command should look similar to the following, with prompts to be answered:
View the disk configuration:
cat /proc/partitions
Enter the following command to load the oracleasm kernel module
# oracleasm init
Verify the Oracle ASM status:
oracleasm status
Format disk /dev/sda, /dev/sdb, /dev/sdc, /dev/sdd by running the following commands
fdisk /dev/sda
fdisk /dev/sdb
fdisk /dev/sdc
fdisk /dev/sdd
Answer the prompts from the above fdisk commands with:
n for new partition
p for primary partition
1 to select the first partition
press enter for the default first cylinder
press enter for the default last cylinder
press w to write the changes to the partition table
Create Oracle ASM disks:
oracleasm createdisk DATA_DISK_01 /dev/sda1
oracleasm createdisk DATA_DISK_02 /dev/sdb1
oracleasm createdisk ARCH_DISK_01 /dev/sdc1
oracleasm createdisk RECO_DISK_01 /dev/sdd1
List Oracle ASM disks:
oracleasm listdisks
Change the passwords for the root and oracle users:
passwd oracle
passwd root
Change the directory permissions:
chmod -R 775 /oracle
chown grid:oinstall /oracle
chown oracle:oinstall /dev/sda1
chown oracle:oinstall /dev/sdb1
chown oracle:oinstall /dev/sdc1
chown oracle:oinstall /dev/sdd1
chmod 600 /dev/sda1
chmod 600 /dev/sdb1
chmod 600 /dev/sdc1
chmod 600 /dev/sdf1
DB Instance Install(SWPM)
Before we begin the DB instance install , mount the sapmnt (NFS share) directory which must have been created during the ASCS instance setup.
Create sapmnt directory and mount remote NFS file system mkdir /sapmnt mount <<ip of NFS server>>:/sapmnt /sapmnt
Every host running the SAP installer requires the presence of the C shell command language interpreter as documented a. here. Verify the existence of the /bin/csh script file. When not existing install using following command: yum install csh
Verify that the /bin/csh script file exists using the following command: ls -al /bin/csh
Start the SAP SWPM installer and select the appropriate options: Software Provisioning Manager 1.0 SP 29 –> SAP NetWeaver 7.5 –> Oracle à Application Server ABAP–> Distributed System –> Database Instance
Specify the profile directory
Specify the DBSID and select the ‘Single Instance on Oracle ASM
You may see this error – “Supported Linux distributions for SAP Products…” .This can be safely ignored
Select 19 as Oracle server and client versions.
Select ‘Remove database and recreate’
Enter ORACLE_HOME and ORACLE_SID for GRID and select “Oracle Grid Software not installed”
Select the Number of parallel jobs based on the CPU cores. The default number is 3
SWPM stops for the installation of Oracle software
Oracle Grid Install
Download the following from SAP portal as documented in SAP Note 509314
An empty folder /oracle/stage/19 is created by SWPM installer. We downloaded the grid and oracle rdbms installer into this folder
Run the grid installer setup .Login as oracle and unzip the grid installer: cd /oracle/stage/19/grid_home unzip -q linuxx64_12201_grid_home.zip
Run the grid installer setup .This would launch Oracle Grid Infrastructure Setup Wizard ./gridSetup.shCurrently we have a known issue with Oracle 8.2 install.The Oracle Installer fails with error INS-08101:
Currently we have a known issue with Oracle 8.2 install.The Oracle Installer fails with error INS-08101:
The work around to resolve this is: ⦁ Set the OS parameter in your terminal to a previous version and re-start the Oracle Universal Installer. export CV_ASSUME_DISTID=OEL7.8
Enter the Disk group name for DATA, select the disk path of Data disks and set the discovery path (e.g. ‘dev/oracleasm/disks/):
Specify the password for ASM user accounts (SYS and SNMP)
Select name of operating system group,which you want to use for system authentication to Oracle ASM
Select the path for Oracle base
Select Oracle inventory directory path
If you choose to run the configuration scripts automatically , specify the ‘root’ user credentials
Verify the settings and click Next to finish
We have just configured/created data group named ‘DATA’ .. To configure other disk groups (ARCH and RECO) , we use ASM Configuration Assistant tool.
To start ASMCA, enter asmca at a command prompt inside the Oracle Grid Infrastructure home. cd $ORACLE_HOME/bin ./asmca
Oracle DB Installation:
SAP Bundle Patches
Download following SBP patches(19.8) for Oracle RDBMS and GRID, and follow the instructions from respective readme files :
Oracle Database SAP Bundle Patch
Following files were downloaded to the database host for Oracle DB SAP Bundle Patch:
SAP19P_2008-70004508.ZIP (this SBP)
GIRU19P_2008-70004508.ZIP (DBRU 19.8.0.0.200714)
OPATCH19P_2008-70004508.ZIP (OPatch 12.2.0.1.21)
Follow the instructions in ‘readme’ file (README19P_2008-70004508.HTM ) and install the SAP Bundle Patch. Main command to install this Patch is:
Oracle Database SAP Bundle Patch for Grid Infrastructure
Downloaded the following files for SAP Bundle Patch for Grid Infrastructure:
SGR19P_2008-70004550.ZIP (this SBP)
GIRU19P_2008-70004550.ZIP (GIRU 19.8.0.0.200714)
OPATCH19P_2008-70004550.ZIP (OPatch 12.2.0.1.21)
Follow the instructions in the ‘readme’ file(README19P_2008-70004550.HTM) and Install the patches of the SAP Bundle Patch into the grid home. Main command to install this Patch is:
SWPM was stopped/paused for the installation of Oracle software . Now that Oracle software(RDBMS, Grid ) and SAP Bundle Patches are installed, we can click ‘Next’ to continue with the installation.
This completes the Installation of Oracle DB instance with ASM.
You may verify by running the ASM instance .
You can verify the setup by running the Oracle Enterprise manager
This article is contributed. See the original author and article here.
Hi Everyone,
Zoheb here again with my colleague Tim Beasley. Today, we will be sharing some best practices to help ensure that your VMs (virtual machines) (including Domain Controllers) are secure in your Azure/Cloud environment.
I would like to start this blog with an African Proverb “If you want to go fast, go alone. If you want to go far go together.”
This proverb is one of the principals we refer to internally at Microsoft (#OneMicrosoft). It helps us utilize the synergy to build / leverage great ideas from other Microsoft employees across the globe.
This proverb sums it up perfectly of what occurred during the creation of this blog post. There were multiple contributors (Tristan Kington, Akhlesh Sharma, Pierre Audonnet and Shobhit Garg) who also helped provide details and additional information in hopes of benefiting our customers.
The Initial Problem I found myself facing – I forgot my Administrator Password!
While working in my lab environment in Azure, I sometimes forget what the Administrator password is (This rarely happens. Am I right? :p). Considering this is an important environment I needed to regain access to, I started thinking about different ways of retrieving my password.
Initially, I tried guessing what password was using a few random ones. However, this did not work (I have Azure AD Password Protection configured in my lab to help protect against known passwords :smiling_face_with_smiling_eyes:). I then tried the VM Password Reset option, but that only works for members of the local Administrators group.
Suddenly, I had an epiphany! I remembered the Extensions setting that is available for VMs running in Azure where you can execute scripts running under the System Context.
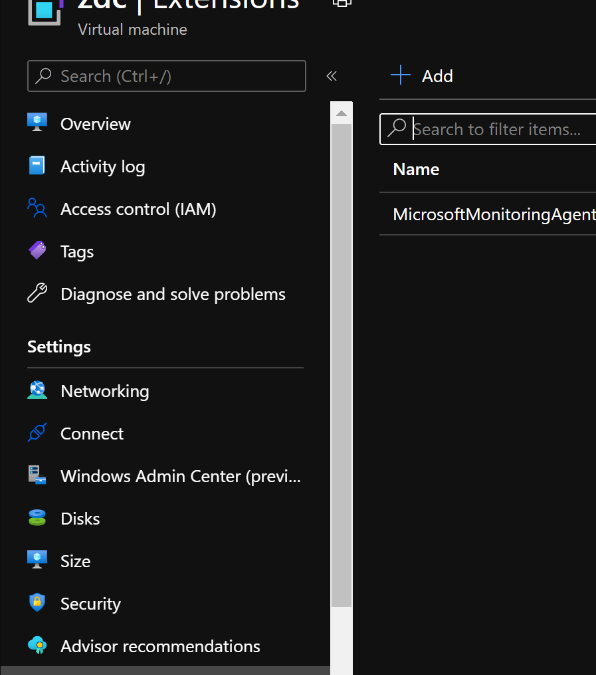
To achieve this, I located and selected the Azure Virtual Machine I was targeting and clicked on Extensions which is located under Settings. Here is where I will upload and execute a Custom Script Extension as shown below:
Figure 1. Click on Extensions.
Figure 2. Select Custom ScriptExtension.
Figure 3. Browse for the custom PowerShell script you wish to upload.
Figure 4. Select Upload to upload your custom PowerShell script.
As you can see below, I uploaded the testreset.ps1 PowerShell script (to be added as a custom script extension) and ran it on the virtual machine in my lab environment. The PowerShell script uses the native Command Prompt utility Net.exe. In this example, we used Net User to reset the password for an Administrator account named zdcadm using DontKeepe@syPassw0rd$ as the password.
Net User zdcadm DontKeepe@syPassw0rd$
Figure 5. Custom PowerShell script was uploaded.
After the extension was applied and executed against the VM, it successfully reset the password for my Administrator account (zdcadm), which allowed me to regain access to that VM.
We managed to achieve this because Azure VM Agent is installed by default on any Windows VM deployed from an Azure Marketplace image. When you deploy an Azure Marketplace image from the portal, PowerShell, Command Line Interface, or an Azure Resource Manager template, the Azure VM Agent is also installed.
Though I was happy that this allowed me to log back into the VM, it also started to concern me. So, I started thinking about how this could potentially affect our customers and whether they are protecting their environment from such risks where Privilege escalation can be gained by Azure operators to domain admin (and by extension, domain admin on-prem).
We found similar concerns that were raised / discussed for our traditional infrastructure (Hypervisors) where we provide broad guidance on how to secure them. You can learn more about this by reading the Virtualizing Domain Controllers using Hyper-V Microsoft article.
Why should you be concerned?
You as an organization who have DC’s in Azure or cloud you should check who has access to them in Azure & is the access to Subscription controlled well.
Do you have any Azure Operators who could do Privilege Escalation to become a Domain Admin?
Remember when you let someone else administer a lower layer than your own, you are implicitly trusting that person equivalently to yourself.
Increasingly we see permissions being mis managed in many organization and Identity team is not always managing subscriptions, this can lead to some loose permissions on your resources if left unmonitored/checked.
How can you check who has access to your Domain Controllers or Azure Resources ?
There are many ways you could see who has access to resources, I am listing one of the easier ways where you can get full information from a single dashboard.
Use the Azure Continuous Cloud Optimization dashboard, this can show the Azure RBAC (role-based access control) permissions from all the subscriptions a given Azure account has access to. You will be able to identify the roles applied to all Azure resources and if the subscriptions have custom roles. You can filter the information by:
Tenant
Subscription
Object type
User
The Solution to this little dilemma:
This made us think about the “Level of Protection” we should recommend to our customers that have important VMs (e.g. Domain Controllers) running in Azure. After several internal discussions along with reviewing publicly available Microsoft documentation, we decided that the following recommendations below will add an extra layer of protection to help secure your Azure IaaS VMs / environment (Not all, but heavy hitters)
Force MFA (Azure Multi-Factor Authentication) for Admins with access to Domain Controllers (no matter where they are at – on-premises and cloud) whenever they are accessing Azure Portal.
This will ensure that access to Azure Portal has at least two factor Authentication.
Use this policy for all the users who have access to Azure Subscription where DC’s are hosted.
Use Conditional access policies to define Admins location, Trusted machines to access Azure Portal for Domain Controller Subscriptions.
You can further control the access to the Azure Portal/Subscription by using Conditional Access.
You could define Trusted location, Trusted devices and many such parameters.
This will help reduce the access to Domain Controllers.
Limit Highly privileged users and use RBAC permissions to allow access to only specific people to DC’s.
This is probably the most crucial point of all, you need to review who has permission to do such an activity and if they really need this.
Secured, isolated workstations are critically important for the security of sensitive roles like administrators, developers, and critical service operators.
Use highly secured user workstations and/or Azure Bastion for administrative tasks for Azure.
The secured workstations can be centrally managed to enforce secured configuration, including strong authentication, software and hardware baselines, and restricted logical and network access.
Using conditional access allow only approved machines to have access to Azure portal.
Alternatively manage these machines through hardened GPO’s & Intune


Recent Comments