by Contributed | Nov 9, 2020 | Technology
This article is contributed. See the original author and article here.
Overview & Use Case
Thanks to @Ofer_Shezaf and @Yaniv Shasha for the brainstorming, contributing and proof reading!
A multi-national organization having multiple branches with different identities across the globe, each branch have it’s own separate tenant (AAD & O365) logs and the global SOC team are looking for a way on how to ingest these logs coming from all branches to their main parent tenant via Azure Sentinel.
While Azure Sentinel can’t natively do that using the out-of-the box data connectors (Office 365 / Azure AD), we cover your back with O365 & AAD Multi-Tenancy custom connector via an Azure Sentinel Playbook (Logic App) that invoke the Office 365 Management API & Graph API to read from multiple tenants and writes to a custom table in Sentinel, same can be done using Azure Function.
Implementation
With the help of Office 365 Management API & Microsoft Graph API we can invoke specific content types cross-tenants:
API |
Content-Type / Activity Log |
Office 365 Management API |
Audit.AzureActiveDirectory |
Office 365 Management API |
Audit.Exchange |
Office 365 Management API |
Audit.SharePoint |
Office 365 Management API |
Audit.General (includes all other workloads not included in the previous content types) |
Office 365 Management API |
DLP.All (DLP events only for all workloads) |
Graph API |
audit-Logs |
Graph API |
Sign-in Logs |
So, tell us more about the steps?
Assuming, we have a parent tenant (Pt) & a child tenant (Ct) and the requirements is to invoke the “Ct” tenant O365 Management API & Graph APIs to pull Office 365 & AAD logs and ingest at “Pt” ones.
Step(1): Prep & App Registration
- Ensure that “Ct” Office 365 Security & Compliance audit logs is enabled
- Log in to “Ct” Azure tenant, http://portal.azure.com
- Search for App Registration > New Registration
- Type Name, ensure of selecting the right “supported account type”: Accounts in any organizational directory (Any Azure AD directory – Multitenant), then click Register button
- Follow the below gif / step-by step guide on how to define and configure the API permissions & create the secret:

- Click at “API permissions”
- Add a permission > Office 365 Management API > Application permissions
- Select and check “ActivityFeed.Read” , “ActivityFeed.ReadDlp” & “ServiceHealth.Read”
- Add a permission > Microsoft Graph
- Select and check “Directory.Read.All”, “AuditLog.Read.All”
- Click at “grant admin consent” link
- Click at “Certificates & secrets”
- Under Client secrets > Add client secret
- Get the following values:
- Application / Client ID
- Tenant ID
- Secret
- Azure Active Directory Domain
- Register the API subscription via PowerShell, run the below PowerShell as administrator and connect to the “Ct” tenant directory, ensure of replacing $ClientID, $ClientSecret, $tenantdomain and $TenantGUID with the above copied values:
Connect-AzAccount # connect via child "Pt" admin account

# Populate with App ID and Secret from your Azure AD app registration
$ClientID = "<Client_ID>"
$ClientSecret = "<Secret>"
$loginURL = "https://login.microsoftonline.com/"
$tenantdomain = "<tenant-domain>.onmicrosoft.com"
# Get the tenant GUID from Properties | Directory ID under the Azure Active Directory section
$TenantGUID = "<tenant_ID>"
$resource = "https://manage.office.com"
$body = @{grant_type="client_credentials";resource=$resource;client_id=$ClientID;client_secret=$ClientSecret}
$oauth = Invoke-RestMethod -Method Post -Uri $loginURL/$tenantdomain/oauth2/token?api-version=1.0 -Body $body
$headerParams = @{'Authorization'="$($oauth.token_type) $($oauth.access_token)"}
$publisher = New-Guid
Invoke-WebRequest -Method Post -Headers $headerParams -Uri "https://manage.office.com/api/v1.0/$tenantGuid/activity/feed/subscriptions/start?contentType=Audit.AzureActiveDirectory&PublisherIdentifier=$Publisher"
Invoke-WebRequest -Method Post -Headers $headerParams -Uri "https://manage.office.com/api/v1.0/$tenantGuid/activity/feed/subscriptions/start?contentType=DLP.ALL&PublisherIdentifier=$Publisher"
Invoke-WebRequest -Method Post -Headers $headerParams -Uri "https://manage.office.com/api/v1.0/$tenantGuid/activity/feed/subscriptions/start?contentType=Audit.General&PublisherIdentifier=$Publisher"
Invoke-WebRequest -Method Post -Headers $headerParams -Uri "https://manage.office.com/api/v1.0/$tenantGuid/activity/feed/subscriptions/start?contentType=Audit.Exchange&PublisherIdentifier=$Publisher"
Invoke-WebRequest -Method Post -Headers $headerParams -Uri "https://manage.office.com/api/v1.0/$tenantGuid/activity/feed/subscriptions/start?contentType=Audit.SharePoint&PublisherIdentifier=$Publisher"
Step(2): Cross-Tenants Custom Connector
- Log in to “Pt” Azure tenant, http://portal.azure.com
- Go to Azure Sentinel > Playbooks
- Create a new Playbook and follow the below gif / step-by-step guide, the code being uploaded to github repo as well:
- Add a “Recurrence” step and set the following field, below is an example to trigger the Playbook every 5 minutes:
- Interval: 5
- Frequency: Minute
- Initialize set of variables for the content-types values:
- Child-Tenant ID:
- Name: ChildTenantID
- Type: String
- Value: value of the child tenant ID
- Audit.General-Var:
- Audit.AzureActiveDirectory-Var:
- DLP-Var:
- User SignIns-Var:
- User-Activities-Var:
- Set an HTTP endpoints to Get content-types data, ensure the authorization type is Active Directory OAuth:
- HTTP – Get Logs – O365API:
- Method: GET
- URI: @{variables(‘AAD’)}
- Headers:
- Accept: application/json
- Content-Type: application/json
- Authentication type: Active Directory OAuth
- HTTP – GraphAPI:
- Method: GET
- URI: @{variables(‘Sign-Ins’)}
- Headers:
- Accept: application/json
- Content-Type: application/json
- Authentication type: Active Directory OAuth
- Parse content-types data via Json:
- Parse JSON – O365API:
- Content: @{body(‘HTTP__-_Get_Logs-O365API’)}
- Schema: uploaded to github
- Parse JSON – GraphAPI:
- Content: @{body(‘HTTP_-_GraphAPI’)}
- Schema: uploaded to github
- Next step is to send logs to Azure Sentinel via a custom log table, so will show an example of iterating all returned values from O365 Management API and send data to Log analytics and another example of sending the raw-data from Graph API to log analytics without the iteration phase:
- Iterate (For-each) on all returned values (Body) and Get contentUri from Office 365 API and value from Graph API via an embedded – looped HTTP Endpoints, ensuring that the authorization type is Active Directory OAuth:
- Add For Each control:
- Select an output from previous steps: @body(‘Parse_JSON_-_O365API’)
- Add HTTP endpoint step:
- Method: GET
- URI: @{items(‘For_each_-O365API’)[‘contentUri’]}
- Headers:
- Accept: application/json
- Content-Type: application/json
- Authentication: Active Driectory OAuth
- Add Send Data to Log Analytics Control:
- JSON Request body: @{json(body(‘HTTP’))}
- Custom Log Name: ChildO365AAD
- Send the data (Office 365 Management API and Graph API) to Azure Sentinel Log analytics workspace via a custom log tables:
- JSON Request body: @{body(‘HTTP_-_GraphAPI’)}
- Custom Log Name: ChildAADSignIn


Notes & Consideration
- You can customize the parsers at the connector’s flow with the required and needed attributed / fields based on your schema / payload before the ingestion process, also you can create custom Azure Functions once the data being ingested to Azure Sentinel
- Azure Function can be used to create custom connector for multi-tenant access, here’s a great example created by Jon Nord invoking Office 365 Management API which you can extend and add Graph API as well.
- Couple of points to be considered while using Logic Apps:
Get started today!
We encourage you to try it now!
You can also contribute new connectors, workbooks, analytics and more in Azure Sentinel. Get started now by joining the Azure Sentinel Threat Hunters GitHub community.
by Contributed | Nov 9, 2020 | Technology
This article is contributed. See the original author and article here.
The next version of QnA Maker advances several core capabilities like better relevance and precise answering, by introducing state-of-art deep learning technologies.
Summary of new features introduced:
- Deep learnt ranker with enhanced relevance of results across all supported languages.
- Precise phrase/short answer extraction from answer passages.
- Simplified resource management by reducing the number of resources deployed.
- E2E region support for Authoring + Prediction.
Detailed description of the new features is further down in this article. Learn how to migrate to the new QnA Maker managed (Preview) knowledge base here.
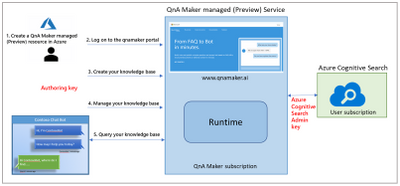
QnA Maker managed (Preview) Architecture.
- As per the architecture of QnA Maker managed (Preview), there will be only two resources: QnA Maker service for authoring and computation and Azure Cognitive Search for storage and L1 ranking. This has been done with an aim of simplifying the resource creation and management process. Now, customers need to manage only 2 resources instead of 5 different resources.
- QnA Maker managed (Preview) also allows the user to do language setting specific to Knowledge Base.
- Computation has been moved out of the user subscription, so there is no dependency on the customers for scaling and availability management. This allowed us to use SOTA deep learnt model for L2 ranker which enhances the L2 ranker horizontally across all the languages, so now we support all the 50+ languages with better and enhanced precision.
- QnA Maker service will be available in multiple regions to give customers’ the flexibility to keep their end-to-end service in one region.
- For inference logs and telemetry, the latest version will be using Azure Monitoring instead of App insights. To keep the experience seamless and easy to adopt all the APIs has been kept backward compatible. There is almost zero change in the management portal experience.

New features of QnA Maker managed (Preview)
This section talks about all the distinguishing features of QnA maker managed in detail.
Simplified Create Blade
Onboarding on QnA Maker managed (Preview), and resource creation has been kept quite simple. Now, you will see a checkbox with Managed, as shown below. As soon as you select the checkbox, the form will be updated with the required resources.

Precise Answering
Machine Reading Comprehension based answer span detection feature is most beneficial for the scenarios where the customers have big passages present as answer in their Knowledge Base. Currently, they put good amount of manual efforts in curating small/precise answers and ingest them in the Knowledge base.
The new features give them flexibility to either choose the precise answer or the answer passage, customers can take this decision based on the confidence score of the precise short answer and answer passage. Here are some examples to show how short answers can be useful:

Deep Learnt ranker
The new L2 ranker is a deep learning-based transformer model, which improves the precision of the service for all the languages. For any user query, the new L2 ranker model understands the semantics of the user query better and gives better aligned results. This model is not language specific and is targeted to improve the overall precision of all languages horizontally. Here are some examples to analyze the difference between the results of current service and QnA Maker managed (Preview) service:
Query
|
Current GA results
|
QnA Maker managed (Preview) results
|
Improvements in Preview
|
can someone ring me
|
I can tell you all about Wi-Fi calling, including the devices that support Wi-Fi calling and where you can get more information yourself. Feel free to ask me a question and I’ll do what I can to answer it
|
Yes, you can make and receive calls using Wi-Fi calling. Pretty nifty, right?
|
The new L2 ranker can understand the relevance between “ring me” and “make and receive calls” and is returning more relevant result unlike the current GA, which has returned a generic answer.
|
can’t connect to mobile data
|
You’ll be connected to Wi-Fi, so it’ll only use your minutes and text allowances.
|
If you don’t have mobile signal, it’s no problem. With Three inTouch Wi-Fi Calling, you can call and text whenever you’re on Wi-Fi in the UK, even without mobile signal.
|
The new L2 ranker is again able to understand the query better as its able to understand that mobile data is somewhere connected to mobile signals and hence giving better results based on the data present in the Knowledge Base than the current GA model.
|
E2E region support
With QnA Maker managed (Preview) our management service is no more limited to west-US region. We are offering end to end region support for:
- South Central US
- North Europe
- Australia East.
Other hero regions will be added when we go GA.
Knowledge Base specific language setting
Now, customers can create Knowledge bases with different language setting within a service. This feature is beneficial for users who have multi-language scenarios and need to power the service for more than one language. In this case, there will be a test index specific to every Knowledge Base, so that the customer can verify how the service is performing specific to every language.
You can configure this setting only with the first Knowledge base of the service, once set the user will not be allowed to update the setting.
Pricing
Public preview of QnA Maker managed (Preview) will be free in all the regions (You only pay for the Azure Cognitive Search SKU). The standard pricing will be applicable when the service goes to GA by mid-2021.
References
by Contributed | Nov 9, 2020 | Technology
This article is contributed. See the original author and article here.
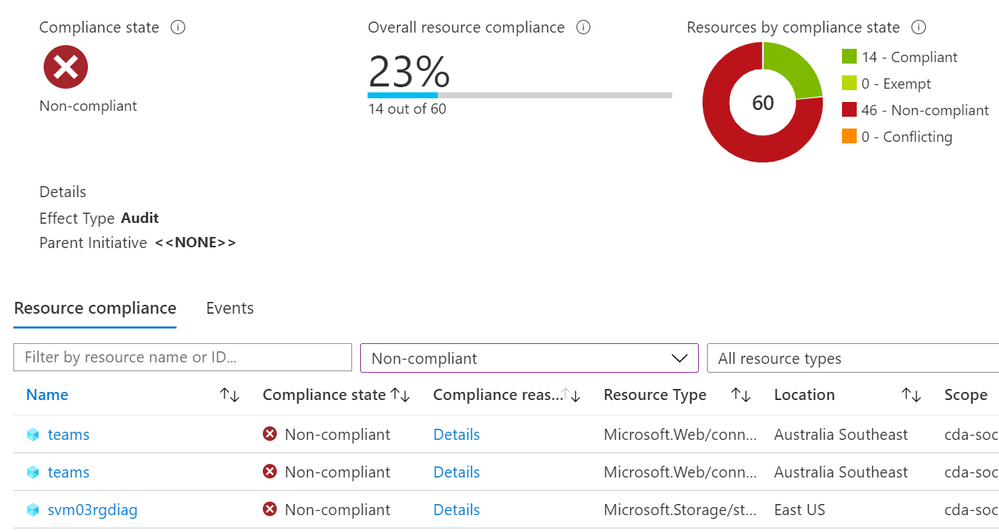
It’s recommended that you plan and implement a governance strategy before you start deploying cloud resources, but in reality it doesn’t always work out like that. How can we find which existing resources don’t meet our new standards?
There’s a couple of ways to do it, including using a Kusto query or PowerShell, but today we’ll look at using an Azure Policy definition in audit mode.
The scenario:
Tailwind Traders have decided that all of the resources in one subscription should have two resource tags applied to them: Dept (department) and Env (environment). This has almost become an accepted standard, as some teams have already tagged their resources, but not consistently. Tailwind Traders doesn’t want to enforce that these tags are required, as they have some automated provisioning processes that will need to be updated first. They do want to see how many of the existing resources do not have these tags, and be able to check this easily on an ongoing basis.
The challenge:
The current built-in Azure Policy definitions for tags either require (on new resources), add, append or inherit tags. The DeployIfNotExists method can be use to retro-actively apply a require tags policy to existing resources, but Tailwind Traders only wants to report which resources are non-compliant, not modify them. Azure Policy can run in audit mode, and Tailwind Traders needs to create a policy definition that looks for two different tag names on each resource. If a resource doesn’t have both tags, we want to know.
The process:
Start with what you know – I mentioned there’s already an in-built Azure Policy definition for requiring a tag on resources. That’s a good place to start to check for the schema of how our JSON should be written. If, like me, you’re not the sort of person who writes JSON off the top of your head, find things that do incorporate some of what you need to apply and take it from there.
Here’s the policy definition for “Require a tag on resources”:
{
  "properties": {
    "displayName": "Require a tag on resources",
    "policyType": "BuiltIn",
    "mode": "Indexed",
    "description": "Enforces existence of a tag. Does not apply to resource groups.",
    "metadata": {
      "version": "1.0.1",
      "category": "Tags"
    },
    "parameters": {
      "tagName": {
        "type": "String",
        "metadata": {
          "displayName": "Tag Name",
          "description": "Name of the tag, such as 'environment'"
        }
      }
    },
    "policyRule": {
      "if": {
        "field": "[concat('tags[', parameters('tagName'), ']')]",
        "exists": "false"
      },
      "then": {
        "effect": "deny"
      }
    }
  },
  "id": "/providers/Microsoft.Authorization/policyDefinitions/871b6d14-10aa-478d-b590-94f262ecfa99",
  "type": "Microsoft.Authorization/policyDefinitions",
  "name": "871b6d14-10aa-478d-b590-94f262ecfa99"
}
The first edit is the easiest one – I need to change the line “effect”: “deny” to read “effect”: “audit”
This will show me if any existing resources are non-compliant and allows new resources to be created without enforcing these tags.
Now to figure out how to add an additional tag!
I know that there’s an in-built policy called Allowed locations. This policy lets you select more than one location where a resource can be deployed. If we take a look at that definition:
{
  "properties": {
    "displayName": "Allowed locations",
    "policyType": "BuiltIn",
    "mode": "Indexed",
    "description": "This policy enables you to restrict the locations your organization can specify when deploying resources. Use to enforce your geo-compliance requirements. Excludes resource groups, Microsoft.AzureActiveDirectory/b2cDirectories, and resources that use the 'global' region.",
    "metadata": {
      "version": "1.0.0",
      "category": "General"
    },
    "parameters": {
      "listOfAllowedLocations": {
        "type": "Array",
        "metadata": {
          "description": "The list of locations that can be specified when deploying resources.",
          "strongType": "location",
          "displayName": "Allowed locations"
        }
      }
    },
    "policyRule": {
      "if": {
        "allOf": [
          {
            "field": "location",
            "notIn": "[parameters('listOfAllowedLocations')]"
          },
          {
            "field": "location",
            "notEquals": "global"
          },
          {
            "field": "type",
            "notEquals": "Microsoft.AzureActiveDirectory/b2cDirectories"
          }
        ]
      },
      "then": {
        "effect": "deny"
      }
    }
  },
  "id": "/providers/Microsoft.Authorization/policyDefinitions/e56962a6-4747-49cd-b67b-bf8b01975c4c",
  "type": "Microsoft.Authorization/policyDefinitions",
  "name": "e56962a6-4747-49cd-b67b-bf8b01975c4c"
}
The key thing is the use of the “allOf” expression after the “if”. This means that all of the conditions that follow have to be satisfied for the “then” effect to kick in. They are encapsulated by the square brackets [ ].
It’s also worth noting that the “listOfAllowedLocations” parameter is only mentioned once, as it’s using an array. That gives you a list of the Azure regions that you can multi-select from. In our case, we want to specify the two tag names when we apply the policy, so we will need to duplicate the parameters entries.
The result:
Merging the above together, we can create the custom policy we want – “Audit if two tags exist”:
{
  "mode": "Indexed",
  "policyRule": {
    "if": {
      "allOf": [
        {
          "field": "[concat('tags[', parameters('tagName1'),  ']')]",
          "exists": "false"
        },
        {
          "field": "[concat('tags[', parameters('tagName2'),  ']')]",
          "exists": "false"
        }
      ]
    },
    "then": {
      "effect": "audit"
    }
  },
  "parameters": {
    "tagName1": {
      "type": "String",
      "metadata": {
        "displayName": "Tag Name 1",
        "description": "Name of first tag, such as 'environment'"
      }
    },
    "tagName2": {
      "type": "String",
      "metadata": {
        "displayName": "Tag Name 2",
        "description": "Name of second tag, such as 'owner'"
      }
    }
  }
}
We’ve added a second tag as a parameter, so both tag names can be specified when the policy is assigned to a scope. This means you could use the same definition to search for different tags when it is assigned to different scopes (e.g. Resource groups or subscriptions).
We have our “allOf” statement to look for both tag name 1 and tag name 2.
And we have our effect in Audit mode.

Troubleshooting:
The trickiest part of merging concepts and duplicating sections is keeping all of your brackets and commas in the right places! In this image, I’ve removed a bracket on purpose.

The Azure Policy definition editor has thrown some grey, yellow and red boxes down the right margin to warn me that something isn’t right. And if I mouse-over a bracket, it will automatically highlight the corresponding bracket pair, so I can also see I’m missing one that should “close off” the parameters section. That final bracket should correspond to the opening bracket at the very top.
Some JSON errors will prevent you from saving your edits, or will generate an error in the notifications.

Some errors won’t be obvious until the policy has had time to run against your resources. For testing, it’s worth having a couple of known resources that you know should pass and some you know should fail against your policy. If these don’t show up with the correct compliance state, double-check both your JSON and your policy assignment – for example, is there a typo in the tag name?
And if all else fails – ask someone else to help you!
Now, it’s over to you!
Don’t be afraid to learn the basics concepts, take what you know, and explore what you can create, even when it’s not explicitly documented. Share with us if you’ve built some advanced Azure Policy definitions – you can even share your work with the community by adding to the Azure Community Policy GitHub repository.
Learn more:
Docs – What is Azure Policy?
Docs – Tutorial: Manage tag governance with Azure Policy
Docs – Azure Policy pattern: tags
Docs – Understand Azure Policy effects
MS Learn – Build a cloud governance strategy on Azure
-SCuffy

by Contributed | Nov 9, 2020 | Technology
This article is contributed. See the original author and article here.
Hello, dear readers! Here is Hélder Pinto again, writing the last post of a series dedicated to the implementation of automated Continuous Optimization with Azure Advisor recommendations. For a contextualization of the solution here described, please read the introductory post for an overview of the solution, the second post for the details and deployment of the main solution components and also the third post to see how the Azure Optimization Engine generates recommendations and reports on it.
Introduction
If you didn’t have time to read the full post series about the Azure Optimization Engine, let me quickly recap. The Azure Optimization Engine (AOE) is an extensible solution designed to generate custom optimization recommendations for your Azure environment. See it like a fully customizable Azure Advisor. It leverages Azure Resource Graph, Log Analytics, Automation, and, of course, Azure Advisor itself, to build a rich repository of custom optimization opportunities. The first recommendations use-case covered by AOE was augmenting Azure Advisor Cost recommendations, particularly Virtual Machine right-sizing, with VM metrics and properties all enabling for better informed right-size decisions. Other recommendations can be easily added/augmented with AOE, not only for cost optimization but also for security, high-availability, and other Well Architected Framework pillars.
In this last post, I will show you how we can use AOE to automate the remediation of optimization opportunities – the ultimate goal of the engine – and how to extend it with new custom recommendations.
Do you really want me to automate right-size recommendations?!
The customer pain that sparked this series was all about remediating dozens or hundreds of VM right-size recommendations, for which one had trouble in reaching information that could help in making well-informed decisions. An Azure administrator can well spend many hours of investigation and many interactions with other colleagues before deciding to downsize a VM. Many times, it becomes an unfeasible task and Azure inefficiencies can last forever.
What if customers could simply automate those recommendation remediations? It may at first seem a reckless and naive option, but let’s face it: if we were highly confident that the recommendation was feasible and the environment we were touching was not critical, wouldn’t we prefer to automate?
 Automate non-critical VM downsize when confidence score is high for several weeks in a row
With the help of AOE, we now have a database of recommendations that have all the details we need to make an automated decision (see all the details in the previous post)
- A confidence score that is based on several factors:
- Are the number of data disks and network interfaces supported by the size recommended by Azure Advisor?
- Is the performance observed in my VM supported in the target size, according to my own memory, processor, and I/O thresholds and aggregations?
- Historical data that allows me to check whether a right-size recommendation has been made for long enough to be taken seriously. A recommendation that just popped up this week is less trustworthy than a recommendation that Advisor is insisting on for the last 4 weeks.
- VM properties that describe how critical it is (e.g., Azure subscription, resource group, or specific tags)
Based on these details, we can perfectly write a remediation runbook that simply queries the recommendations database for VMs that have been recommended for right-size for the past X weeks and with a confidence score larger than Y. The T-SQL query could be this one:
SELECT RecommendationId, InstanceId, Tags, COUNT(InstanceId)
        FROM [dbo].[Recommendations]
        WHERE RecommendationSubTypeId = '$rightSizeRecommendationId' AND ConfidenceScore >= $minConfidenceScore AND GeneratedDate >= GETDATE()-(7*$minWeeksInARow)
        GROUP BY InstanceId, InstanceName, Tags
        HAVING COUNT(InstanceId) >= $minWeeksInARow
Additionally, we could filter the VMs to remediate to include only those that had a specific tag value. For a scenario where $minWeeksInARow=4 and $minConfidenceScore=4.5 and tag environment=dev, these would be the automated remediation results:
Recommendation
|
Conf. Score
|
Weeks in a Row
|
Env. tag
|
Action
|
we1-prd-dc01
|
4.6
|
6
|
prod
|
None
|
we1-dev-app02
|
4.7
|
4
|
dev
|
Downsize
|
we1-dev-sql03
|
4.3
|
5
|
dev
|
None
|
we1-dev-app03
|
4.8
|
2
|
dev
|
None
|
The AOE includes a Remediate-AdvisorRightSizeFiltered runbook that implements exactly the algorithm above. After having deployed the solution, you just have to define values for the following Automation variables and finally schedule the runbook for the desired time and frequency. Happy rightsizing!
- AzureOptimization_RemediateRightSizeMinWeeksInARow – the minimum number of consecutive weeks a recommendation must be made for the same VM.
- AzureOptimization_RemediateRightSizeMinConfidenceScore – the minimum confidence scores a recommendation must have each week.
- AzureOptimization_RemediateRightSizeTagsFilter – an optional VM tags JSON filter that will be used to select VMs that will be subject to remediation. Example: [ { “tagName”: “a”, “tagValue”: “b” }, { “tagName”: “c”, “tagValue”: “d” } ]
How to generate my own custom recommendations?
OK, now you have customized right-size recommendations, but you probably want more. You want to identify other cost saving opportunities that may be specific to the environments you manage and that Advisor does not cover yet, such as underutilized App Service Plans or SQL Databases, ever-growing Storage Accounts, VMs stopped but not deallocated, etc.. In the previous post, you saw that writing a recommendation runbook for orphaned disks was really easy.
In this post, I want to show you that the AOE is not meant only for Cost optimization but can be used for other Well Architected Framework pillars – High Availability, Performance, Operational Excellence and Security. I’ve recently added to the AOE a recommendation for the High Availability pillar, identifying VMs with unmanaged disks. This new recommendation does not need additional data sources, as the Virtual Machine data already being exported from Azure Resource Graph is enough to identify VMs in this situation.
If you want to generate your own custom recommendations, you just have to first make sure you are collecting the required data with the Data Collection runbooks – follow the pattern of the existing runbooks that dump the data as CSV into a Storage Account and then rely on the data source-agnostic Log Analytics ingestion runbook. Having the required data in Log Analytics, you can write a new recommendation runbook that runs a weekly query for optimization opportunities. Looking at the Recommend-VMsWithUnmanagedDisksToBlobStorage runbook, you’ll identify the recommendation generation pattern:
- Collect AOE generic and recommendation-specific variables (Log Analytics workspace, Storage Account container, etc.)
- Authenticate against the Azure environment
- Obtain a context reference to the Storage Account where the recommendations file is going to be stored.
- Execute the recommendation query against Log Analytics.
- Build the recommendations objects – pay attention to the properties, as all those are required for the recommendation to correctly show up in the Power BI report. You will need to create a new GUID for your new recommendation type.
- Finally, export the recommendations file to blob storage – use a file naming specific to the recommendation type.
Don’t forget to link the runbook to the AzureOptimization_RecommendationsWeekly schedule and that’s all you must do. On the next scheduled recommendations generation run, you’ll have your new recommendations flowing into the Power BI report!
Thank you for having been following this series! ;)
Disclaimer
The Azure Optimization Engine is not supported under any Microsoft standard support program or service. The scripts are provided AS IS without warranty of any kind. Microsoft further disclaims all implied warranties including, without limitation, any implied warranties of merchantability or of fitness for a particular purpose. The entire risk arising out of the use or performance of the sample scripts and documentation remains with you. In no event shall Microsoft, its authors, or anyone else involved in the creation, production, or delivery of the scripts be liable for any damages whatsoever (including, without limitation, damages for loss of business profits, business interruption, loss of business information, or other pecuniary loss) arising out of the use of or inability to use the sample scripts or documentation, even if Microsoft has been advised of the possibility of such damages.

by Contributed | Nov 8, 2020 | Technology
This article is contributed. See the original author and article here.
Throughout this series, I’m going to show how an Azure Functions instance can map APEX domains, add an SSL certificate and update its public inbound IP address to DNS.
In my previous post, I walked through how to update an A record of DNS server and renew the SSL certificate automatically, when an inbound IP of the Azure Functions instance changes, using GitHub Actions workflow. As the last post of this series, I’m going to discuss how to deploy the Azure Functions app through GitHub Actions workflow, without having to know the publish profile.
Azure Functions Action
There is an official GitHub Actions for Azure Functions deployment on GitHub Marketplace. The following YAML pipeline shows how to use it. The publish-profile parameter takes the publish profile of your Azure Functions instance for deployment (line #11).
    jobs:

    build-and-deploy:

      runs-on: ubuntu-latest

      steps:

      …

      – name: ‘Run Azure Functions Action’

        uses: Azure/functions-action@v1

        with:

          app-name: ${{ env.AZURE_FUNCTIONAPP_NAME }}

          package: ‘${{ env.AZURE_FUNCTIONAPP_PACKAGE_PATH }}/output’

          publish-profile: ${{ secrets.AZURE_FUNCTIONAPP_PUBLISH_PROFILE }}
As you can see the sample pipeline above, we should store the publish profile onto the repository’s secrets. If the publish profile is reset for some reason, the secret MUST be updated with the new profile, manually. It’s cumbersome. What if we populate and make use of the publish profile within the GitHub Actions workflow? Yes, we can!
GitHub Action: PowerShell Scripts
In order to populate the publish profile, you need to log-in to Azure PowerShell through Azure Login. The enable-AzPSSession parameter value of true lets you log-in to Azure PowerShell session (line #9).
    jobs:

    build-and-deploy:

      runs-on: ubuntu-latest

      steps:

      – name: Login via Az Module

        uses: azure/login@v1

        with:

          creds: ${{secrets.AZURE_CREDENTIALS}}

          enable-AzPSSession: true
Then, get the publish profile value, using the PowerShell action below (line #10-12). As the publish profile is basically an XML document, you should remove all the line-feed characters to make the XML document into one linear string (line #14). Finally, the XML document is set to an output value (line #16).
    jobs:

    build-and-deploy:

      runs-on: ubuntu-latest

      steps:

      …

      – name: Get publish Profile

        id: fncapp

        shell: pwsh

        run: |

          $profile = Get-AzWebAppPublishingProfile `

              -ResourceGroupName ${{ secrets.RESOURCE_GROUP_NAME }} `

              -Name ${{ secrets.FUNCTION_APP_NAME }}

          $profile = $profile.Replace(“`r”, “”).Replace(“`n”, “”)

          Write-Output “::set-output name=profile::$profile”
Once it’s done, let’s render the output value on the workflow log.
    jobs:

    build-and-deploy:

      runs-on: ubuntu-latest

      steps:

      …

      – name: Get publish Profile

        id: fncapp

        …

      – name: Show publish profile

        shell: pwsh

        run: |

          echo ${{ steps.fncapp.outputs.profile }}
The result might look like the following. Here’s the weird thing. We got the publish profile successfully, but the password part is not properly masked. Therefore, as soon as the publish profile is displayed like this, we MUST assume that this publish profile is no longer safe to use.

I mean, the publish profile itself is still valid. But after the deployment, it’s safe to reset the profile from the security perspective. Therefore, use the following action to reset the publish profile (line #9-13).
    jobs:

    build-and-deploy:

      runs-on: ubuntu-latest

      steps:

      …

      – name: Reset publish Profile

        shell: pwsh

        run: |

          $profile = Reset-AzWebAppPublishingProfile `

              -ResourceGroupName ${{ secrets.RESOURCE_GROUP_NAME }} `

              -Name ${{ secrets.FUNCTION_APP_NAME }}

          $profile = “”
So, the entire workflow for Azure Functions deployment is:
- Download the publish profile for the Azure Functions app,
- Deploy the Functions app using the publish profile, and
- Reset the publish profile for the Azure Functions app.
GitHub Action: Azure App Service Publish Profile
Those PowerShell script needs to be written every time you define a new workflow. But it would be great if there is GitHub Actions for it. Of course, there is. If you use this Azure App Service Publish Profile action, you can get the publish profile and reset it easily. Let’s set up the workflow like below:
- Download the publish profile for the Azure Functions app (line #12-19),
- Deploy the Functions app using the publish profile (line #26), and
- Reset the publish profile for the Azure Functions app (line #28-35).
    name: Build, Test & Deploy

    on: push
    jobs:

      build_test_deploy:

        name: ‘FunctionApp Build, Test & Deploy’

        runs-on: ubuntu-latest

        steps:

        – name: Checkout the repo

          uses: actions/checkout@v2

        …

        – name: Get FunctionApp publish profile

          id: publishprofile

          uses: aliencube/publish-profile-actions@v1

          env:

            AZURE_CREDENTIALS: ${{ secrets.AZURE_CREDENTIALS_DEV }}

          with:

            resourceGroupName: ${{ secrets.RESOURCE_GROUP_NAME_DEV }}

            appName: ${{ secrets.RESOURCE_FUNCTIONAPP_NAME_DEV }}
        – name: Deploy FunctionApp

          uses: Azure/functions-action@v1

          with:

            app-name: ${{ secrets.RESOURCE_FUNCTIONAPP_NAME_DEV }}

            package: published

            publish-profile: ${{ steps.publishprofile.outputs.profile }}
        – name: Reset FunctionApp publish profile

          uses: aliencube/publish-profile-actions@v1

          env:

            AZURE_CREDENTIALS: ${{ secrets.AZURE_CREDENTIALS_DEV }}

          with:

            resourceGroupName: ${{ secrets.RESOURCE_GROUP_NAME_DEV }}

            appName: ${{ secrets.RESOURCE_FUNCTIONAPP_NAME_DEV }}

            reset: true
With this action, we don’t have to know the publish profile, but the workflow takes care of it. In addition to that, by any chance the publish profile is compromised, the last action always resets the profile. Therefore, the compromised one is no longer valid.
So far, we’ve walked through how we can deploy Azure Functions app through GitHub Actions, with no knowledge of the publish profile and reset the profile. I hope this approach would help build your CI/CD pipeline.
This article was originally published on Dev Kimchi.

Recent Comments