by Contributed | Nov 10, 2020 | Technology
This article is contributed. See the original author and article here.

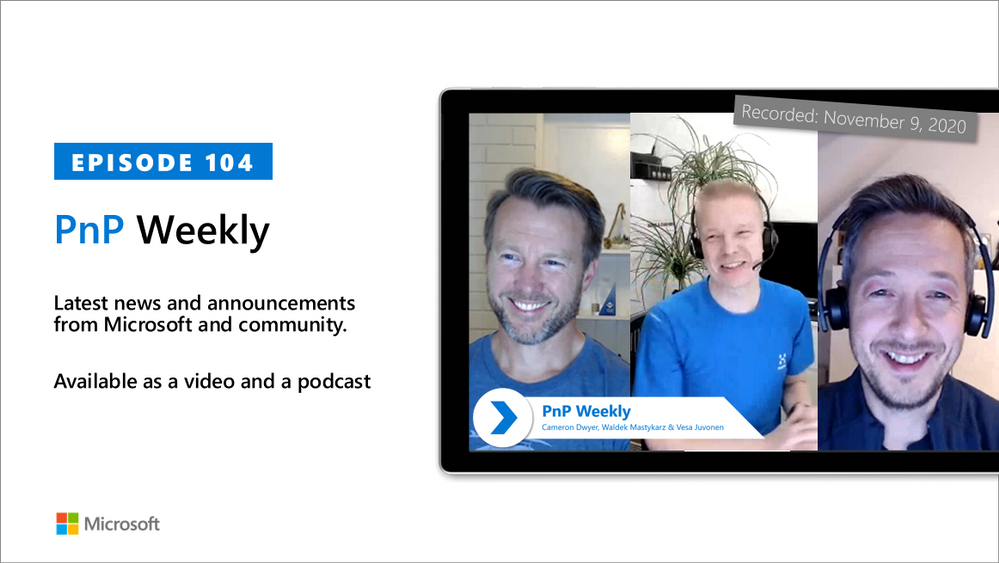
In this installment of the weekly discussion revolving around the latest news and topics on Microsoft 365, host – Vesa Juvonen (Microsoft) | @vesajuvonen is joined by Cameron Dwyer (OnePlace Solutions) | @CameronDwyer – CTO and Office Development MVP at OnePlace Solutions, located in Sydney, Australia. Differences between the ISV – SAAS product developer and the Corporate Developer are considered during this session.
Topics broached include the selection of tools and methods for UX dev layer, API layer, discovery with Microsoft Graph, real web components, authentication and identity across workloads, and more. Insights and challenges when moving from consulting to products and from product license management to a subscription-based model were shared. Why should partners consider the Microsoft 365 ecosystem? Pretty clear reasons are called out in this episode.
Twelve recently released articles and videos from Microsoft and the PnP Community are highlighted in this session as well.
This episode was recorded on Monday, November 9, 2020.
Did we miss your article? Please use #PnPWeekly hashtag in the Twitter for letting us know the content which you have created.
As always, if you need help on an issue, want to share a discovery, or just want to say: “Job well done”, please reach out to Vesa, to Waldek or to your PnP Community.
Sharing is caring!
by Contributed | Nov 10, 2020 | Technology
This article is contributed. See the original author and article here.
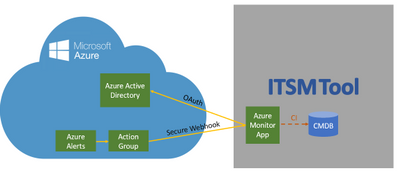
The ServiceNow ITOM connector provides an upgraded new integration between Azure Monitor and ServiceNow® Event Management to help bring Azure telemetry events seamlessly into ServiceNow ITOM Health with its AIOps capabilities such as event correlation, root cause analysis and service impact analysis, to help you maximize performance and availability of your applications and proactively identify problems.
One of the main improvements of the new integration, also referred to as “Secure Export”, is a more secure authentication due to its use of Azure Active Directory (AAD).

Customers who choose this integration will have a single view of events in ServiceNow® Event Management to achieve unified management in hybrid cloud environments (e.g. on-prem and Azure cloud). Customers will be able to have one common process to handle events and review operational and delivery processes, thus achieving faster issue resolution. Ultimately, customers will be able to benefit from a unified KPI management system and be able to define common global goals in the organization using ServiceNow® Event Management.
Enterprises typically start their event management journey by consolidating events from multiple monitoring tools. Collectively, these tools can generate hundreds of thousands—or even millions—of events every day. Event management systems need to collect and process these huge event volumes in real time without losing events or causing delays whether they occur on-premises or in the cloud. To ensure ServiceNow® Event Management and Microsoft Azure continue to serve our joint customers’ most demanding environments, we are announcing enhancements to our ServiceNow Event Management and Azure Monitor integration.
The new ServiceNow Event Management Connector integrates with Microsoft Azure Monitor and includes these key enhancements:
- A secured integration which leverages Azure Active Directory – Safely integrate Azure Monitoring and ServiceNow Event Management using Active Directory based authentication and authorization. Register ServiceNow as a trusted application in the Microsoft identity platform which is authenticated using OAuth with Azure Active Directory using “Secure Export” action group.
- A dedicated listener and transformation of Azure events to ServiceNow Event Management events – Out of the box dedicated end point for receiving Azure events and transforming them into ServiceNow events
- Deduplication of Azure events and mapping to ServiceNow Event Management alerts – Deduplicate and correlate multiple Azure Monitor events to a single actionable ServiceNow alert leveraging ServiceNow AIOps capabilities, including finding unexpected and unusual behaviours and resolve them, even before the end users call and report them to the helpdesk.
- Bind Azure-generated alerts to CI and perform impact analysis on your monitored services – Creating and or updating ServiceNow alerts, binding them to a CI in the CMDB and performing an impact analysis to realize the impact on the monitored service
- Creation of actionable alerts and allowing incident creation using out the box Alert Management rules – Orchestrating the incident creation in ServiceNow by applying out-of-the-box Alert Management rules. Incident is automatically created with the right information bubbled up from Azure Monitor to ServiceNow Event Management and to Incident Management.
- Single view of tickets in one central system where the customer can centrally monitor and manage work items in his ServiceNow Service Management product.
The new Event Management Connector and Azure Monitor integration is available in the ServiceNow Store in the Event Management Connectors app.
For further information:
by Contributed | Nov 10, 2020 | Technology
This article is contributed. See the original author and article here.
Hello folks,
Lately I’ve been building and tearing down complete environments in Azure to test and record demos. To do that I’ve been using a combination of PowerShell scripts, ARM templates and AzureCLI scripts in the Azure Cloud Shell. Some of those scripts require a significant amount of time to run. (especially the ones with gateways).
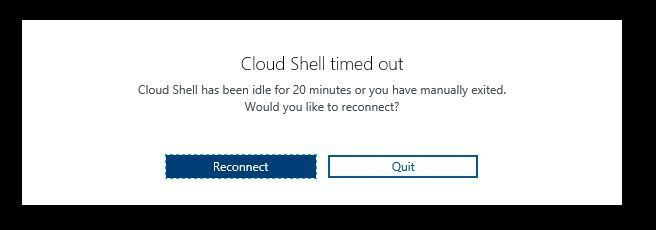
The last time I setup my demo environment I started the process, went to the kitchen for a cup of coffee and came back to my desk to the dreaded Cloud Shell timed out message.

A fit of rage and despair filled my heart….

Once I regained my calm, I started to thing that there must be a way to avoid this issue with the Azure Cloud Shell 20-minute timeout… We know that the cloud shell is intended for interactive use cases. Therefore, any long-running non-interactive sessions are ended WITHOUT warning.
I started researching way to run the shell locally. I already knew that I could run the shell in a Windows Terminal but that would not solve my issue since this basically presents the online Azure cloud Shell inside the terminal windows.
Some background on Azure Cloud Shell. It runs in the background on a virtual machine and provides your Cloud Shell session. That VM is temporary, and it is recycled after your session is inactive for 20 minutes in order to insure we (Microsoft) have enough capacity for everyone.
I found an open sourced image in a Microsoft public Azure Container Registry. Its our primary Registry for all Microsoft Published docker images.
I am now using this image locally to take advantage of all the benefits of using the managed environment and tooling available through the Azure Cloud Shell without the limitation of running it in the cloud.
Those benefits are a great pre-configured shell experience for managing Azure resources without the overhead of installing, versioning, and maintaining all the tooling on my own machine.
There are other reasons you might want to run the shell locally. For example, if your security team has disabled access to Cloud Shell from your network for your users you could use it locally. Cloud Shell utilizes access to the ux.console.azure.com domain, which can be denied, stopping any access to Cloud Shell’s entry points including portal.azure.com, shell.azure.com, Visual Studio Code Azure Account extension, and docs.microsoft.com.
It’s not my issue but if you work in a large enterprise and require more than 20 concurrent sessions, you might also want to run this locally. Azure Cloud Shell has a limit of 20 concurrent users per tenant per region. If you try to open more sessions than your limit, you will get a “Tenant User Over Quota” error.
The solution
The solution to my issues ended up being a combo of different services and tools. I’m now running the Azure Cloud Shell on my Windows 10 workstation in a Docker container. (See the documentation here for installation).
I keep my code (scripts, ARM templates, code samples…) in an Azure Repo (you could use any code repo like GitHub or other…) and just clone it locally in a directory (I put mine on here E:azrshell).
I built a PowerShell script that I use to ensure I am running the latest image and to connect to an existing container should it already be running. (Code below)
function SelectShellType {
    DO {
        cls
        Write-Host "~~~~~~~~~~~~~~~~~~ Menu Title ~~~~~~~~~~~~~~~~~~" -ForegroundColor Cyan
        Write-Host "1: Enter 1 to select PowerShell"
        Write-Host "2: Enter 2 to select Bash"
        Write-Host

        $input = (Read-Host "Please make a selection").ToUpper()
        switch ($input) {
            '1' { $shellType = "/usr/bin/pwsh" }
            '2' { $shellType = "/bin/bash" }
        }
    } While ($input -NotIn 1..2)
    return $shellType
}

$results = $(docker ps -q --filter ancestor=mcr.microsoft.com/azure-cloudshell)
If ($results -ne $null) {
    Write-Host "container running..."
    Write-Host "connecting to container..."
    docker exec -it $results bash
}
Else {
    Write-Host "container not running"
    Write-Host "Updating container image..."
    Write-Host "Picking Shell Type"

    $StartShellType = SelectShellType
    $default = "E:azrshell"
    if (!($ScriptsLocation = Read-Host "Enter the path where your local scripts are located. Press Enter to accept the default = [$default]")) { $ScriptsLocation = $default }
    Write-Host "updating container image..."
    docker pull mcr.microsoft.com/azure-cloudshell:latest
    Write-Host "Starting container and connecting your shell..."
    Write-Host "Mapping your scripts directory in the container home drive to " $ScriptsLocation "..."
    Write-Host
    Write-Host "___________________________________________________________"
    Write-Host
    docker run -it -v ""$ScriptsLocation':/usr/cloudshell/scripts'"" mcr.microsoft.com/azure-cloudshell $StartShellType
}
I know it’s not the prettiest script and it could use some refinements, but it works as intended. I created a shortcut on my desktop and in my start menu with the following command.
"C:Program FilesPowerShell7-previewpwsh.exe" -ExecutionPolicy Bypass -File "c:UserspierrerDesktopAzrShell.ps1"
The open-source image I leverage has all the bits needed to run both the Bash shell and the PowerShell Core shell just like the one in the online shell.azure.com one. When I click on the shortcut the script will provides me a choice of shells and the opportunity to specify where the clone of my script repo is.
The first time running this script, will take about 5 minutes to completely pull the image and run the container.
If no update to the image is needed, it will load in seconds.

There are some of you who will ask “what’s the catch??” There must be some differences.
Well, yes there are some…
In Cloud Shell, we provide a way to automatically obtain tokens for the user connected to the shell. When you run the image locally, you’ll have to authenticate explicitly before you can access Azure resources using “az login” for AzureCLI or “Connect-AzAccount” for PowerShell.
We don’t mount the Cloud Drive from your Azure Cloud Shell. That’s why we mount a local drive in the container pointing to our local clone.
In Azure Cloud Shell you always run as a regular user. When running the image locally, you run as root. Therefore, you can make changes to the installed tooling.
The last main difference I found is the fact that in the Azure Cloud Shell, when using the PowerShell option, you have the Azure drive (Azure:) It enables easy discovery and navigation of Azure resources such as Compute, Network, Storage etc. like a filesystem navigation.

I hope this little story on how I addressed my own issue will help you get around some of the Azure shell restrictions that you may have.
Let me know in the comment below if you have scenarios, you’d like us to explore.
Cheers!
Pierre
by Contributed | Nov 10, 2020 | Technology
This article is contributed. See the original author and article here.
Scenario:
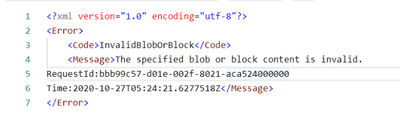
While trying to upload multiple blobs to the azure blob storage, there could be a scenario wherein you may have faced the below errors:
Error 1:
Invalid Block/Blob ‘The specified blob or block content is invalid’

Error 2:
The uncommitted block count cannot exceed the maximum limit of 100,000 blocks ErrorCode:BlockCountExceedsLimit
Error 3:
Invalid Block ‘The specified block list is invalid’
Cause:
For the Error 1
This can occur if the application / client specify a block size that is not supported.
Reference link for the Put Block REST API:
https://docs.microsoft.com/en-us/rest/api/storageservices/put-block#remarks
For the Error 2
This can occur if the application doing the copy is exceeding this limit during the copy or if there are some uncommitted blocks left from a previous copy that was canceled.
A blob can have a maximum of 100,000 uncommitted blocks at any given time.
Reference Link : https://docs.microsoft.com/en-us/azure/storage/common/storage-scalability-targets#azure-blob-storage-scale-targets
https://docs.microsoft.com/en-us/rest/api/storageservices/put-block#remarks
For the Error 3
This happens when you upload blocks with different applications and there are uncommitted blocks for which we don’t find same length as different application use different length to upload the data. This could have happened due to a previous upload that failed.
Resolution:
The issue that has been observed on both the above errors can be resolved by following either of the 3 methods:
Method 1:
Perform a GetBlockList (with blocklisttype=uncommitted) to retrieve the uncommitted block list, commit the block list, then delete the blob.
Method 2:
Create a dummy blob (can be of length zero) with the same blob name in the same container and transfer it using a non-blocked transfer
Method 3:
Wait 7 days for the uncommitted block list to garbage collect.
Tip :
You can also consider using Azure Blob Events.
The event is only triggered when a Put Blob or Put Block List is completed so you will know that the blob is fully committed before trying to take action on it.
This has the benefit of being notified of when a new blob is written and you can reference this blob directly without having to blobs in the container to find blobs that need action.
Reference Linkhttps://docs.microsoft.com/en-us/azure/event-grid/event-schema-blob-storage
Pre-Requisites:
- Azure Storage GPV2 / Blob Storage Account/ ADLSGEN2 account used with blob endpoint.
- Windows PowerShell
Action:
The below is a PowerShell script would help with the resolution mentioned on Method 1
Disclaimer :
By using the following materials or sample code you agree to be bound by the license terms below and the Microsoft Partner Program Agreement the terms of which are incorporated herein by this reference.
These license terms are an agreement between Microsoft Corporation (or, if applicable based on where you are located, one of its affiliates) and you. Any materials (other than sample code) we provide to you are for your internal use only. Any sample code is provided for the purpose of illustration only and is not intended to be used in a production environment. We grant you a nonexclusive, royalty-free right to use and modify the sample code and to reproduce and distribute the object code form of the sample code, provided that you agree:
- to not use Microsoft’s name, logo, or trademarks to market your software product in which the sample code is embedded;
- to include a valid copyright notice on your software product in which the sample code is embedded;
- to provide on behalf of and for the benefit of your subcontractors a disclaimer of warranties, exclusion of liability for indirect and consequential damages and a reasonable limitation of liability
- to indemnify, hold harmless, and defend Microsoft, its affiliates and suppliers from and against any third party claims or lawsuits, including attorneys’ fees, that arise or result from the use or distribution of the sample code.”
Perform a GetBlockList (with blocklisttype=uncommitted) to retrieve the uncommitted block list and then delete the blob.
[CmdletBinding()]
Param(
#Please enter storage account name
[Parameter(Mandatory=$true,Position=1)] [string] $StorageAccountName,
#Please enter Shared Access Signature <SAS token > generated with the permissions <ss=b;srt=sco;sp=rwldc>
[Parameter(Mandatory=$True,Position=1)] [string] $SharedAccessSignature,
#Please enter storage Container name
[Parameter(Mandatory=$True,Position=1)] [string] $ContainerName ,
#Please enter Blob name
[Parameter(Mandatory=$True,Position=1)] [string] $Blobname
)
# below rest API helps in getting the uncommitted block List
$Blob = “https://$StorageAccountName.blob.core.windows.net/“+$ContainerName+”/”+$Blobname+”$SharedAccessSignature&comp=blocklist&blocklisttype=uncommitted”
$Blob
$listfileURI = Invoke-WebRequest -Method Get -Uri $Blob
$FilesystemName = $listfileURI.Content
$String=$FilesystemName -replace ‘’ , ”
$String | Select-Xml –Xpath “/BlockList/UncommittedBlocks/Block”|Select-Object -Expand Node
$Count=$String.Count
#deletion of the blob & uncommitted block
if($Count.Count -gt 0)
{
$delete= “https://$StorageAccountName.blob.core.windows.net/“+$ContainerName+”/”+$Blobname+”$SharedAccessSignature”
$listfileURI1 = Invoke-WebRequest -Method Delete -Uri $delete
$FilesystemName1 = $listfileURI1.StatusCode
Write-Host “Deletion has been successfully , API returned status code ” $FilesystemName1
}
Write-Host “Check if the uncommitted block are still present”
Try
{
$Blobcheck = “https://$StorageAccountName.blob.core.windows.net/“+$ContainerName+”/”+$Blobname+”$SharedAccessSignature&comp=blocklist&blocklisttype=uncommitted”
$listfileURI2 = Invoke-WebRequest -Method Get -Uri $Blobcheck
}
catch{
#$err=$_.Exception
Write-Host “StatusCode:” $_.Exception.Response.StatusCode.value__
Write-Host “StatusDescription:” $_.Exception.Response.StatusDescription
}
Write-Host “With the above error message we can confirm that the uncommitted blocks and their respective blob has been deleted”
Write-Host “Name and size of uncommitted block that has been deleted are as below”
Hope this helps 
by Contributed | Nov 9, 2020 | Technology
This article is contributed. See the original author and article here.
The Azure Sphere 20.10 release includes an updated Azure Sphere OS, Azure Sphere SDK, and extensions for Visual Studio and Visual Studio Code. If your devices are connected to the internet, they will receive the updated OS from the cloud. However, to develop apps that use the new features in the OS, you’ll need to install the 20.10 SDK and the updated extension for your development environment.
If you installed the 20.10 Evaluation SDK, you should replace it by installing the 20.10 SDK for the retail release. The 20.10 SDK contains the 5, 6, 7, and 7+Beta2010 sysroots and all the new features introduced with the 20.10 release.
New and changed features in the 20.10 release
For the Azure Sphere 20.10 release, we upgraded the Yocto Project to the latest 3.1 LTS Dunfell release. The upgrade included updates to open-source tools, libraries, and the GNU Compiler Collection (GCC) toolchain. The upgrade brought new functionality to support changes like a 64-bit time_t type. It also addressed known security vulnerabilities in the open-source libraries used for building Azure Sphere.
Memory visualization in Visual Studio Extension
The 20.10 Visual Studio Extension now lets you see memory usage for high-level applications, using new information available from the Azure Sphere OS. See Memory use in high-level applications for information about how to use the new feature.
Container support for build pipelines
We have added support for use of containers (first shipped in 20.07) as part of build pipelines in GitHub and ADO. Add continuous integration to your container builds describes how to use containers as part of build pipelines in GitHub and ADO, and Use containers for build and debug with Visual Studio Code explains how to debug directly in a container with Visual Studio Code.
MAC address
It is now possible to set the Ethernet MAC address for eth0 connections by using the azsphere device network update-interface command.
Custom NTP server
High-level apps can now use a custom NTP server. For more information, see Specifying an NTP Server in the online documentation and the CustomerNTP_HighLevelApp for sample code.
Server-side authentication for wolfSSL
Azure Sphere now supports server-side authentication for wolfSSL, in addition to client-side.
New IOCTLs for GPIO and UART
New I/O controls (IOCTLs) are available for both GPIO and UART. See ioctl for a complete list.
Power management
The 20.10 release introduces power profiles, which let high-level apps select the appropriate balance between performance and energy use. See Set power profiles for Azure Sphere devices for details.
Secure connections
Applications can now access the device authentication and attestation (DAA) certificate on the device for use in authenticating with wolfSSL and other services. The DeviceAuth_GetCertificatePath function is new in the deviceauth.h header for this release.
External interrupts in RTApps
Real-time capable applications (RTApps) can now use external interrupts.
Support for AIA in tenant CA certificates
Azure Sphere tenant CA certificates now support the Authority Information Access (AIA) extension, which is an industry standard for all certificates. This extension includes an access method and a URL that points to the issuing certificate’s public certificate file. Support for the AIA extension means that you can use the Certification Path tab on the Certificate control panel to view the tenant certificate chain up to the Root CA certificate.
Device certificates do not yet support the AIA extension.
IoT C SDK
For the 20.10 release, we’ve added support for Model ID to help simplify some IoT Central/PnP and IoT Edge scenarios. We’ve also added new functions from the SDK and exposed more functionality to enable connectivity to IoT Edge.
IoT Edge example
We have added support for IoT Edge to the Azure IoT sample . IoT Edge provides a filtering and data processing layer between a downstream device, like Azure Sphere, and IoT hub. Consider using IoT Edge if your Azure Sphere device produces too much data or data that requires post-processing.
The sample application lets you start prototyping solutions with IoT Edge and Azure Sphere. It does not support bulk device onboarding. In addition to the sample, we’ve added Set up Azure IoT Edge for Azure Sphere to the online documentation.
C runtime library time_t type
In this release, we upgraded the C runtime library (libc) in the Azure Sphere OS to musl version 1.2. With this upgrade, musl has updated C type time_t (and thus all of its derivatives) to 64 bits instead of 32 bits in preparation for the UNIX epoch rollover in 2038. To read more about this change, please visit the MUSL release page: https://musl.libc.org/time64.html and see C runtime library time_t type in What’s new.
For more information on Azure Sphere OS feeds and setting up an evaluation device group, see Azure Sphere OS feeds.
If you encounter problems
For self-help technical inquiries, please visit Microsoft Q&A or Stack Overflow. If you require technical support and have a support plan, please submit a support ticket in Microsoft Azure Support or work with your Microsoft Technical Account Manager. If you would like to purchase a support plan, please explore the Azure support plans.

Recent Comments