by Contributed | Nov 16, 2020 | Azure, Microsoft, Technology
This article is contributed. See the original author and article here.
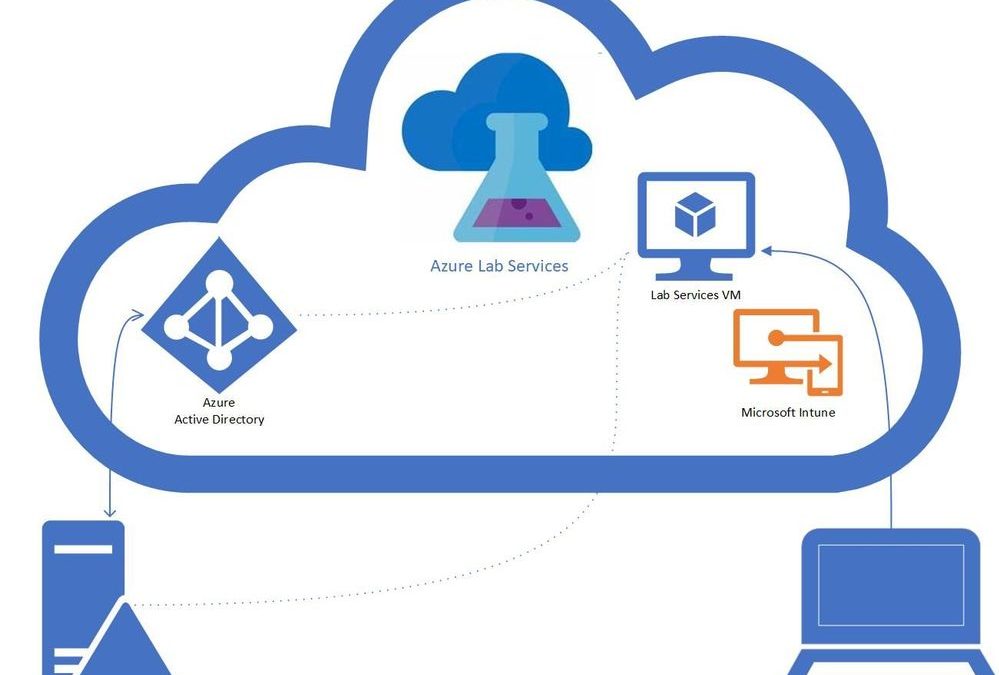
Intune + Azure Lab Services

A question that we get asked by IT departments is “can Intune be used to manage Windows 10 machines in a lab?” The answer is yes! In this blog post, we will show you how you can enable Intune on your lab’s VMs. This post will focus on getting lab VMs automatically domain joined, enrolled into Intune, and into a specific AD group at the initial student logon.
Benefits
There are several benefits to having the lab VMs being managed by Intune. The ability to create profiles that configure the VM to allow or restrict capabilities like blocking different URLs, setting sites to open when the browser starts, blocking downloads, and managing Bitlocker encryption. The Microsoft Endpoint Manager helps deliver a modern management tool for your lab VMs where you can create and customize these configuration profiles. For an education focused management tool, the Intune for Education is a portal that helps simplify Windows configuration, Take a Test, user management, group / sub-group inheritance and app management.
Prerequisites
These steps assume the following prerequisites have been configured:
- Check with your account representative for the appropriate Intune licensing.
- The Active Directory is setup with a MDM service, that is configured for auto-enrollment.
- You have a Azure Lab Services Account peered to a hybrid Azure Active Directory.
Here is more information on how to setup an Azure Lab Services account that is connected to your network.
Setting up the Lab
- Setup Template VM to join the domain.
Currently, there is a set of PowerShell scripts that are run on the template VM so that the Lab VMs will be domain joined when they are initially started. These set of scripts also rename the Lab VM to make the name unique, including setting a prefix for the VM name that can be used to put the VM in the appropriate AD group, I’ve included more details later in this blog.
- Set Group Policy to auto enroll into Intune.
The following steps will setup the auto enrollment for the lab VMs. On the template VM setup the auto-enrollment using the following steps:
- Open the local group policy editor (gpedit.msc)
- Under Computer Configuration / Administrative Templates / Windows Components / MDM
- Enable automatic MDM enrollment using default Azure AD credentials set to User Credential.
- Disable MDM enrollment is disabled.
- More information is available in the device management documentation.
- Publish Template
Once the template is published, the machines for that class will be created. The students VMs will join the domain on first startup. When the student logs on with their account, the device will be Intune enabled.
You should start the VMs before the students to get the VMs domain joined and setup for the students. The domain join and setting up the student access may take some time. Once the domain join has completed, the VMs can be turned off and when the students start and logon to the VM the auto enrollment will occur. In the case that you run into issues I’ve included a section on troubleshooting.
Additional: Setup dynamic AD group for the class
The Lab VMs are Intune enabled, but an additional step is to have the VMs added to a specific active directory group. Profiles can be set for an AD group so that any VMs added to the group will be configured based on the profile information. The dynamic group allows you to set up rules for which machines are in the group. Each group corresponds to a class or more specifically, the machines within the class. A student could have multiple classes where each class has a different set of requirements and machines that will need to be managed. Dynamic groups use rules to determine which AD group a VM should belong to. The simplest example is to use the VM name prefix (from the domain join script) as the rule for the group. An example rule would be “displayName -startsWith “Prefix”
Troubleshooting
In the case that the student VMs aren’t working as expected here are some troubleshooting tips.
- Start with the Domain join scripts.
- Check the Group Policy on the student VM
- Confirm that the group policy for auto-enrollment is set on the student VM, if not check the template VM.
- Check Event viewer on the student VM for information on the auto-enrollment task.
Final thoughts
Given the complexity of Active Directory and network configurations this is a specific example to help understand how to get Azure Lab Services working with Intune which opens a whole world of capabilities in managing student VMs.
by Contributed | Nov 16, 2020 | Technology
This article is contributed. See the original author and article here.
We are excited to announce the November release of the Bot Framework SDK and Composer, driving the Microsoft Conversational AI platform forward and building on the announcements we made in September at Microsoft Ignite. Our November update sees new updates to the Bot Framework SDK and Bot Framework Composer, adding new capabilities for developers and improving integration with our key partners, including Power Virtual Agents and HealthBot.
Bot Framework v4.11
Version 4.11 of the Bot Framework SDK, including new releases for .NET, JavaScript, Python and Java (preview 7), along with updates to our tooling, including the CLI.
Following our quality focused 4.10 release, we continue to push on this area, including improvements to the commonly used typing and transcript logging middleware behavior and associated error handling.
For developers building solutions for Microsoft Teams, new support for meetings has been added, including the Meeting Participant API and meeting specific notifications.
We continue to reduce developer friction for Skill development, adding the ability to test Skills locally, using the Bot Framework Emulator, without requiring an App Id and password. Additional scenarios, such as interruption support when calling a Skill and the ability to update or delete activities from a Skill have also been added.
Skills support has now also been added to HealthBot, a cloud platform for virtual health bots and assistants built on Bot Framework, with solutions now able consume, or for themselves to be consumed as a Bot Framework Skill.
We’re also undertaking significant investments in automated testing in this area, with the opportunity for you to review and provide feedback on the current specifications for Functional Testing and the Test Runner.
Further improvements to our documentation include expanding content across Adaptive Dialogs, Skills, overall architecture topics, as well as adding reference documentation for the Java SDK preview.
Bot Framework Composer v1.2
A new release of Composer (v1.2) is now available. This release deepens integration with Power Virtual Agents (PVA), part of the Power Platform, with a new public preview of PVA integration with Bot Framework Composer.

Users of the no-code PVA platform were already able to extend their solutions by consuming Bot Framework Skills. Now, PVA solutions can be opened in Bot Framework Composer, using a deep-link from the PVA portal, extending them with more sophisticated capabilities and enabling the collaboration between business users and developers on the same project.
Try the new Power Virtual Agents integration with Bot Framework Composer today!
When ready, Composer developers can publish directly from Composer, using a pre-configured publishing profile, back into the PVA portal, with new PVA Topics added using Composer then shown alongside existing Topics and immediately ready for testing.
An upcoming release of Composer, expected in December, will add improved provisioning and publishing support and enhanced QnA Maker knowledgebase integration.
As part of the December release, users will also have the option to enable new preview capabilities through the addition of feature flags. The first preview features planned include Orchestrator integration, the new intent detection and arbitration (dispatch) technology that runs locally within your bot, along with Form Dialogs, enabling the rapid generation of intelligent slot-filling dialogs, including complex capabilities such as slot disambiguation.
Nightly builds of Composer are available (enabled via the Composer settings page) which allow you to try the latest updates as soon as they are available.
by Contributed | Nov 16, 2020 | Technology
This article is contributed. See the original author and article here.
Earlier this year we announced the release of a new function, LET, which allows you to give names to calculations or expressions in your formulae (Announcing LET). As of earlier this month, the LET function is now generally available within the Production audience!
Thanks to all of our Insider’s for using the LET function and giving us feedback! As a result we’ve made a few changes that we’ll outline below. Additionally, we’d like to share some best practices to consider when using the function or writing formulas in general!
Accessing LET Today
To get access to LET, please make sure you have updated to the latest version of Excel.
LET is available to Excel subscribers with Office 365 or Microsoft 365. The feature is currently available on the Current Channel across all platforms and generally on the web.
Specifically versions of Excel greater than or equal to:
- Windows: Version 2009 (Build 13231.20262)
- Mac: Version 16.42 (20101102)
What version of Office am I using?
Changes made to LET
1. Autocompletion of names
We added a quality of life improvement whereby autocomplete will special case names defined by a LET with a unique icon and entry.
In the following example, you can see the special icon  indicating that you can autocomplete your formula with the count name:
 LET GIF
2. Allowed Names
“.” is no longer a legal character in names bound by a LET. If you happen to have a pre-existing wrokbook which has a “.” in its name, it will be silent upgraded to a legal name.
The reason for this change was due to conflicts which could occur within “dot notation” for dereferencing Data Types.
To learn more about what names are allowed, please see the Help topic for LET.
3. Localization changes
Thanks to feedback from the community, we have removed localization for the LET function. LET is the name of the function in all SKUs of Excel and not localized.
Best Practices when Authoring Formulas
With the addition of LET, there are some new best practices we have found useful when authoring formulas, in general and with LET. We’d love to hear more from you if there are other best practices you have employed!
Example Scenario: Converting and formatting Temperature Values
For the below examples, feel free to follow along and try it out for yourself with the included sample data. The example LET fills out the values in the Fahrenheit column
Day
|
Celsius
|
Fahrenheit
|
January 1
|
4.68
|
|
January 2
|
4.49
|
|
January 3
|
4.4
|
|
January 4
|
4.71
|
|
Line Breaks
In desktop versions of Excel, you can add line breaks to your formulas using the “ALT+Enter” shortcut while authoring. We like to make use of this functionality and add an additonal indenting of white space, by hitting “spacebar” 5 times, to help make the formula easier to read when defining names.
Formula without line-breaks
=LET(Celsius, B2:B5, ConversionFactor, 9/5, FValue, (Celsius*ConversionFactor)+32, FValueRounded, ROUND(FValue,2), FValueRounded&”°F”)
|
Formula with line-breaks and white spacing
=LET(CelsiusValue, B2:B5,
ConversionFactor, 9/5,
FValue, (CelsiusValue*ConversionFactor)+32,
FValueRounded, ROUND(FValue, 2),
FValueRounded&”°F”
)
|
Documenting your logic
The formula we have created does not benefit from any performance gains when using a LET. It does, however, gain improvements in documenting the intent of the formula and what each individual calculation does. This allows for easier debugging of more complex expressions and allows you to more easily document your work.
Consider the aforementioned formula with no LET
=ROUND((B2:B5*9/5)+32,2)&”°F”
|
While it is true that the above formula is shorter, it does not do a good job of conveying the intent of the calculation. With a LET, it is much easier to understand all the individual components and transformations that the value goes through as it gets converted. Simply read the formula, line by line.
=LET(CelsiusValue, B2:B5,
ConversionFactor, 9/5,
FValue, (CelsiusValue*ConversionFactor)+32,
FValueRounded, ROUND(FValue, 2),
FValueRounded&”°F”
)
|
Debugging and Updating Formulas
The last major benefit LET provides is with debugging and/or updating your formulas. Let’s take the previous example and imagine, while authoring the formula, we got to a state where we have the Fahrenheit value calculated and wanted to simply append “°F” to the end.
The formula might look something like this:
=LET(CelsiusValue, B2:B5,
ConversionFactor, 9/5,
FValue, (CelsiusValue*ConversionFactor)+32,
FValueRounded, ROUND(FValue, 2),
FValueRounded&”°F”
)
|
This formula will work fine but immediately we realize there are too many significant digits in our result:
Fahrenheit
|
40.424°F
|
40.082°F
|
39.92°F
|
40.478°F
|
At this point, all that’s needed to do is round the value and so we update the formula:
=LET(CelsiusValue, B2:B5,
ConversionFactor, 9/5,
FValue, ((CelsiusValue*ConversionFactor)+32)&”°F”,
ROUND(FValue, 2)
)
|
We then run into an issue because we are suddenly getting #VALUE! as a result…
That’s OK, though. With LET, we can more easily see where the error is occurring by testing different parts of the formula.
Breaking apart FValue, which seems to be the source of the error, we can return FValue and see what is getting fed into the ROUND function:
=LET(CelsiusValue, B2:B5,
ConversionFactor, 9/5,
FValue, ((CelsiusValue*ConversionFactor)+32)&”°F”,
result, ROUND(FValue, 2),
FValue
)
|
This will of course return the previous results we saw before:
Fahrenheit
|
40.424°F
|
40.082°F
|
39.92°F
|
40.478°F
|
Depending on your formula authoring abilities and proficiency with debugging formula errors, the problem may jump out immediately to you: The issue is that we are returning a string and the ROUND function expects a number.
However, if it isn’t immediately obvious, you can further debug the statement by re-writing the LET to return the various components of FValue: CelsiusValue and ConversionFactor. These will both return numbers which means that the error lies in the expression defining FValue.
The offending line is clearly the appending of “°F”: &”°F” and all that’s needed to do is append the value after rounding which will give us the final formula:
=LET(CelsiusValue, B2:B5,
ConversionFactor, 9/5,
FValue, ((CelsiusValue*ConversionFactor)+32),
result, ROUND(FValue, 2)&”°F”,
result
)
|
While the above is valid, one last tip would be to simply add another name for the string conversion, in case you want to add an IF statement which returns both an unformatted and formatted value for Fahrenheit based on a condition in the future.
=LET(CelsiusValue, B2:B5,
ConversionFactor, 9/5,
FValue, ((CelsiusValue*ConversionFactor)+32),
FValueRounded, ROUND(FValue, 2),
FValueStringAppended, FValueRounded&”°F”,
FValueStringAppended
)
|
Learn More
To learn more about LET, please check out our help article and in the meantime we are excited to hear more from you about the ways you have used LET in your own workbooks!
LET Help
Availability Notes
LET is now available to Excel subscribers of Office 365 or Microsoft 365 in Production Current Channel.
To stay connected to Excel and its community, read the Excel blog posts and send us ideas and suggestions via UserVoice. You can also Excel on Facebook and Twitter.
Chris Gross
Program Manager, Excel

by Contributed | Nov 16, 2020 | Technology
This article is contributed. See the original author and article here.
Here in our Microsoft 365 App Compliance Team, the focus is to protect our customers’ data by creating a trusted ecosystem of secure and compliant apps. Our program also helps customers like you to distinguish and filter out apps, based on their own risk tolerance.

The Microsoft 365 App Compliance Program consists of 3 tiers:
- Publisher Verification helps admins and users understand the authenticity of app developers integrating with the Microsoft identity platform.
- Publisher Attestation is where developers share general, data handling, security and compliance information about their app service.
- Microsoft 365 Certification offers assurance and confidence to organizations that data and privacy are adequately secured and protected when using Microsoft Teams, Outlook, Office Add-ins, SharePoint Add-ins, OneNote and Project apps.
Check out our previous blog to learn how these tiers benefit you.
What do we do?
Our program is designed to provide assurance to organizations and enterprise IT admins like you, that when your data interacts with a certified application, that application has undergone a security and privacy review. Microsoft 365 Certification requires a thorough assessment of an app and its underlying infrastructure against a series of security controls. This involves validating a variety of things such as updated antimalware signatures, proper data encryption at rest and in-transit, and many more. All controls span four domains:
- Application Security
- Operational Security / Secure Deployment
- Data Handling Security and Privacy
- Optional External Compliance Frameworks
In the Certification tier of the program, we verify the evidence and documentation provided, and attest to its completeness and accuracy prior to awarding a certification.
How does this help you?
This program provides you with the capability to identify trust-worthy apps as we make visible the following app information through AppSource and Microsoft Docs:
- Information about the app’s security, privacy, and data handling practices
- Customer reviews and compliance information in AppSource
- Consent screens and Certification status of an app
Example of Microsoft 365 Certification badge in Microsoft docs

Example of Microsoft 365 certification badge in AppSource

Example of MCAS report on security, compliance and legal practices followed by the app.
You can find more examples here.


This valuable app information provides rich insights and empowers you to make timely and knowledgeable decisions.
And that is not all. We have now expanded the scope of our program from Teams apps to include Outlook, Office Add-ins, SharePoint Add-ins, OneNote and Project. That means more application options for you to choose from.

Some new apps who have undergone Publisher Attestation and/or Microsoft 365 Certification are HeyTaco!, Coco, Klaxoon, SheetGo, SalesTim.

As customer’s data security is of utmost importance to us, we strive to build and grow our program. While doing so, we are working on standardizing the process for annual re–certification of apps. Identifying significant app updates that call for a re-certification is another milestone we plan to achieve.
If you have questions about our program, please reach out to appcert@microsoft.com.
by Contributed | Nov 16, 2020 | Azure, Microsoft, Technology
This article is contributed. See the original author and article here.
If you prefer using a CLI—for one-time tasks as well as for more complicated, automated scripts—you can use the Azure CLI to take advantage of the improvements for provisioning and managing Flexible Server (in preview) in Azure Database for PostgreSQL. Flexible Server is a new deployment option (now in preview) for our fully-managed Postgres database service and is designed to give you more granular control and flexibility over database management functions and configuration settings.
The new Azure CLI experience with Flexible Server for Azure Database for PostgreSQL includes:
- Refined output to keep you informed about what’s going on behind the scenes.
- One command to create a secure server inside a virtual network.
- Ability to use contextual information between CLI commands help reduce the number of keystrokes for each command.
Try Azure Database for PostgreSQL – Flexible Server CLI commands.
 Screenshot of Azure CLI welcome message
Use local context to store common information
Flexible server CLI commands support local context with az config param-persist command that stores information locally such as region, resource group, subscription ID, resource name, etc. for every sequential CLI command you run. You can easily turn on local context to store information with az config param persist on. If local context is turned on, you can see the contextual information using az config param-persist show. You can always turn if off using az config param persist off.
Run the command to view what is in your local context.
az config param-persist show
The output as shown below will tell you the values stored in your local context.
Command group "config param-persist" is experimental and not covered by customer support.
{
   "all":
     {
       "location":"eastus",
       "resource_group_name":"mynewproject"
     }
}
Ease of provisioning and deprovisioning
When creating a Postgres server using our managed database service on Azure, you probably want to get started quickly. Especially if you’re just trying things out. With the new and improved Azure CLI for Flexible Server on Azure Database for PostgreSQL, you can quickly create a Postgres server inside a virtual network. Or if you prefer, you can easily provision a server with firewall rules in one single step. You can also view the progress visually as CLI commands keep you informed about what’s going on behind the scenes.
Create a Postgres Flexible Server inside a new virtual network
Instead of creating a resource group, a virtual network, and a subnet with separate commands, you can use one command—az postgres flexible-server create as shown below—to create a secure PostgreSQL Flexible Server inside a new virtual network and have a new subnet delegated to the server.
Run the command to create a secure server inside a virtual network.
az postgres flexible-server create
The output shows you at the steps taken to create this server with the virtual network, subnet, username, and password are all auto-generated.
Local context is turned on. Its information is saved in working directory /home/azuser. You can run az local-context off to turn it off.
Command argument values from local context: --resource-group: mynewproject, --location: eastus
Command group "postgres flexible-server" is in preview. It may be changed/removed in a future release.
Checking the existence of the resource group "mynewproject"...
Resource group "mynewproject" exists ? : True
Creating new vnet "VNET095447391" in resource group "mynewproject"...
Creating new subnet "Subnet095447391" in resource group "mynewproject" and delegating it to "Microsoft.DBforPostgreSQL/flexibleServers"...
Creating PostgreSQL Server "server095447391" in group "mynewproject"...
Your server "server095447391" is using sku "Standard_D2s_v3" (Paid Tier). Please refer to https://aka.ms/postgres-pricing for pricing details
Make a note of your password. If you forget, you would have to reset your password with "az postgres flexible-server update -n server095447391 -g mynewproject -p <new-password>".
{
  "connectionString": "postgresql://username:your-password@server095447391.postgres.database.azure.com/postgres?sslmode=require",
  "host": "server095447391.postgres.database.azure.com",
  "id": "/subscriptions/your-subscription-id/resourceGroups/mynewproject/providers/Microsoft.DBforPostgreSQL/flexibleServers/server095447391",
  "location": "East US",
  "password": "your-password",
  "resourceGroup": "mynewproject",
  "skuname": "Standard_D2s_v3",
  "subnetId": "/subscriptions/your-subscription-id/resourceGroups/mynewproject/providers/Microsoft.Network/virtualNetworks/VNET095447391/subnets/Subnet095447391",
  "username": "your-username",
  "version": "12"
}
Create a PostgreSQL Flexible Server with public access to all IPs
Use az postgres flexible-server create –public-access all if you want to create a publicly accessible postgres server. Publicly accessible server can be access from any client machine as long as you have the correct username and password. If you want to restrict access only to your IP set –public -access argument to either your <IP – address> or an IP address range such as <Start IP address- End IP address>.
Run the command create a server will public access.
az postgres flexible-server create --public-access all
The output shows your a new server created with a firewall rule that allows IPs from 0.0.0.0 to 255.255.255.255:
Local context is turned on. Its information is saved in working directory /home/azuser. You can run az local-context off to turn it off.
Command argument values from local context: --resource-group: mynewproject, --location: eastus
Command group "postgres flexible-server" is in preview. It may be changed/removed in a future release.
Checking the existence of the resource group "mynewproject"...
Resource group "mynewproject" exists ? : True
Creating PostgreSQL Server "server184001358" in group "mynewproject"...
Your server "server184001358" is using sku "Standard_D2s_v3" (Paid Tier). Please refer to https://aka.ms/postgres-pricing for pricing details
Configuring server firewall rule to accept connections from "0.0.0.0" to "255.255.255.255"...
Make a note of your password. If you forget, you would have to  reset your password with "az postgres flexible-server update -n server184001358 -g mynewproject -p <new-password>".
{
"connectionString": "postgresql://username:your-password@server184001358.postgres.database.azure.com/postgres?sslmode=require",
"firewallName": "AllowAll_2020-11-11_20-29-34",
"host": "server184001358.postgres.database.azure.com",
"id": "/subscriptions/your-subscription-id/resourceGroups/mynewproject/providers/Microsoft.DBforPostgreSQL/flexibleServers/server184001358",
"location": "East US",
"password": "your-password",
"resourceGroup": "mynewproject",
"skuname": "Standard_D2s_v3",
"username": "your-username",
"version": "12"
}
Delete the server when using local context
Use az postgres flexible-server delete to delete the server which will look in local context to find for any PostgreSQL flexible server. In the example below, it identified server056513445 in local context and hence tries to delete that server.
Run the command to delete your server.
az postgres flexible-server delete
The output prompts you to confirm if you want to delete the server.
Local context is turned on. Its information is saved in working directory /home/azuser. You can run az local-context off to turn it off.
Command argument values from local context: --resource-group: mynewproject, --name: server184001358
Command group "postgres flexible-server" is in preview. It may be changed/removed in a future release.
Are you sure you want to delete the server "server184001358" in resource group "mynewproject" (y/n): y
Tune your PostgreSQL server
Tuning PostgreSQL database parameters is important to configure your server to fit your application’s needs or even to optimize performance. You can use az postgres flexible-server parameter set command to easily update server parameters with ease. You can view all the server parameter with parameter list command and parameter show command to view the parameter values of an specific server parameter.
Run the command to configure log_error_verbosity parameter:
az postgres flexible-server parameter set --name log_error_verbosity --value TERSE
The output shows you if the value has change to TERSE .
 Local context is turned on. Its information is saved in working directory /home/azuser. You can run az local-context off to turn it off.
 Command argument values from local context: --server-name: server184001358, --resource-group: sumuth-flexible-server
 Command group "postgres flexible-server parameter" is in preview. It may be changed/removed in a future release.

{
  "allowedValues": "terse,default,verbose",
  "dataType": "Enumeration",
  "defaultValue": "default",
  "description": "Sets the verbosity of logged messages.",
  "id": "/subscriptions/xxxxxxxxxxxxxxxxxxxxxxxxxxx/resourceGroups/sumuth-flexible-server/providers/Microsoft.DBforPostgreSQL/serversv2/server184001358/configurations/log_error_verbosity",
  "name": "log_error_verbosity",
  "resourceGroup": "sumuth-flexible-server",
  "source": "user-override",
  "type": "Microsoft.DBforPostgreSQL/flexibleServers/configurations",
  "value": "TERSE"
}
Use powerful Azure CLI utilities with flexible server CLI
Azure CLI has powerful utilities that can be used with PostgreSQL Flexible Server CLI commands from finding right commands, getting readable output or even running REST APIs.
- az find to find the command you are looking.
- Use the
–help argument to get a complete list of commands and subgroups of a group.
- Change the output formatting to table or tsv or yaml formats as you see fit.
- Use az interactive mode which provides interactive shell with auto-completion, command descriptions, and examples.
- Use az upgrade to update your CLI and extensions.
- Use az rest command that lets you call your service endpoints to run GET, PUT, PATCH methods in a secure way.
The new experience has been designed to support the best possible experience for developers to create and manage your PostgreSQL servers. We’d love for you to try out Azure Database for PostgreSQL Flexible server CLI commands and share your feedback for new CLI commands or issues with existing ones.

Recent Comments