
by Contributed | Nov 17, 2020 | Technology
This article is contributed. See the original author and article here.
Abstract:
Often we get into scenarios where we are unable to reproduce the issue inhouse. These situations become complicated as we cannot do a live debug using Visual Studio.
This session gives an insight on how to effectively and efficiently use VS debugger tool to debug your .NET application as a postmortem debugger.
This session also intended to include couple of demos covering the scenarios such as application crash, memory leaks, UI debugging etc.
Webinar Date & Time : December 8, 2020. Time 2.00 PM IST (8.30 AM GMT)
Invite : Download the Calendar Invite
Speaker Bio:

Prashant Ranjan currently works as a Support Engineer at Developer Tools. His day to day role is to enable Developers around the world to achieve more. He helps out the customer by enabling them understand the debugging features of Visual Studio and how to use the tool as a postmortem debugger for crash, Memory leaks, UI debugging. His role provides him a unique view of technology and customers. He partners with Products groups to help our customers and developers. He currently focusses on .NET, WPF, Win Form, Desktop Applications and Visual Studio.

Anurag Singh works as a Support Escalation Engineer in Microsoft Developer Support team at Bengaluru. He works to enable and empower developers around the world to achieve more with Microsoft technologies. His key areas of interest are Visual Studio, .NET (both Framework and Core), VC++ and Data Access (mainly ADO.NET, EF). Anurag works closely with our customers to help them resolve issues as efficiently as possible.
Devinar 2020
by Contributed | Nov 17, 2020 | Technology
This article is contributed. See the original author and article here.
My old Synology NAS for home use had started to show signs of wear and was in need of replacement. It had plenty of disk space and performed well enough – but the version I had lacked any real power or cloud connectivity. I decided it was time to repurpose one of my “home lab” servers to be a replacement and wanted to take a kick at the can of setting it up as a headless Windows Server 2019 File Server that I could connect up with Azure File Sync for some “cloud connected” storage. I came across a few interesting things took a bit of time to solve so I thought I’d share my experience making this server with you here – in case you come across these yourself in your travels.
Windows Server 2019 default install
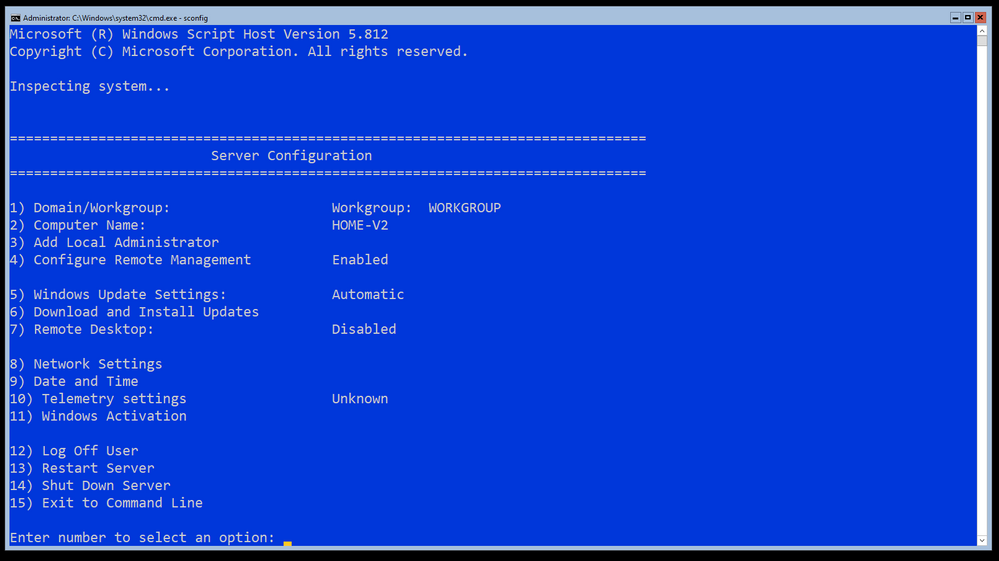
In case you didn’t know – it does not have a GUI. This can pose some challenges when you complete the install and need to fine tune and configure it. I’m going to be managing this system (once it’s configured) using Windows Admin Center, but completing the setup will take a bit of wrangling. I’m not going to cover a vanilla install of Windows Server, so I pickup from just after the first logon where I have the opportunity to set the local Administrators password. The first stop in this manual install is your old friend SCONFIG.

As you can see – I have already enabled and configured some important settings here:
- I have changed the Computer Name (Option 2)
- I have enabled and configured Remote Management (Option 4)
- I have configured Windows Update to be Automatic and check for updates every day at 3am localtime (Option 5)
- I have Downloaded and installed updates (Option 6)
- I have gone ahead and input my product key and proceeded to activate Windows Server (Option 11)
This was the easy part – we have an (almost forgotten) tool with SCONFIG to get this part done. You’ll notice I didn’t join a domain – this is a simple NAS for some clients here in the house, I no longer have local domain controllers running for the family / lab.
Power Management
Since this machine is essentially a Server and it will be running headless, it won’t be going to sleep or turning off monitors as it’s going to be headless after this configuration is complete. As such – I want to change the Power Profile to High Performance. It’s a bit harder with no GUI, but you can use the PowerCfg.exe tool to do this. To list off your settings it’s as simple as running PowerCfg /list and then you can copy the scheme GUID for High Performance and then run PowerCfg /Set 8c5e7fda-e8bf-4a96-9a85-a6e23a8c635c

Command Line Driver Installs
Once I got around to wanting to configure a Storage Space and tried to list off my physical disks with a Get-PhysicalDisk command, I realized that my HP workstation was still missing drivers for the controller card. Doing some digging, I realized that I needed to download the drivers from the HP support site, transfer them via USB stick on to the system – but they required a GUI for the install. I extracted the drivers into C:SWSetup folder and then found the docs about how to go about adding driver packages into the drive store. In my case – one command did the missing controller software install and updated my chipset drivers: pnputil /add-driver *.inf /subdirs /install

Storage Configuration
This server has an SSD for the main OS drive and a few spinning rust disks for data who had previously been part of a Windows Storage Space in an old configuration. I had to dig around to figure out how to clear out the old Storage Space information as it’s stamped on each disk – so unless you are using pristine / unused disks – you’ll want to remove any old unhealthy storage pools from the system. You can then delete them with a simple Get-StoragePool -HealthStatus Unhealthy | Remove-StoragePool. This should free up the disks to be included in a net new Storage pool and be configured into a new Storage Space. Storage Spaces is documented in the Deploy StorageSpaces on a stand-alone server doc from way back in the 2012 documentation space, but it still applies to 2019. You can list off your visible disks on the system even if you are repurposing hardware – you’ll want to ensure you are clean and starting from scratch. List off your disks with Get-PhysicalDisk and you should see all of them with a “CanPool” status of True.

To create you Storage Space from the CanPool disks, first off group them together as a variable with $PhysicalDisks = (Get-PhysicalDisk -CanPool $True) Then you can group them together into a Storage Pool so you can make a virtual disk with the redundancy you like. First make the Storage Pool with New-StoragePool -FriendlyName Storage – StorageSubsystemFriendlyName “Windows Storage*” -PhysicalDisks $PhysicalDisks

Because I am using old disks of mismatched sizes and want to gain all the space possible for my resilient storage, I am going to create a RAID 5 equivalent setup using the ResiliancySettingName of Parity with New-VirtualDisk -StoragePoolFriendlyName Storage -FriendlyName data -ResiliencySettingName Parity -UseMaximumSize

Finally it’s time to initialize the disk, create the volume and format the partition as NTFS with Get-VirtualDisk -FriendlyName data | Get-Disk | Initialize-Disk -Passthru | New-Partition -AssignDriveLetter -UseMaximumSize | Format-Volume -FileSystem ntfs

Local User Creation
Next up – making some standard SMB Shares that my workstations can access the stored data. Since this is for home use, I only have regular Users and if you remember – I no longer have a domain in use, so I will need some local accounts created. You can read the full New-LocalUser command reference from the doc page. I create a secure password with $Password = Read-Host -AsSecureString and then create the local account with New-LocalUser “Mackenzie” -Password $Password -FullName “Mackenzie” -Description “Son” -PasswordNeverExpires

I went ahead and created a user for each member of the family and myself and proceeded to make a note to visit each family members machine to map drives to the server using their unique local user ID in order to authenticate to the server. This part made me cringe as a consultant who has designed over 140+ Active Directory domains for enterprise customers over the years. Maybe I should make this simpler and create a local domain for home again – but honestly this is a small setup, not something for a small / medium business so I’ll let it pass.
Creating the SMB Shares
I create the necessary folder structure on the new E: drive, in this example it’s E:sharesDocuments that I want to share out with Change access to the Users group and Full access to the Administrators group. You can read the full New-SmbShare command reference from the docs page. For this I use New-SmbShare -Name “Documents” -Path “E:sharesDocuments” -ChangeAccess “Users” -FullAccess “Administrators”

Once the shares were made it was time to transfer the data. I decided to keep things simple and simply mapped a drive from the new server over to the old NAS and then proceeded to robocopy the files down to their new locations. Needless to say – this took a long time, multiple days in fact – but we made it in the end. Because this was a simple NAS for home use, there wasn’t a very complex security structure in place.
And we’re done.
To review – I wanted to replace an aging home NAS device with a Windows Server 2019 file server running on some repurposed home lab hardware. Because Windows Server 2019 runs without a GUI I managed to figure out the following from the command line / PowerShell prompt:
- Configuring the basics with SCONFIG
- Changed the Power Profile to High Performance
- Added and Installed 3rd party drivers
- Deleted old Storage Space
- Created a new Storage Space / Virtual Drive / Resilient volume
- Created new Local Users
- Created new SMB shares
Now how about managing this server going forward? Well for that, you will have to wait for my next blog post.

by Contributed | Nov 17, 2020 | Technology
This article is contributed. See the original author and article here.
Abstract:
Microsoft Healthcare Bot is a cloud service that powers conversational AI for healthcare.
It’s designed to empower healthcare organizations to build and deploy compliant, AI-powered virtual health assistants and chatbots that help them put more information in the hands of their users, enable self-service, drive better outcomes, and reduce costs.
This session will give a detailed introduction to Microsoft Healthcare Bot with a lot of interesting demos.
Webinar Date & Time : December 3, 2020. Time 4.00 PM IST (10.30 AM GMT)
Invite : Download the Calendar Invite
Speaker Bio:

Parag is working with the Developer web apps team in Microsoft for about 2 years. He works with customers and support them on technologies like IIS, ASP.NET, Azure Bot Framework and Microsoft Healthcare Bot. He is enthusiastic about working with these technologies and would love to share my experiences which he gained while troubleshooting with the customers.

Ram is working with the Developer web apps team for about 2 years. He comes with 6 years of experience in web development technologies and works on technologies like IIS, ASP.NET, WCF, Azure Bot Framework and Microsoft Healthcare Bot.
Devinar 2020
by Contributed | Nov 17, 2020 | Technology
This article is contributed. See the original author and article here.

Microsoft 365 & SharePoint Ecosystem (PnP) November 2020 update is out with a summary of the latest guidance, samples, and solutions from Microsoft or from the community for the community. This article is a summary of all the different areas and topics around the community work we do around Microsoft 365 and SharePoint ecosystem during the past month.
Thank you for being part of this initiative. Sharing is caring!
Got feedback, suggestions or ideas? – don’t hesitate to contact.
by Contributed | Nov 17, 2020 | Technology
This article is contributed. See the original author and article here.
We’re thrilled to share that the new CloudAppEvents table is now available as a public preview in advanced hunting for Microsoft 365 Defender.
This new advanced hunting schema table contains activities monitored by Microsoft Cloud App Security (MCAS) involving the following services:
- Microsoft Exchange Online
- Microsoft Teams
In Microsoft 365 Defender advanced hunting, you can use Kusto Query Language (KQL) to proactively find threat activity involving these applications including setting inbox rules, mailbox permissions, and Teams channels updates.
This new table includes:
- Precise location information in these columns:
- UserAgent information from web browsers or other client applications
- ActivityObjects column listing various objects involved in the recorded event, such as files or folders. This is identical to what is already displayed for each activity in Cloud App Security.
In early 2021, this table will also include activities involving the following O365 services:
- OneDrive for Business
- SharePoint Online

Replacing the AppFileEvents table
The AppFileEvents table, which contains file activities from these applications, will stop getting populated with new data in early 2021. Activities involving these applications, including file activities, will be recorded in the new CloudAppEvents table. In addition to this change, SMB file copy activity (action type: SmbFileCopy) from Microsoft Defender for Identity currently stored in the AppFileEvents table will be moved to the IdentityDirectoryEvents.
If you have any saved queries, custom detection rules or queries running through the API, using the AppFileEvents table, please make sure to edit them to work with the CloudAppEvents table.
For example, here is a query that checks the AppFileEvents table:
AppFileEvents
| where ActionType == “FileUploaded” and Application == “Microsoft SharePoint Online”
| where FileName endswith “.xlsx”
| project Timestamp, ActionType, Application, FileName, FolderPath, AccountObjectId, AccountDisplayName, IPAddress, Location
| take 50
You can edit it to use the CloudAppEvents table like so:
CloudAppEvents
| where ActionType == “FileUploaded” and Application == “Microsoft SharePoint Online”
| where ObjectType == “File” and ObjectName endswith “.xlsx”
| project Timestamp, ActionType, Application, ObjectName, AccountObjectId, AccountDisplayName, IPAddress, CountryCode
| take 50
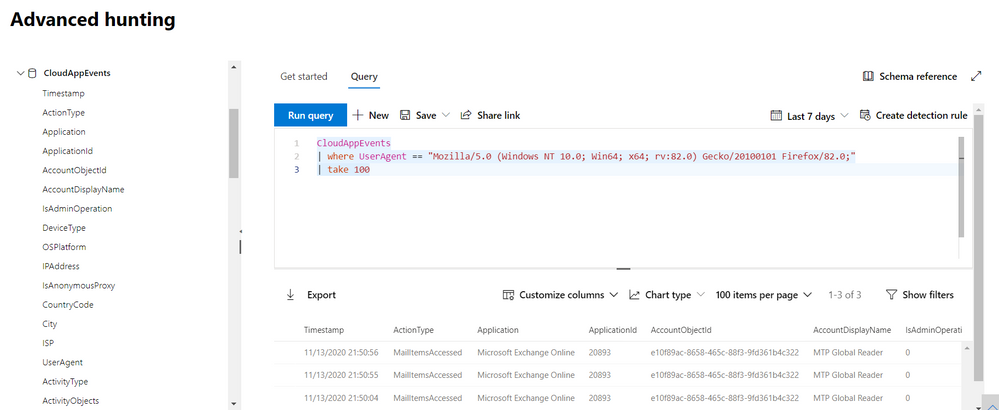
Sample queries with CloudAppEvents
Here are some samples queries that might help you understand how to use this new table:
//Activities from a specific app
CloudAppEvents
| where Application == “Microsoft SharePoint Online”
| take 100
//Activities made by a specific user, the user is the “actor”
let user = “<user name>” ;
CloudAppEvents
| where AccountDisplayName == user
| take 100
//Activities involving a specific user, the user is with any role, not “actor” only
let user = “<user name>” ;
CloudAppEvents
| where ActivityObjects has user
| take 100
//Activities on a specific file
let fileName = “<file name>”;
CloudAppEvents
| where ObjectType == and ObjectName == fileName
| take 100
//Activities from specific IP address
CloudAppEvents
| where IPAddress == “<IP>”
| take 100
//Activities from a specific user agent
CloudAppEvents
| where UserAgent == “<user agent>”
| take 100
As always, we’d love to know what you think. Leave us feedback directly on Microsoft 365 security center or contact us at AHfeedback@microsoft.com.
Stay safe and happy hunting!

Recent Comments