Protecting your data – creating a secure and compliant Microsoft Teams environment
This article is contributed. See the original author and article here.
Organizations are continuing to work in a remote or hybrid-remote environment which accentuates the need to protect people, devices, apps, and the data that spans across the entire landscape. An increase in online collaboration has caused an influx of data that is critical for organizations to ensure remains secure, wherever employees are collaborating from. This is supported by the 115 million daily active users on Microsoft Teams, reemphasizing the need to ensure we can protect all the information and data created from increased online collaboration.
Key customer questions for data governance and protection
As the world has shifted to remote work as the new normal, organizations are facing a variety of increasing regulations and challenges. We are often asked a common set of questions by business leaders:
- How can we ensure sensitive data is not purposefully or accidentally shared with unintended recipients?
- With the shift to online collaboration creating an increased volume of information and data, how do we remain complaint with regulations and privacy needs?
- When employees are communicating online, how can we ensure they follow company policies to foster a safe and inclusive culture?
These questions are supported by a Harvard Business Review study commissioned by Microsoft that reveals organizations are finding an increased difficulty in securing and governing their data. While 77% of organizations agree an effective security, risk, and compliance strategy is essential for business success, an alarming 82% acknowledge increased risks and complexities have made an effective data management strategy more challenging.
Understanding the data landscape: structured versus unstructured data
One of the first components of data protection involves understanding how much structured and unstructured data exists in your organization. Structured data, organized in a pattern such as account numbers or credit cards, can often be identified using tools focused on preventing data loss. But how can we also ensure that unstructured data, like an internal release plan or confidential product specifications, also remains protected?
Creating an effective data governance and protection strategy
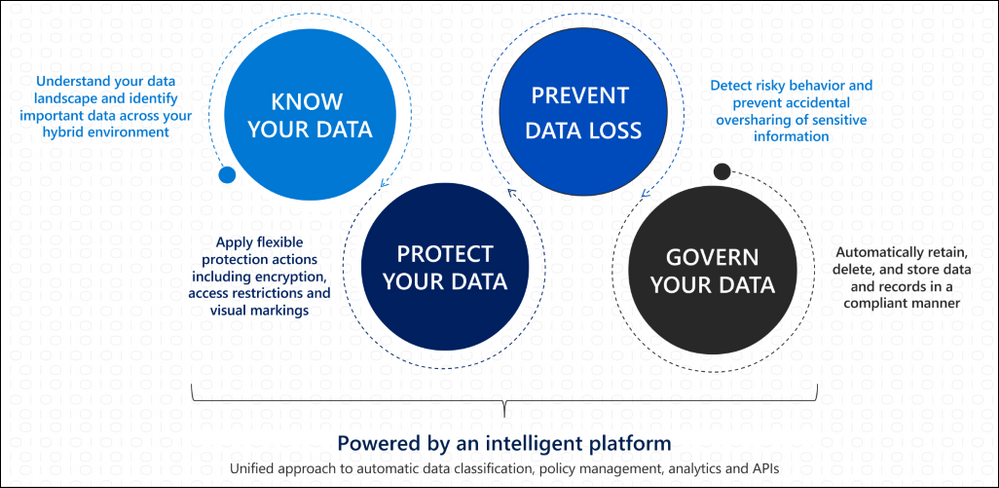
To help customers address complex data management needs, we can leverage built-in protections and AI capabilities to help safeguard both structured and unstructured data wherever it lives. By focusing on an approach of knowing, protecting, and governing data we can effectively build our organizational data governance and protection strategy.
Identifying the volume of structured and unstructured data in our organization helps us understand what protection capabilities we need to implement to have protection across our landscape. Data Loss prevention capabilities can leverage both built-in and custom sensitive information types to help protect structured data. Using trainable classifiers helps us govern our unstructured data by being able to identify items that meet our organization-defined policies to apply protections such as sensitivity or retention polices.

How does that apply to Microsoft Teams?
As part of the Microsoft 365 services, Teams follows all the security best practices and procedures such as service-level security through defense-in-depth and rich controls within the service. This means we can apply these same principles to ensure our collaboration and communication landscape have consistent advanced security and compliance capabilities leveraged from Microsoft 365. Teams enforces team and organization-wide multi-factor authentication (MFA) and single single-on through Azure Active Directory. Teams integration with SharePoint ensures file storage is backed by SharePoint encryption, while items like notes stored in OneNote are backed by OneNote encryption and stored in the team SharePoint site.
Because of this integration with familiar services like SharePoint and Exchange, IT can take advantage of simplified manageability in the centralized Microsoft 365 admin center to protect the data landscape. Let us look at how information protection and data loss prevention are implemented in Teams.
Data Protection in Microsoft Teams
Data Loss Prevention (DLP) capabilities allow IT to define policies that help prevent people from sharing sensitive information, extending into Teams chat, channel, and private channel messages. This also includes protection from OneDrive for Business for documents containing sensitive information shared in Teams messages to ensure unauthorized users cannot access the document. Similar to how DLP works across Microsoft 365 like in Outlook or OneDrive, when a DLP policy violation occurs in Teams the sensitive content is blocked for data protection. Additionally, a helpful end user tip appears to educate the end user on why the content was blocked.
The sender’s view:

An educational policy tip for the sender:

The recipient’s view:

By leveraging the strength of Microsoft 365 security across our data landscape, we can easily leverage existing DLP policies in other services, like Exchange or SharePoint Online, to extend their protection into Teams. IT can also create new policies across Microsoft 365 or specific to Teams depending on organizational needs or requirements.

Sensitivity labels allow us to classify and protect unstructured organizational data that may not be identified through our DLP policies such as a confidential internal memo. Once a sensitivity label is applied to an email or document, the configured protection settings for that specific label are enforced wherever that content travels within the Microsoft ecosystem. This includes encrypting emails or documents, applying watermarks, automatic and recommended labeling, and the ability to protect content in site and group containers.
Now let’s cover how to take advantage of data protection and governance in Teams to address the security needs of your organization.
Applying Data Protection and Governance in your Organization
Data protection and governance is often not a one-size-fits-all model. While organization-wide baseline protections play a critical role in a data management strategy, different business groups, departments, or subsets of users may need heightened protections to ensure data security. Below are some of the most impactful capabilities and controls organizations can implement across their landscape to drive an effective data protection and governance strategy.
How to secure data and prevent data loss
As mentioned throughout this blog, effective data management requires IT to be able to identify, monitor, and automatically protect all sensitive information across Microsoft 365. For structured data, this can be supported through creating data loss prevention policies to intelligently detect and prevent inadvertent disclosure. In order to protect unstructured data, IT can take advantage of sensitivity labels to have protection settings, such as content encryption or markings, applied to the content. The integration of sensitivity labels in Teams helps regulate access to sensitive organizational documents within teams by protecting content at the container level.
For groups or individuals that may need to be prevented from communicating with other groups, such as departments handling confidential information, Information Barrier policies can help IT isolate segments to meet relevant industry standards or regulations. Additionally, with this major shift to online communications we can leverage Communication Compliance in Teams and across Microsoft 365 to foster a safe and inclusive workplace. Communication Compliance helps organizations meet corporate policies such as ethical standards and risk management including identifying potential data leakage.
How to govern data for compliance and regulatory requirements
While items like DLP and Communication Compliance enable organizations meet regulatory requirements, we also need to ensure we can retain and search data across our landscape. Retention policies enabled across Microsoft 365 services, including Teams, help organizations meet both industry regulations and internal policies on data retention and deletion.
Organizations have many reasons to respond to a legal case that might require stakeholders to quickly find and retain relevant data across email, documents, instant messaging conversations, and other content locations. eDiscovery case tools help relevant stakeholders perform tasks like managing holds, case management, content search, and many other similar activities all in the security and compliance center. Additionally, large organizations can be required to turn over all Electronically Stored Information (ESI) which can be assisted by eDiscovery in Teams.
Creating a secure and compliant Microsoft Teams environment
While data protection and governance in Teams is foundational with the increase in online communications, it’s only one set of security capabilities. With Teams you have comprehensive security including items like multi-factor authentication, Conditional Access policies, Safe Attachments, Advanced Threat Protection capabilities, and more that builds on the Microsoft 365 security foundation. You can learn more about leveraging the Microsoft 365 security foundation to manage security and compliance in Teams in our latest Microsoft Ignite session.
In order to create a secure and complaint Teams environment for your organization, please review the below guidance to start enabling these capabilities:
- Enabling Data Loss Prevention for Teams
- 12 tasks to support secure remote work
- Learn more about security and compliance in Microsoft Teams
- Understanding Security and Microsoft Teams
For more depth learning and interactive training make sure to check out the latest Teams training on Microsoft Learn including a specific learning path on enforcing security, privacy, and compliance in Microsoft Teams!


Recent Comments