by Scott Muniz | Sep 16, 2020 | Uncategorized
This article is contributed. See the original author and article here.
Over the past few months, we’ve addressed several major asks from our Visio for the web users. We’re announcing some of these for this first time today, like hyperlinks and copy diagrams across files, and recapping others that were released earlier this year, like export as image and multipage operations. Each of these is available for licensed users, although certain limited capabilities are available for Visio Viewer and unlicensed users. Read on for a quick overview of each feature.
Hyperlinks
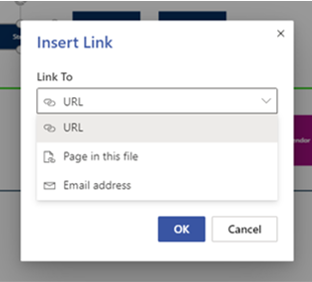
You can now add links to diagram shapes that redirect to a web page, another file stored online, or a sub process or page within same file. You can even insert an email address that prompts the shape to create a draft email when selected.

To insert links, choose the appropriate shape, select the link option from the Insert tab or from the right-click options, and pick the link type.
- URL: Link shapes to a webpage or any document that has been stored online, including Visio files.
- Page in this file: Link shapes to a diagram on another page within the same Visio file.
- Email address: Enable shapes to create a draft email with the recipient’s pre-filled address.
Unlicensed users can still access hyperlinks but cannot insert or edit them.
Refer to our support article to learn more about how to add links to your diagrams.
Copy diagrams across files
Reusing existing diagram parts just got a lot easier. You can now copy diagrams and diagram parts from one Visio file and paste them into another. Simply select the entire diagram or a single shape and use the Copy function  from the ribbon; right click and select Copy; or, press CTRL + C on your keyboard. Pasting the copied element works the same way: Paste
  from the ribbon, right-click options, or CTRL + V on your keyboard.
This functionality is available in both Visio for the web and Microsoft Teams. The copied diagrams or shapes will follow the destination theme, while any specific formatting you applied in the source file (other than the theme) will be respected and retained in the destination file.
The use cases for copy-paste in Visio for the web are endless. For example, you can copy a diagram part from one file and paste it into another to build out that part more completely. Conversely, you can merge multiple subprocesses from different files to create one final process.

Export as image
With this feature, you can save your Visio for the web diagrams as an image file locally on your device to reuse it anywhere at any time.
To export a Visio diagram as an image, go to the File menu, select Save As, then Download as Image to see the “Download as Image” dialog box. From there, you can choose the pages to download from your Visio file from the “Diagram area” dropdown. You also have the option to pick the resolution of your image: High (300 ppi), Medium (144 ppi), or Low (72 ppi). The image file formats currently supported are JPEG, PNG, and PNG with a transparent background. The selected pages in your file will be downloaded as an individual image file (for a single page) or as a zip folder (for multiple pages).

This functionality is also available in Visio Viewer—click on the ellipses menu (…) and select “Download as Image”—with limited customization options. The current active page will be downloaded as a PNG with medium resolution by default. The same is true for unlicensed users, who can export diagrams as an image with the aforementioned defaults.

Refer to our support article to learn more about exporting diagrams as an image.
Multipage operations
We’ve made a host of enhancements that bring the familiarity of Office, especially elements like Excel tabs, into Visio for the web.
- Insert page: Right-click on an existing page in the page navigation bar to insert a blank page adjacent to it. The inserted page will have all the page-level properties of the source page.
- Duplicate page: Create an exact replica of your existing page by right-clicking that page in the navigation bar.
- Reorder pages: Drag pages across the navigation bar to rearrange them into a more appropriate order. This operation can also be performed using the Reorder option after right clicking a page in the navigation bar.
- Page navigation list: Get a one-shot view of the pages in your Visio file by clicking on the page navigation hamburger menu. Click on any page in this list to make it active.
- Scroll arrows: Scroll through the list of pages in the page navigation bar using the left and right arrows. This helps you view the pages in your diagram without making any page active.

Of the above operations, Visio Viewer and unlicensed users can use page navigation list and scroll arrows to navigate through the list of pages in the file.

You can learn more about these multipage operations on our support page. Here are the specific links: Insert page and navigate through multiple pages, Duplicate page, and Reorder pages.
All these improvements happened because of people like you leaving feedback on our UserVoice site—so keep it up! And please continue visiting our Tech Community site for all the latest Visio news.
by Scott Muniz | Sep 16, 2020 | Azure, Technology, Uncategorized
This article is contributed. See the original author and article here.
 Microsoft Ignite banner
The Azure Marketplace team is excited for the upcoming Microsoft Ignite conference! The event is all digital and all free with tons of interesting sessions for customers and partners. We’ll be sharing insight into how IT organizations can use Azure Marketplace to remain agile while maintaining security, compliance, and budgets.
Join the live session or watch on-demand for announcements, engage the team at Ask The Experts, and schedule consultations to go deeper one-on-one.
Register for Microsoft Ignite:
https://myignite.microsoft.com/
Sessions and consultations
Find, try, and buy solutions with ease in Azure Marketplace
On-demand viewing anytime
Learn how to find an application in Azure Marketplace or in the Azure Portal. We will show you how to find, try, and buy solutions aligned to your needs and deploy applications in your environment. After that, we will walk through how you can manage applications purchased through Marketplace.
https://myignite.microsoft.com/sessions/6e0827f9-1e21-43cd-b2ea-472d007ee981
Simplify software procurement and management with Azure Marketplace
Tuesday, September 22 | 1:00 PM – 1:30 PM PDT
Want to accelerate your organization’s access to IT, developer, and business solutions while thrilling your procurement and legal teams? Confidently buy and deploy software solutions and discover services offerings from Microsoft and Microsoft partners in Azure Marketplace. Learn about new governance and management functionality built into the Azure Portal plus how buying through Microsoft simplifies contracting and billing.
https://myignite.microsoft.com/sessions/0e22c4ff-63c4-452d-b502-42083ac46c27
Simplify software procurement and management with Azure Marketplace
Tuesday, September 22 | 9:00 PM – 9:30 PM PDT
https://myignite.microsoft.com/sessions/868cbac4-b741-4270-b970-3f4a6afb45e1
Simplify software procurement and management with Azure Marketplace
Wednesday, September 23 | 5:00 AM – 5:30 AM PDT
https://myignite.microsoft.com/sessions/1e7a9a47-3c2a-445f-8a6a-29c6c86f4165
Ask the Expert: Simplify software procurement and management with Azure Marketplace
Wednesday, September 23 | 5:45 AM – 6:15 AM PDT
Join Microsoft experts to discuss how you can confidently buy and deploy software solutions and discover services offerings from Microsoft and Microsoft partners in Azure Marketplace.
https://myignite.microsoft.com/sessions/8c056d2e-559a-43fb-83e1-ed3dd444ff24
One-on-one consultation
Schedule a 45 minute engagement
Organizations of all sizes and industries find innovative IT and developer tools in Azure Marketplace and business and industry solutions in Microsoft AppSource. Join individual consultations with specialized tech and industry category managers to help you find software from Microsoft partners, or meet with architects and program managers to learn how you can commercialize your organization’s IP to sell through Microsoft.
https://myignite.microsoft.com/app-consult

by Scott Muniz | Sep 15, 2020 | Uncategorized
This article is contributed. See the original author and article here.

I wrote this post as a proof of concept and as a best effort to make a 16-bit application run on Windows 10 64-bit.
It will be demonstrated how to use a third-part open source framework called otya128 – winevdm, how to use MSIX, UWP Execution Alias and Packaging Support Framework.

Please notice that Microsoft recommends using virtualization or 32-bit machines to run 16-bit applications.
This post is only a proof of concept and for informational and training purposes only and are provided “as is” without warranty of any kind, whether express or implied.
Download the 16-bit emulator
As 64-bit operating system does not have support for the Windows NT DOS Virtual Machine (NTVM) system component, the first step is to download the 16-bit emulator called otya128 – winevdm that is open source and available on GitHub:

https://github.com/otya128/winevdm
You can clone the repository and build yourself or download the build artifact from the AppVeyor repository https://ci.appveyor.com/project/otya128/winevdm/history
If you opt to download the app from the AppVeyor repository, you need to choose what build you want:

Select the job:

And finally click on artifacts to download the artifact file:

Now, all you must do is to extract the files to a folder of your preference. I will extract the files in the following folder of the root of my C drive:
C:otvdm-master-1846
Installing Microsoft Visual Basic 3.0 IDE on Windows 10 64-bit
If you try to run the Visual Basic 3 installer (setup.exe), you will receive the following message telling that the application cannot run, since it is a 16-bit application and that the NTVDM is not available.

We need to run the otvdm.exe passing as argument the application that we want to launch, in our case, the setup.exe of Visual Basic 3.0:
C:otvdm-master-1846otvdm.exe "C:VBVB.EXE"
Notice that now the Visual Basic 3.0 16-bit installer has been successfully launched:

We can proceed with the installation:

The default destination folder is C:VB:

There are no registry keys, and all the files will be copied to the C:VB directory:

Done!!!! Visual Basic is successfully installed:

Click on Run Visual Basic 3.0 to launch VB3 on Windows 10 64-bit:

Notice that despite of Visual Basic 3 is available on Start menu, you can’t directly launch the app from there, as the app is 16-bit:

In that case you need to run the following command:
C:otvdm-master-1846otvdm.exe "C:VBVB.EXE"
Improving the app distribution and providing a better user experience through MSIX
Let’s see how MSIX can simplify the application deployment by keeping together the 16-bit emulator and VB3 application in a single MSIX installation file. The installation will be reduced to a single click action that will install the App in less than 10 seconds.
At the same time MSIX will provide a better user experience, allowing the users or other apps to call the application executable, in this case, VB.EXE without having to specify the otvdm emulator.
MSIX Packaging Tool
We need of the install the MSIX Packaging Tool, that is free and available on Microsoft Store:
https://www.microsoft.com/store/productId/9N5LW3JBCXKF

See the following documentation for more details about the tool:
https://docs.microsoft.com/windows/msix/mpt-overview
Before launching the MSIX Packaging Tool, move the emulator and VB folders to another folder, like C:setup:

This step is need, as MSIX Packaging Tool (MPT) will monitor the changes made on the computer environment. So, as we already have VB3 installed and we don’t want to install it again, I will just copy these two folders to their final destinations at the moment that the MPT will be monitoring the modifications.
Once installed, open the MSIX Packaging Tool and click on Application package to create a new package for the application:

The MSIX Packaging Tool will monitor the changes made on the environment. To perform the packaging, it is possible to use a virtual machine or the physical machine itself to install the application.
The best scenario is to use a virtual machine allowing you to reproduce the same process if necessary. It is important that the machine used to install the application does not contain the applications and their previously installed components.
Choose the desired scenario and click the Next button:

In this step, the tool will verify that the MSIX Packaging Tool Driver is installed and will disable Windows Update to decrease the number of changes to the operating system:

Click on the Next button.
Only MSIX packages signed with a valid certificate can be installed on Windows 10 machines.
You can create a self-signed certificate for testing purposes, using the following PowerShell command:
function CreateCertificate($name, $path)
{

    Set-Location Cert:LocalMachineMy

    New-SelfSignedCertificate -Type Custom -Subject "CN=$name" -KeyUsage DigitalSignature -FriendlyName $name -CertStoreLocation "Cert:LocalMachineMy"

    $cert = Get-ChildItem "Cert:LocalMachineMy" | Where Subject -eq "CN=$name"

    $pwd = ConvertTo-SecureString -String DefineTheCertificatePasswordHere@2020 -Force -AsPlainText

    Export-PfxCertificate -cert $cert.Thumbprint -FilePath "$path.pfx" -Password $pwd

    Export-Certificate -Cert $cert -FilePath "$path.cer"

    Move-Item -Path $cert.PSPath -Destination "Cert:LocalMachineTrustedPeople"

}

CreateCertificate "luisdem" "cert"
To execute the command, open PowerShell_ISE.exe and press F5. The command creates the test certificate and copies it to the Trusted People folder.
It is important to notice that this test certificate should only be used to approve the application in a test environment. To distribute the application.
Now, that we have a certificate, we can inform the certificate to have the final MSIX package file automatically signed. It is not necessary to provide the installer file, as the tool monitors all changes made to the operating system.

Click on the Next button.
In this step, it is necessary to provide information such as the name of the package, the description that will be displayed to the user during installation, the name of the supplier (must be the same as the certificate) and the version number. Fill in the requested information:

Click on the Next button.
Is in this step that we need to install the application.

As we already have the VB3 installed, this is the moment to moving back the emulator and VB3 folders to the drive C root:

Click on the Next button only after completing the application installation and all settings.
On the next screen it is necessary to define which applications will be visible in the start menu.
As VB3 is a 16-bit application that depends on the 16-bit emulator, select only the otvdm.exe, as follows:

Notice that is not possible to provide the arguments for the otvdm.exe, i.e., C:VBVB.EXE. For now, we can ignore the arguments as we are fix that later.
Follows the expected result so far:

Click on the Next button.
The following screen is displayed at the end of the installation and asks for confirmation if the monitoring can be ended:

Click the Next button, as the application does not install any services:

At this point, it is necessary to inform where the package will be generated, as well as it is possible to edit the package before saving it.
Click on the Package editor button to check the package structure, as follows:

Click on Open file to check how the manifest was generated:

It is possible to edit the manifest information, such as processor architecture, application description, minimum supported version of Windows 10 and others.
Change the ProcessorArchitecture to “x86”, the DisplayName and Description attributes to “Microsoft Visual Basic 3.0”:

Notice that the Executable attribute doesn’t have the C:otvdm-master-1846, but instead it has the value VFSAppVPackageDriveotvdm-master-1846. The AppVPackageDrive is the folder inside the package that corresponds to drive C. The application will look for the file on C:otvdm-master-1846 but it will be redirected to the folder inside the package (VFSAppVPackageDriveotvdm-master-1846).
The only problem here, is that is no possible to pass arguments in this manifest file. So, we will need to use Package Support Framework (PSF) to fix that.
For now, just change the Executable value path to “PsfLauncher32.exe” that is part of the PSF.

We will now create an execution ALIAS to allow launching the application by typing or calling the VB.EXE command. To do this, add the following lines just below the line </uap:VisualElements>:
<Extensions>
        <uap3:Extension Category="windows.appExecutionAlias"
                        Executable="PsfLauncher32.exe"
                        EntryPoint="Windows.FullTrustApplication">
          <uap3:AppExecutionAlias>
            <desktop:ExecutionAlias Alias="VB.EXE" />
          </uap3:AppExecutionAlias>
        </uap3:Extension>
 </Extensions>
Follows how the manifest file must be defined:

Save the file and close Notepad to free access to the MSIX Packaging Tool Editor screen.
Click on Package files and check if all the files and directories listed are used by the application.
Remove unnecessary files or directories to reduce the package size:

It is at this step that we need to add the Package Support Framework files, to allow the PsfLauncher32.exe calling the emulator passing the arguments.
To proceed, download the PSF files (PSFBinaries.zip) available on GitHub:
Releases · microsoft/MSIX-PackageSupportFramework (github.com)

And extract the contents to a folder of your preference. I will extract to C:PSF:

In the same folder, create a config.json file with the following content:
{
   "applications": [
    {
      "id": "OTVDM",
      "executable": "VFS/AppVPackageDrive/otvdm-master-1846/otvdmw.exe",
      "arguments": "AppVPackageDrive/VB/VB.EXE",
      "workingDirectory": "VFS"
    }
  ]
}
The id corresponds to the Application Id defined in the application manifest, the executable contains the emulator path inside the package and the arguments the VB3 path inside the package.
Switch back to MSIX Packaging Tool. In the Package file tab, right click on Package folder and click on
Add file from the context menu:

Add all the files that finish with 32 and the config.json files to the project:

Click on the Create button to generate the package and inform where the file should be generated.
The following screen will display where the MSIX file was generated as well as the log file:

Install the Visual Basic 3 packaged with MSIX
Double-click the package to install the application:

You can now launch the application directly from Start menu:

That solution is compatible with MSIX App Attach for Windows Virtual Desktop on-premises or on Microsoft Azure.

I hope you like it!!!

Recent Comments