
by Contributed | Sep 30, 2020 | Uncategorized
This article is contributed. See the original author and article here.
On the 19th October at 1PM PDT, 9PM BST, Marko Paloski, a Microsoft Learn Student Ambassador from Ss. Cyril and Methodius University in Skopje, North Macedonia, and Jim Bennett, a Cloud Advocate from Microsoft will livestream an in-depth walkthrough of how to run cognitive services on IoT Edge on Learn TV.
The content will be based on a module on Microsoft Learn, our hands-on, self guided learning platform, and you can follow along at aka.ms/LearnLive/RunCognitiveServicesIoTEdge.
You can follow along with us live on October 19, or join the Microsoft IoT Cloud Advocates in our IoT TechCommunity throughout October to ask your questions about IoT Edge development and Cognitive Services containers.
Meet the presenters
 Marko Paloski
Microsoft Learn Student Ambassador, Ss. Cyril and Methodius University

Jim Bennett
Senior Academic Cloud Advocate, Microsoft
Session details
Cognitive Services brings AI within reach of every developer – without requiring machine-learning expertise. All it takes is an API call to embed the ability to see, hear, speak, search, understand and accelerate decision-making into your apps. As well as accessing these cognitive services via the cloud, you can also now download containers that run these services, and deploy them to devices via IoT Edge, allowing them to be accessed offline or in very low bandwidth scenarios..
In this Learn TV Live session, Marko and Jim will learn how to take a language detection cognitive service and deploy it to an IoT Edge device.
Ready to go
Our Livestream will be shown live on this page and at Microsoft Learn TV on Monday 19th October 2020.
This is a Global event and can be viewed LIVE at these times:
USA 1pm PDT
USA 4pm EDT
UK 9pm BST
EU 10pm CEST
India 1.30am (20th October) IST
by Contributed | Sep 30, 2020 | Uncategorized
This article is contributed. See the original author and article here.
Today, I worked on a service request when our customer wants to have an error file in case that any issue may happen running a bulk insert process in Azure SQL Database.
Unfortunately, every time that our customer execute the bulk insert process they faced the following error message:
Msg 4861, Level 16, State 1, Line 19
Cannot bulk load because the file “Error.Txt” could not be opened. Operating system error code 80(The file exists.).
Msg 4861, Level 16, State 1, Line 19
Cannot bulk load because the file “Error.Txt.Error.Txt” could not be opened. Operating system error code 80(The file exists.).
I reproduced the issue and I found the reason why our customer faced this error:
First of all, let’s try to create the example code:
CREATE MASTER KEY ENCRYPTION BY PASSWORD = 'Password123!!!!'
CREATE DATABASE SCOPED CREDENTIAL [JM_Scope] WITH IDENTITY = 'SHARED ACCESS SIGNATURE', SECRET = 'sv=2019-12-12&ss=b&srt=sco&sp=rwdlacx&se=2020-10-28T23:38:22Z&st=2020-09-29T14:38:22Z&spr=https&sig=24TJMAf1hOzE2DDVqw1QRs....'
CREATE EXTERNAL DATA SOURCE [JM_EXT_DSource] WITH ( TYPE = BLOB_STORAGE, LOCATION = 'https://myblobstorage.blob.core.windows.net/jmread', CREDENTIAL = [JM_Scope] );

CREATE EXTERNAL DATA SOURCE [JM_EXT_DSource_Error] WITH ( TYPE = BLOB_STORAGE, LOCATION = 'https://myblobstorage.blob.core.windows.net/jmread/error', CREDENTIAL = [JM_Scope] );

CREATE TABLE Table1 (ID INT)

BULK INSERT [dbo].[Table1]
FROM 'filetoread.txt'
WITH (DATA_SOURCE = 'JM_EXT_DSource'
, FIELDTERMINATOR = 't'
, ERRORFILE = 'error.Txt'
, ERRORFILE_DATA_SOURCE = 'JM_EXT_DSource_Error')
I modified the filetoread.txt with an incorrect values as follows in order to raise a conversion issue.
1
2
3
IK
The first time that I executed the process everything worked as expected and I got an error:
Msg 4864, Level 16, State 1, Line 19
Bulk load data conversion error (type mismatch or invalid character for the specified codepage) for row 4, column 1 (ID).
Completion time: 2020-10-01T00:42:10.9217117+02:00
As result of this issue I got two files:
-
Error.Txt that contains the data lines that are causing the error.
-
Error.Txt.Error.Txt that contains the number line and the error message with all details.
The second time that I executed the process I got another error message:
Msg 4861, Level 16, State 1, Line 19
Cannot bulk load because the file “Error.Txt” could not be opened. Operating system error code 80(The file exists.).
Msg 4861, Level 16, State 1, Line 19
Cannot bulk load because the file “Error.Txt.Error.Txt” could not be opened. Operating system error code 80(The file exists.).
This error is caused because if the ErrorFile exist in the destination folder there is not possible to overwrite and you need to delete the file. You have this information in this doc : “The error file is created when the command is executed. An error occurs if the file already exists. Additionally, a control file that has the extension .ERROR.txt is created. This references each row in the error file and provides error diagnostics. As soon as the errors have been corrected, the data can be loaded.“
Enjoy!
by Contributed | Sep 30, 2020 | Azure, Technology, Uncategorized
This article is contributed. See the original author and article here.
Hello Everyone!
We are exploring to provide a seamless integration with your EDU systems! If you currently use any Learning Management System (LMS), we would love to talk to you.
Please complete this 3 minute survey so we can better understand your context. Don’t forget to leave your email at the end of the survey (optional) if you want to be contacted by us to talk about the new features.
https://microsoft.qualtrics.com/jfe/form/SV_eu6fjkSPOHV4Ld3
Your feedback will be extremely helpful for us and will influence future improvements to the service.
Thank you,
Sagar Lankala
by Contributed | Sep 30, 2020 | Azure, Technology, Uncategorized
This article is contributed. See the original author and article here.
Nested ESXi is very useful for multiple reasons, can’t even begin to guess how many times I’ve done this and been able to demo something, test something, etc.. But keep in mind this is not supported by VMware, see this VMware KB article for the specific details. The supportability from VMware aside, nested ESXi works just fine and you can do this on Azure VMware Solution with relative ease… doesn’t get much better!! So let’s begin.
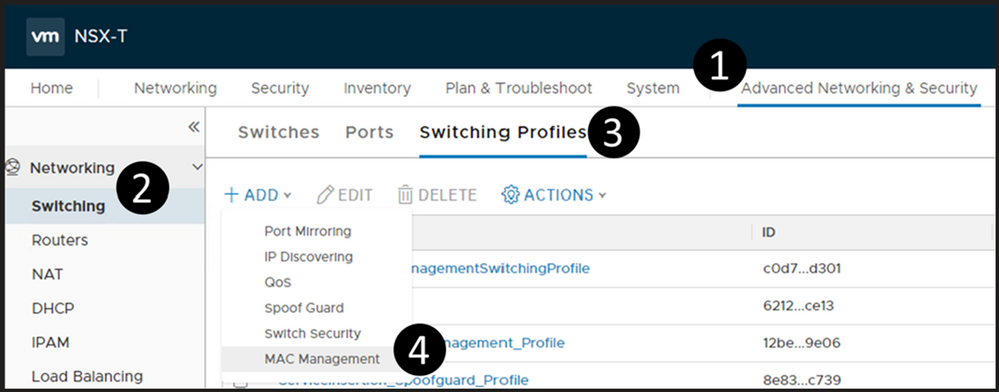
Segment Profile Creation
Log into your NSX manager in Azure VMware Solution and navigate your way to MAC Management as shown below.
Create a new MAC Management profile. Make sure you configure it as outlined below. Of course, you can choose whatever name you would like.

Deploy a Segment
The segment will be the network segment where you will have your ESXi vNIC(s) attached. You can have one segment or multiple, the critical thing here is for every segment created, create it as shown below.
Do steps 1-3 (DO NOT DO STEP 4 YET), then fill in as shown here, name it whatever you like. DO NOT Save.

Now, select Set Subnets (#4 from above)
Define whatever subnet you would like, you should end up with a screen as shown below. Then Apply.

Your screen should look like the picture below, if it does, then choose Save.

You should now be prompted as shown below, choose YES.

Now expand the segment profile section and change the MAC Discovery segment profile to the one which you just created and Save.

At this point you now have a NSX Segment (subnet) you can start to attach your ESXi hosts vNIC(s) to. Again, you may choose to deploy multiple segments, but this decision will be driven by your needs.
Nested ESXi Disk Requirement
In Azure VMware Solution I have found that you need to make your disk set to IDE. Any virtual hosts which get deployed needs to have their virtual device node changed to IDE.

by Contributed | Sep 30, 2020 | Uncategorized
This article is contributed. See the original author and article here.
Our team recently updated the items on the Microsoft 365 Public Roadmap. You can see our upcoming features and when those features will be available!
You can let us know what you think about these new features on Microsoft UserVoice. Join an existing thread or create a new one to tell us how to make Project better.
We also love feedback on existing features! If you have feedback, submit it by using the ‘Feedback’ button in Project for the web. Make sure to include your email so we can contact you directly with any follow up questions or comments. We also monitor the comments on all blog posts, so let us know what you think about this or other articles!
New Features:
-
Task Custom Fields: Store custom information about your projects efficiently by adding custom fields! For more information, check out the blog post on this feature.
-
Dynamics 365 Project Operations: Our team partnered with Dynamics to help launch Project Operations, a new application that has everything you need to run your service business. Check out our new features and capabilities released as part of wave 2 on October 1st. For more information on this product, check out the Project Operations overview page
-
Group by Assigned to: You can organize your tasks by assignee in the Board view. Get insight into what each person is working on! This feature should now be available to all Project users.
-
Self-Service Onboarding: Customers can make a self-service purchase online. New users can try out Project and other Microsoft solutions on their own! Check out the FAQ page for this feature to learn more.
Upcoming Features:
-
Project & Roadmap in Microsoft Teams: Starting in October, you’ll be able to add a project or roadmap as a tab in Teams. Chat with your teammates while viewing and updating your work.
-
Export to Excel: Export your project grid into an Excel spreadsheet. Share this information with colleagues and analyze Project data using the power of Excel!
-
Share projects with groups you don’t own: You can see all your added groups when you add a group to your project. Easily share your work with all the important people without creating new groups.
Answers to top questions:
Q: I was not able to attend Ignite this year, but I still want to watch some sessions! How can I do that?
Microsoft has several recorded sessions from Ignite that you can watch. Here are links to some of our favorites:
Also, we have some post-Ignite opportunities for customer connection. These conversations will run through October and cover a range of topics. You can find more information on these expert connects, including the list of events & the sign up page, on this site. The sign up form for these events can be found here.

Recent Comments