by Scott Muniz | Aug 6, 2020 | Uncategorized
This article is contributed. See the original author and article here.
If you’ve been using ADX dashboards, you know it is now in public preview. Thank you for your great feedback on ease of use, performance, and deep integration with the Web UI client. You can continue sending your feedback to adxdbdsup@microsoft.com. You can also provide feedback in the feedback box in the dashboard app.
In this update we will present the new ADX dashboards features and capabilities released on August:
Auto refresh
Due to popular customer request, we recently introduced the capability to auto refresh dashboards. This feature allows you to display your ADX dashboards on team and hallway monitors. The dashboards are refreshed regularly to see the latest data. This feature allows you to control the minimal time interval of continuous refresh to reduce the load on the ADX cluster.
Free text parameter
The new “free text” parameter type lets you specify a text value to be used when filtering your dashboards. This is very useful in high cardinality situations where it’s not practical to display thousands or even millions of filter values in the filter control.

Filter search
Filter search allows you to quickly and easily search for specific values in the filter drop-down. This prevents the need to scroll through the whole list of filter values to find the value you need.
Visual formatting options
Using the visual formatting options, you can easily customize various aspects of the visuals.
Sharing and permission improvements
In addition to adding support for AAD groups, we now also fully support guest users within AAD groups.
Stay tuned for more upcoming ADX dashboard features!
Thanks,
ADX Team
by Scott Muniz | Aug 6, 2020 | Alerts, Microsoft, Technology, Uncategorized
This article is contributed. See the original author and article here.
Final Update: Thursday, 06 August 2020 13:30 UTC
We’ve confirmed that all systems are back to normal with no customer impact as of 8/6, 13:00 UTC. Our logs show the incident started on 8/06, 10:00 UTC and that during the 3 hours that it took to resolve the issue customers could have experienced a delay in alerting.
-
Root Cause: The failure was due to some backend dependencies.
-
Incident Timeline:3 Hours – 8/06, 10:00 UTC through 8/06, 13:00 UTC
We understand that customers rely on Azure Monitor as a critical service and apologize for any impact this incident caused.
-Eric Singleton
by Scott Muniz | Aug 6, 2020 | Uncategorized
This article is contributed. See the original author and article here.
When designing queries and filters (WHERE) sometimes we need to convert some data before filtering, and depending on what you do you may get a bad plan.
Find below some scenarios
- 1 – Date filter
- 1.1 Solution – Using range filter
- 1.2 Solution – Using DATE data type
- 2 – Function on Column / TRIM function
- 2.1 Solution – Cleanup source data
- 2.2 Solution – Using like
- 2.3 Solution – Using computed column + index
- 3 – Implicit conversions
- 3.1 Solution – Using parameters with correct data type
Creating environment
To create a test environment you can use adventure works + this scrip to create a table with data types needed
DROP TABLE IF EXISTS dbo.[Customer_TEST]
GO

SET ANSI_NULLS ON
GO
SET QUOTED_IDENTIFIER ON
GO

CREATE TABLE [dbo].[Customer_TEST](
	[CustomerID] INT NOT NULL PRIMARY KEY IDENTITY(1,1),
	[NameStyle] [dbo].[NameStyle] NULL,
	[Title] [nvarchar](8) NULL,
	[FirstName] [dbo].[Name] NULL,
	[MiddleName] [dbo].[Name] NULL,
	[LastName] [varchar](50) NULL,
	[Suffix] [nvarchar](10) NULL,
	[CompanyName] [nvarchar](128) NULL,
	[SalesPerson] [nvarchar](256) NULL,
	[EmailAddress] [nvarchar](50) NULL,
	[Phone] [dbo].[Phone] NULL,
	[PasswordHash] [varchar](128) NULL,
	[PasswordSalt] [varchar](10) NULL,
	[rowguid] [uniqueidentifier] NULL,
	[ModifiedDate] [datetime] NULL
) ON [PRIMARY]
GO


INSERT INTO [dbo].[Customer_TEST]
	([NameStyle],[Title],[FirstName],[MiddleName],[LastName]
	,[Suffix],[CompanyName],[SalesPerson],[EmailAddress]
	,[Phone],[PasswordHash],[PasswordSalt],[rowguid],[ModifiedDate])
SELECT
	 NameStyle
	,Title
	,FirstName
	,MiddleName
	,LastName = CONVERT(VARCHAR(50),LastName)
	,Suffix
	,CompanyName
	,SalesPerson
	,EmailAddress
	,Phone
	,PasswordHash
	,PasswordSalt
	,rowguid
	,ModifiedDate
FROM [SalesLT].[Customer]
GO 100 -- LOAD 100x


CREATE NONCLUSTERED INDEX IX_Customer_TEST_LastName ON dbo.[Customer_TEST](LastName)
CREATE NONCLUSTERED INDEX IX_Customer_TEST_ModifiedDate ON dbo.[Customer_TEST](ModifiedDate)
GO
1 – Date filter
One classic scenario we see this is when customer is looking to filter data range or when you want to ignore the hour part of the datetime data type.
DECLARE @ModifiedDate DATETIME2(7) = '2009-05-16 16:33:33.077'
SELECT
     CustomerID
    ,ModifiedDate
    ,CONVERT(VARCHAR(10),ModifiedDate,120)
    ,CONVERT(VARCHAR(10),@ModifiedDate,120)
FROM dbo.[Customer_TEST]
WHERE CONVERT(VARCHAR(10),ModifiedDate,120) = CONVERT(VARCHAR(10),@ModifiedDate,120)
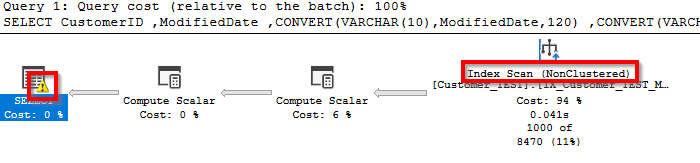
This conversion “CONVERT(VARCHAR(10),ModifiedDate,120)” converts full date + time to “YYYY-MM-DD” format. The problem here is that SQL will have to convert all values in the table to this format before filtering and will not use an index seek.
)_ - Micr.png")
The plan will show this conversion as a warning that you can quickly find this

1.1 Solution – Using range filter
Use some date math to create two parameters and do like sample below
DateColumn >= DAY 00:00:00 and DateColumn < DAY+1 00:00:00
DECLARE @ModifiedDate DATETIME2(7) = '2009-05-16 16:33:33.077'
SELECT
     CustomerID
    ,ModifiedDate
    ,STARTDATE = CONVERT(VARCHAR(10),@ModifiedDate,120)
    ,ENDDATE = CONVERT(VARCHAR(10),DATEADD(day, 1, @ModifiedDate),120)
FROM dbo.[Customer_TEST]
WHERE
    ModifiedDate >= CONVERT(VARCHAR(10),@ModifiedDate,120)
    AND
    ModifiedDate < CONVERT(VARCHAR(10),DATEADD(day, 1, @ModifiedDate),120)
GO
) - Micros.png")
1.2 Solution – Using DATE data type
If time part of the date is not needed for the business you can use DATE data type. It will also consume less space in disk as a bonus.
2 – Function on Column / TRIM function
Sometimes you are searching data that was not cleanup and you may have spaces before and after data and you need to TRIM data before you filter
DECLARE @LastName VARCHAR(50)= 'Gates'
SELECT *
FROM dbo.[Customer_TEST]
WHERE TRIM(LastName) = @LastName
GO
DECLARE @LastName VARCHAR(50)= 'Gates'
SELECT LastName, CustomerID
FROM dbo.[Customer_TEST]
WHERE TRIM(LastName) = @LastName
GO
You will get a Cluster Index Scan or Noncluster Index Scan ( If its not needed all columns (*) ) but on both ways you will never be able to get a SEEK
)_ - Micr.png")
2.1 Solution – Cleanup source data
You can cleanup empty spaces in the data before using it, like a big update in the source data and do not use function in the column side
DECLARE @LastName VARCHAR(50)= 'Gates'
SELECT LastName, CustomerID
FROM dbo.[Customer_TEST]
WHERE LastName = @LastName
2.2 Solution – Using like
If only right trim is needed you can use like with % wildcard at end.
*If you use % at start it will also avoid index usage and is not recommended
DECLARE @LastName VARCHAR(50)= 'Gates'
SELECT *
FROM dbo.[Customer_TEST]
WHERE LastName LIKE @LastName + '%'
)_ - Micr.png")
2.3 Solution – Using computed column + index
You can create a computed column and create noncluster index over the computed column.
*I also included LastName in index to avoid lookup when looking for original LastName without the trim
ALTER TABLE dbo.[Customer_TEST]
ADD LastName_Test AS TRIM(LastName)
GO
CREATE NONCLUSTERED INDEX IX_Customer_TEST_LastName_Test
ON dbo.[Customer_TEST](LastName_Test) INCLUDE (LastName)
GO
You can use the new column or the function used to create computed column and it will be using the index automatically.
This is good because you can fix the performance issue without changing the code. Be aware that as you are adding new column and may affect queries using * to return all columns. That is also not a best practice
)_ - Micr.png")
3 – Implicit conversions
You should always match the parameter in procedures / application with the table data type. Depending on the data type you have SQL will have to convert the source data and will cause performance issues and avoid index usage
DECLARE @LastName VARCHAR(50) = 'Gates'
SELECT LastName, CustomerID
FROM dbo.[Customer_TEST]
WHERE LastName = @LastName
GO
DECLARE @LastName NVARCHAR(50) = 'Gates'
SELECT LastName, CustomerID
FROM dbo.[Customer_TEST]
WHERE LastName = @LastName
)_ - Micr.png")
This implicit conversion is shown as a warning

SQL will use Data Type precedence to check if data need to be converted and what the destination.
In this sample you should convert VARCHAR to NVARCHAR, because you can lose information if you convert NVARCHAR to VARCHAR
https://docs.microsoft.com/en-us/sql/t-sql/data-types/data-type-precedence-transact-sql
 - SQL Server _ Microsoft Docs and 2 more pag.png")
3.1 Solution – Using parameters with correct data type
As said before match the parameter in procedures / application with the table data type
by Scott Muniz | Aug 6, 2020 | Uncategorized
This article is contributed. See the original author and article here.
System Center team at Microsoft is committed to partner with customers in their journey to modernize their data centers. We are excited to announce that Update Rollup 2 (UR2) for System Center Virtual Machine Manager (VMM) 2019 is just released and it is packed with exciting new features!
VMM 2019 UR2 release includes new features and bug fixes. In this blog, we will introduce you to all the new features in this release. For a quick update on all the bugs fixed in this release, please refer to the KB article here. System Center team is also working on next Update Rollup (UR3) for SCVMM 2019.
Following are the new features released in SCVMM 2019 UR2:
- Support for managing Windows Server 2012 R2 hosts
- Support for managing VMware vSphere 6.7 ESXi hosts
- Support for new Linux versions as guest OS
- Ability to set affinity between vNICs and pNICs
- IPv6 Support for SDN
- Simplifying Logical Switch Creation
Support for managing Windows Server 2012 R2 hosts
We understand that some enterprises might be using hardware that is not capable of being upgraded to latest Windows Server OS and hence these enterprises face the challenges of managing host servers on various Windows Server OS versions. To make the Windows Server management easier for such enterprises, VMM 2019 UR2 now supports managing 2012 R2 hosts.
Enterprises can now manage Windows Server 2012 R2 servers as hosts, SOFS and remote library shares in addition to the already supported versions of Windows Server 2016 and Windows Server 2019 OS servers. For details of all the hardware OS versions supported, please refer to the documentation here.
Windows Servers in the VMM fabric
|
Operating System
|
Hyper-V Host
|
SOFS
|
Remote Library Server
|
Update Server
|
PXE Server
|
|
Windows Server 2012 R2 (Standard and Data Center)
|
Y
|
Y
|
Y
|
N
|
N
|
Support for managing VMware vSphere 6.7 ESXi hosts
We are glad to announce that SCVMM 2019 UR2 now extends management support to ESXi 6.7 hosts and vCenter 6.7. Enterprises that have both VMware and Hyper-V environments can make use of this feature in VMM so that both VMware and Hyper-V hosts can be managed within the same fabric management tool. Also, customers looking to migrate their VMware environments to Hyper-V can make use of our support for vSphere 6.7 so that there is seamless migration. For more details on ESXi server support, please refer here.
VMware servers in the VMM 2019 fabric
|
VMware
|
Versions Supported
|
|
ESX/ESXi
|
ESX/ESXi 5.1, 5.5, 6.0, 6.5, 6.7
|
|
vCenter
|
5.1, 5.5, 5.8, 6.0, 6.5, 6.7
|
Support for new Linux versions as guest OS
In SCVMM 2019 UR2, we have added support for the following Linux versions as guest OS:
- Red Hat 8.0
- Centos 8
- Debian 10
- Ubuntu 20.04
Ability to set affinity between vNICs and pNICS
VMM 2019 UR2 now supports affinity between vNICs and pNICs. Affinity between vNICs and pNICs brings in flexibility to route network traffic across teamed pNICs. With this feature, customers can increase throughput by mapping RDMA capable physical adapter with a RDMA settings enabled vNIC.
Use Cases
- Customers can route specific type of traffic (eg: Live Migration) to a higher bandwidth physical adapter.
- In HCI deployment scenarios, by specifying affinity, customers can leverage SMB multichannel to meet high throughput for SMB traffic.
Pre-Requisites to set Affinity between vNICs and pNICs
- Logical Switch is deployed on a host
- SET teaming property is enabled on the logical switch.
Configuration
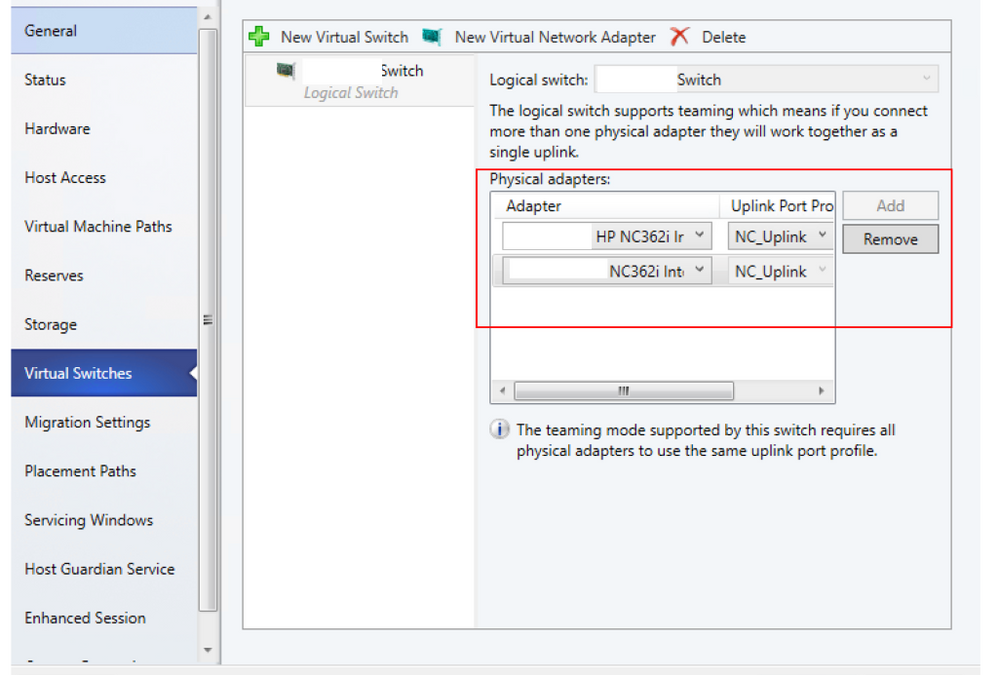
- Open Fabric > Servers > All Hosts > Host group > Hosts > Host. Right-click Host, select Properties, and navigate to Virtual Switches tab.
- Verify that the physical adapters to be teamed are added here. Affinity can be mapped only for physical adapters that are added here.

- Click New virtual network adapter to add a new vNIC to the virtual switch
- By default, the affinity value is set as None. This setting corresponds to the existing behavior, where the operating system distributes the traffic from vNIC to any of the teamed physical NICs.
- Set the affinity between a vNIC and physical NIC by selecting a physical adapter from the drop-down menu. Once the affinity is defined, traffic from the vNIC is routed to the mapped physical adapter.

- For more information on vNIC to pNIC mapping, please refer to the documentation here.
IPv6 Support for SDN
VMM 2019 UR2 now supports IPv6 for SDN deployments. IPv6 support is another exciting feature that helps our customers in their journey to modernize their data centers.
Advantages of IPv6 over IPv4
IPv6 was mainly created to overcome the IP address space limitation posed by IPv4. Apart from increasing the number of available IP addresses, IPv6 also provides some other advantages like Improved Security and Auto-Configuration. Customers can now enable IPv6 using VMM in their SDN deployments.
Regulatory and Compliance Requirements
IPv6 support for SDN not only helps the SC VMM customers who want to take advantage of IPv6 features but also helps the customers who want to have IPv6 support for meeting regulatory and compliance requirements.
Configuration
To enable IPv6 for SDN deployments, the required changes to setup NC (Network Controller) Gateway, MUX, and SLB (Load Balancer) are highlighted below. In this blog, we will cover the key configuration changes needed for IPv6 support at a high level. For a more detailed explanation about various IPv6 SDN configuration options, please refer to the documentation here.
Create the HNV provider network and Create the IPv6 address pool
- Start the Create Logical Network Wizard. Type a name and optional description for this network.
- In Settings, select the network type as Virtualized Network and choose Microsoft Network Controller managed Network virtualization (SDN v2).

- Right-click the HNV Provider logical network > Create IP Pool.
- Provide a name and optional description, and ensure that the HNV Provider logical network is selected for the logical network.
- In Network Site you need to select the subnet that this IP address pool will service.
Note: To enable IPv6 support, add an IPv6 subnet and create IPv6 address pool. To use IPv6 address space, both IPv4 and IPv6 subnets should be added to the network site.
VM Network
- When you create VM network, to enable IPv6 support, select IPv6 from the dropdown ‘IP address protocol for the VM network’. Please note that dual stack (IPv4 + IPv6) support is not available for VM networks in the current release.

SLB (Load Balancer)
- To use IPv6 address space, add IPv6 subnet to network site and create IPv6 address pools for the private and public VIP networks.
- Add IPv6 address pools when you onboard an SLB service

Gateway
- While creating GRE VIP logical network, add IPv6 subnet site and create IPv6 address pool.
- While onboarding Gateway service, click on ‘Enable IPv6’ checkbox and select IPv6 GRE VIP subnet that you have created previously.
- Also select public IPv6 pool and provide the public IPv6 address

Site to Site VPN connection
- To enable IPv6 for site to site VPN connection, routing subnet must be both IPv4 and IPv6. For gateway to work in IPv6, Provide IPv4 and IPv6 addresses separated by ‘;’.

Simplifying Logical Switch Creation
Simplifying Logical switch creation is the second step in our journey to simplify VMM networking for our customers. In 2019 UR1 release, we simplified the process to create logical networks. In 2019 UR2 release, we have made it easier for the customers to configure logical switches.
Based on the feedback we received from the customers with respect to VMM networking, we understood that we need to provide the following to make it easier for the customers to configure VMM networking:
- Smart Defaults and Visual Representations
- Clear explanation of different options
- Topology View
Smart Defaults and Visual Representations
General Screen
In General Screen, the default uplink mode is now shown as Embedded Team. There is now clear explanation suggesting the users to use “Embedded Team” as uplink mode for Windows Server 2016 and above. Similarly, there is explanation suggesting the users to use “Team” as uplink mode for Windows Server 2012. There are also visual representations for “Embedded Team” and “Team” options so that it is more clear for the customers.


Extensions Screen
In the Extensions Screen, the default option is now not to have any extensions pre-selected.

Uplink Screen
In the Uplink screen, we now show only the relevant load balancing algorithms corresponding to the Uplink mode selected. If the customers choose Embedded Team as the uplink mode, then the only supported load balancing algorithms are Hyper-V Port and Dynamic and the default is Hyper-V Port. When the user moves the cursor on Hyper-V Port and Dynamic algorithms, then we show user friendly informational message that Hyper-V Port is the highly recommended algorithm.
Clear explanation of different options
Settings Screen
In Settings Screen, we have now provided explanation for various options related to Minimum Bandwidth mode. As the customer changes the minimum bandwidth mode, the corresponding explanation also changes.


Virtual Port Screen
In Virtual Port Screen, we now show the mapping of Port Classification to Port Profile.

We have also simplified the text and layout of the screen where the customers add port classification and port profile as shown below.

We have now added a check and user-friendly error message when the customer tries to proceed to the next screen by only adding port classification and not port profile.

Topology View
Once the logical switch is created, then the customer can right click on Logical Switch name and then click on View Topology option to view the topology.

The topology diagram shows the uplink port profiles and virtual network adapters for this logical switch.

Uplink Port Profiles – Information regarding Load Balancing Algorithm, Teaming Mode and Network Sites is shown in the topology diagram.

Virtual Network Adapters – Information regarding VM Networks, VLANs and Port Classifications is shown in the topology diagram.

We also want to notify our customers that Logical Network Simplification (introduced in 2019 UR1) and Logical Switch Simplification (introduced in 2019 UR2) are just intermediate steps in simplifying VMM networking and our end goal is to have a revamped UX/UI for networking section so that users can easily and intuitively configure VMM networking settings.
by Scott Muniz | Aug 6, 2020 | Alerts, Microsoft, Technology, Uncategorized
This article is contributed. See the original author and article here.
The year 2020 has started eventfully, and it continues to present challenging times for people, businesses, and economies around the world. As our CEO Satya Nadella puts it, “We have seen two years of digital transformation in two months.” Azure Database for MySQL service is at the heart of this transformation, empowering online education, video streaming services, digital payment solutions, e-commerce platforms, gaming services, news portals, government and healthcare websites to support unprecedented growth at optimized cost. It’s immensely satisfying to see Azure Database for MySQL enable our customers to meet growing demands for their services during these critical times. Azure Database for MySQL service, with community version of MySQL, is powering mission critical services such as healthcare services for citizens of Denmark, digital payment application for citizens of Hong Kong, music and video streaming platforms for citizens of India, Korea, and Japan, online news websites, and mobile gaming services including our very own Minecraft Realms.
MySQL – Popular choice for Internet scale web or mobile applications
MySQL is a popular choice of database engine for designing internet scale consumer applications, which are highly transactional online applications with short chatty transactions against a relatively small database size. These applications are typically developed in Java or php and migrated to run on Azure virtual machine scale sets (VMSS) or Azure App Services or are containerized to run on Azure Kubernetes Service (AKS). The database is typically required to scale high volume of incoming transactions. Most of our customers leverage proxysql load balancer proxy and read replicas to scale out and meet the workload demands for their business. MySQL versions 5.7 and 8.0 continue to be popular choices among our customers for meeting their performance and scale goals.

What’s new in Azure Database for MySQL?
Over the last six months, we’ve focused on enhancing security and governance for customers, simplifying performance tuning, and reducing cost for our customers in addition to increasing the regional availability of our optimized large storage platform with 16-TB storage and 20K IOPs scale. This aligns with our promise of making Azure the most secure and trusted cloud for our customers. A complete list of all the features we’ve released is available via Azure updates, but I’ll summarize a few important updates below.
Enterprise Grade Security, Compliance & Governance
- Data encryption at rest using customer managed keys. Since we launched Azure Database for MySQL to public, all customer data is always encrypted at rest using service managed keys. The service is fully compliant with PCI DSS, HIPAA and FedRAMP certifications. With this release, we allow our customers to bring their own key for data encryption of their data at rest. This was one of the highly requested ask by our finance, healthcare industry and government customers to meet their compliance and regulatory requirements. Learn more about this feature here.
- Infrastructure double encryption. The feature provides an additional layer of protection for customers’ data at rest. Infrastructure double encryption uses the FIPS 140-2 validated cryptographic module, but with a different encryption algorithm. The key used in Infrastructure Double encryption is managed by the Azure Database for MySQL service. Infrastructure double encryption is not enabled by default since the additional layer of encryption can have a performance impact. Learn more about this feature here.
- Minimum TLS version enforcement ability. Azure Database for MySQL currently support TLS v1.0, 1.1 and 1.2. Our recommendation is to upgrade to TLS version v1.2 to enhance security, and with this feature, we allow customers to control and enforce the right behavior for their MySQL servers from the server side. Server administrators can simply go in the Azure portal and set the minimum TLS version on the server side to meet the compliance. Security administrators can define right policies at the subscription or organization level using Azure Policy to ensure the minimum TLS version for all the MySQL servers in the Azure subscription meets the compliance and regulatory requirements defined by the organization. Learn more about this feature here.

- Private Link for Azure Database for MySQL. Azure Private Link is the most secure way to isolate and connect to Azure Database for MySQL either within the same Azure region or across regions. Customers can also use this feature to disable public endpoints, which ensures that there aren’t any connections coming from public endpoints. Learn more about this feature .
- Azure Active Directory Authentication for Azure Database for MySQL. Azure Active Directory authentication allows customersdatabase by using identities defined in Azure AD and manage credentials in a central place. For consistent role management, database access can be managed by using Active Directory groups, as well as . Learn more about this feature here.
- Governance capability by enforcing Azure policies – All of the above security features are opt-in and driving the right security practices and behavior is a shared responsibility. To standardize and enforce these security controls at an organization level, customers can leverage Azure Policy. Azure Policy is an Azure service that is used to create, assign, and manage policies. These policies enforce different rules and effects on resources to ensure that they stay compliant with corporate standards and service level agreements. Azure Policy meets this need by evaluating resources for non-compliance with assigned policies, at the same time ensuring that all data stored by Azure Policy is encrypted at rest. We are glad to announce the integration of Azure Database for MySQL with Azure Policy to enforce these compliance requirements at scale.
We’ve created an Azure Policy GitHub repository that contains quick-start samples from the community. For more information about using these sample policies, see the article here.
Intelligent Performance
Besides the security controls, the engineering team focused on making life easier for devops team who are tasked to manage the performance of large fleet of servers. Intelligent performance is our differentiated feature which includes query store, query performance insight, and performance recommendations. Intelligent performance allows devops teams to better understand their workloads, visually inspect them and identify bottlenecks, and to see a list of recommendations for improving the performance of database workloads.
For some canonical workloads like WordPress, we are taking a step forward to allow users to configure an optimized performance configuration for their Azure Database for MySQL server using resource tags. To take advantage of this feature and drive performance optimizations for WordPress applications, users can simply set the following resource tag on Azure Database for MySQL server used for WordPress application at time of server creation. Learn more about this feature here.
- Name: AppProfile
- Value: WordPress
We are constantly using pattern analysis to programmatically analyze metrics telemetry of servers and provide targeted Advisor recommendation which can enable users to improve performance of their MySQL servers out of the box without any code changes. The recent recommendation which we added is to increase tmp_table_size and max_heap_table_size values for servers which are impacted by temp tables spills to storage. The increase in the server parameter values for those impacted servers can improve overall workload performance out of the box. For Azure Database for MySQL servers impacted by temp table spills to storage, customers will see the recommendation to increase the values in Advisor recommendation blade in the portal. Learn the latest about this feature here.
As scale demands of the workload increases, customers can leverage read replicas to scale-out and proxysql to transparently split the reads and writes from the application. In some scenarios, there may still be high amount of thread churn inside the server with short burst of highly concurrent transactions limiting the transaction throughput due to high cpu contention. To minimize this and improve the performance out of the box, we released thread pool feature which can be enabled using server parameters in Azure Database for MySQL service. Learn more about this feature here.
Cost Optimization
Reducing cost is top in the mind of customers and therefore, it is a top priority for us too. We released few features in this area to ensure customers are provisioning the right size for their workloads and benefit from capacity commitments. This is an active area of investment for us and we are committed to do more in this area so please stay tuned.
- Recommendation to optimize cloud spend – The Recommendations feature gives daily insights about the database server to help users optimize performance and cost. Azure Advisors is a personalized cloud consultant that helps users follow guidelines to optimize their Azure deployments. We started off with Performance based recommendations, but we have now expanded the portfolio to include cost optimization recommendations through right sizing and Reserved instance.
- 3 years RI expansion – We started off by providing 1-year RI announced in Microsoft Ignite 2019. However, learning from the feedback from customers we have quickly expanded the support for 3 years RI as well to let customer save cost for long term commitments. Learn more about reserved instances and its use here.
Large Storage with up to 16TB storage. With our new storage infrastructure that supports up to 16TB, we have done bunch of optimizations in the storage engine including switching to snapshot-based backups. The 16 TB storage also supports IOPs up to 20K IOPs for higher concurrent scaling. In a subset of Azure regions, all newly provisioned servers can support up to 16-TB storage and 20K IOPs. We are also working towards rolling out this storage infrastructure in remaining Azure regions which will be the default storage option going forward.
Getting Started with Azure Database for MySQL Service
Users new to Azure Database for MySQL can get started by leveraging the following QuickStart articles:
The connection to Azure Database for MySQL requires users to specify the username in the format username@servername. For more information on this requirement, read more here.

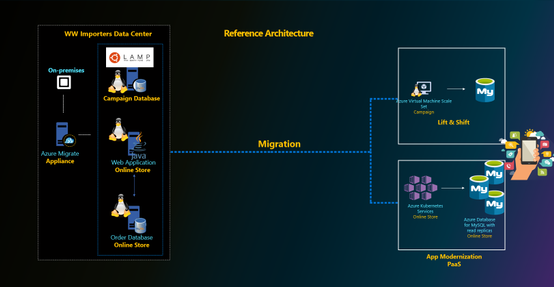
Migrating to Azure Database for MySQL service
Customers looking to migrate their database to Azure Database for MySQL can use the
- Dump and Restore – For offline migrations where users can afford some downtime, leverage dump and restore using community tools like mysqldump/mydumper. Read more in our documentation. For migrating large databases, leverage the best practices shared by our field customer engineer working closely with some of our mission critical customers.
- Azure Database Migration Service – For seamless migrations to Azure Database for MySQL service with minimal downtime, customers use the Azure Database Migration Service. Learn more about this service in our documentation. The best practices for migrating MySQL databases using Azure Database Migration service can be found here.
- Data-in replication – For minimal downtime migrations, data-in replication which relies on binlog based replication can also be leveraged. Data-in replication is preferred for minimal downtime migrations by hands-on experts who are looking for more control over migration. You can read more in our documentation.
To migrate users from an existing environment to a Azure Database for MySQL server, leverage the script documented here.
Planned Maintenance Notification
If you want to get alerted for upcoming planned maintenance to your Azure Database for MySQL server, we recommend subscribing to planned maintenance notification. Learn more about this feature here.
Stay updated
To stay updated around the latest development with Azure Database for MySQL service, we recommend the following:
Feedback
We are constantly looking at ways to improve our service and prioritize highly requested items. If you have any feedback, you can leverage the following forums:
- UserVoice
- Use Azure Portal to leave us your feedback

Questions
If our documentation fails to provide clarity, we encourage customers to contact us with questions.
Support
For support with an existing Azure Database for MySQL server, use the Azure portal to open a support request with us.

Recent Comments