by Scott Muniz | Aug 7, 2020 | Uncategorized
This article is contributed. See the original author and article here.
The Workplace Analytics team is excited to announce our feature update for August 2020. (You can see past blog articles here). This month’s update gives you a preview of something to come!
Coming soon
- Workweek Span and Person and Person-to-Group Network Metrics will now include Teams chat and data
Coming soon: Teams metrics
With the recent shift to remote work, large numbers of users are relying on Teams for much of their remote collaboration. In other words, communication over Teams is at an all-time high. To improve the accuracy of metrics within Workplace Analytics, we are soon adding Teams chat and call data to Workplace Analytics metrics.
Data about calls and chats will now be reflected in several metrics, including Workweek Span. This will improve the quality of data that’s available to analysts by more truthfully delineating the actual workweek span of users. Here is the complete list of metrics that are being updated:
|
Metric
|
Brief description
|
|
Internal network size
|
The number of people within the company with whom the person had at least two meaningful interactions in the last four weeks.
|
|
Networking outside organization
|
The number of distinct organizations within the company that the person had at least two meaningful interactions with in the last four weeks.
|
|
Networking outside company
|
The number of distinct external domains outside the company a person has had at least two meaningful interactions in the last four weeks.
|
|
Workweek span
|
The time between the person’s first and last sent email, IM, Teams call, or meeting attended for each day of the workweek.
|
|
Network size
|
The number of people in the collaborator group who had at least two meaningful interactions in the last four weeks with the time investor.
|
Note: For complete definitions of these metrics, see Metric descriptions for Workplace Analytics.
By using these new metric values, you’ll be able to more accurately analyze connectedness across the company, analyze changes in the workweek span, gauge the effect of Teams in improving organizational connectivity, and support Business Continuity scenarios.
To request early access
We are planning to release this change on August 20, 2020. If you want early access to the updated metric values complete the Teams metric changes preview form and we’ll activate the new metric values for your organization. It might take up to four business days to activate the new metric values and we will send you a confirmation email after they’ve been activated.
Note that these new metrics will not affect any of the results of your previously saved queries. But they will go into effect for all new queries (including any queries that auto-refresh) retroactively.
by Scott Muniz | Aug 6, 2020 | Alerts, Microsoft, Technology, Uncategorized
This article is contributed. See the original author and article here.
Have you been following along with all the changes in Azure Active Directory (AD)-land and the various Microsoft Identity branded things?
(Especially since my epic series on all things Azure AD B2C?)
The changes and new features are amazing but change can be confusing. So let’s have a little chat about Azure AD and Microsoft Identity.
The Quick Tour
OK – so I’m going to level with you… the way things are named in Microsoft’s Identity Platform is a little bit… well, confusing.
I just illustrated my own point – I said Microsoft Identity Platform without introducing it first. What in the world does that even mean?
Microsoft uses the term Microsoft Identity Platform as the next evolution to the Azure Active Directory Developer Platform. It’s the all encompassing term for building apps with Azure AD.
The official Microsoft Identity Platform docs are good. Surprisingly good. But, you still need to know what you’re talking about before really grabbing and retaining info from the docs.
So let’s take the quick tour around Azure AD and Microsoft Identity XXX and try to remove any confusion around process and terms.
Azure AD Sign-In Overview
The super high level overview of Azure AD is that it is an Identity Provider (or IdP).
It verifies your users are who they say they are – and one way can be by username and password.
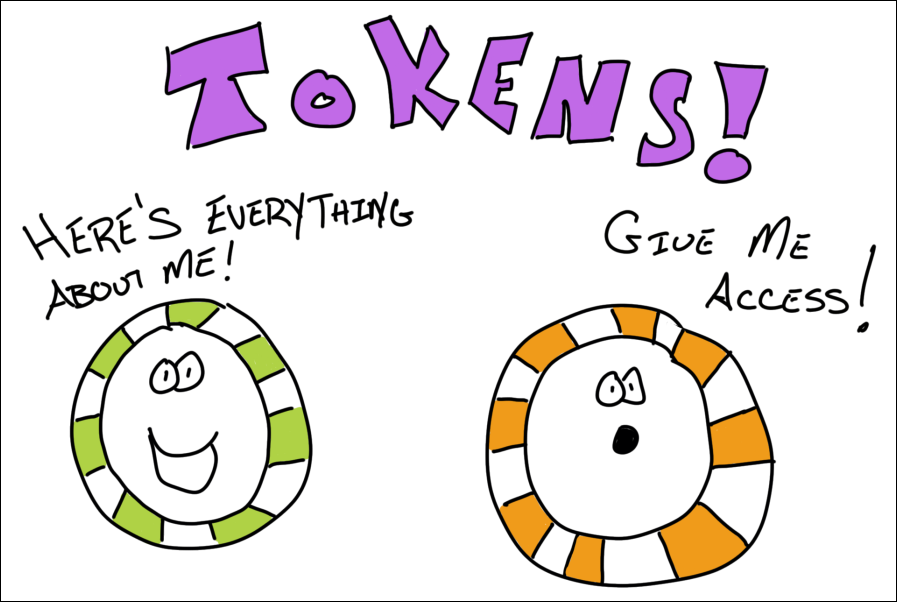
After it successfully verifies the user, it returns two tokens. A Token is a Base64 encoded string (also known as a JSON Web Token (JWT), which is just a standard) that has information in it about the user.
That info is known as Claims.
Think of it as… a user signs in, Azure AD verifies they are who they say they are, and returns 2 tokens full of information that Azure AD claims is true about that user.
Oh – and those 2 token flavors? One is known as an Identity token. And the other is an Access token. An Identity token has information about the user. And an Access token is used to gain access to other resources – like a Web API.

There’s more to it than that – but that’s the gist. And those are also the standard terms you’ll see docs and blogs throw around when talking about signing in users.
Communicating with Azure AD
This is where we could get deep, deep into the details – so I’ll do my best not to.
There are industry standards that Azure AD implements that allow your app to talk to it.
You’ve probably heard of some of them before – like OpenID Connect or OAuth.
For our discussion, these aren’t important other than to know Azure AD supports them.
Supporting them means somebody else can write an SDK to abstract away all the intricacies of implementing the standard yourself to do the communication. That’s a big deal, you don’t want to mess up people signing in to your app.
Specifically, the sign-in request to Azure AD will be directed at an endpoint. And this is where things get confusing.
There used to be v1 endpoints. Now there are v2 endpoints. And you may even hear folks talk about Microsoft Identity Platform endpoints.
But endpoints are really a part of Azure AD Applications…
Azure AD Applications
You can think of an Azure AD Application as a representation of your “real” app in Azure AD.
So let’s say you had a todo list application. That application has a web app, mobile app, and a web API.
Within Azure AD, you would have 2 applications. One to model the frontend apps. The other to model the web API.
Why a separate one to model the web API?
This goes back to those access tokens from before.
The user of the frontend app will authenticate with Azure AD and get an access token that will be passed to the web API to get access to it.
That access is granted by a Scope. It’s a portion of the backend’s functionality that is scoped out for other application’s to use.
So through the Azure AD portal, you create (or expose) a scope (or API permission as it will sometimes be called) for the backend’s Azure AD Application.
Then the frontend application is granted permission to that scope (again through the portal).
When the user signs in – they will be asked to Consent to the backend scope being used.
If you’ve ever used your Twitter credentials to signup for an account on another service, you’re already familiar with the consent screen. It’s the “Application ABCD wants to read your timeline”.
Your code is responsible for asking for the particular scope needed when signing-in to the frontend. And on the backend, your code is responsible for checking any authorization. Scopes tell you what’s going to happen, but leave the implementation details up to you.
Azure AD Application Types and Endpoints
Ok, to make Azure AD Applications a bit more confusing, there are a bunch of different types of them.
V1, V2, and Microsoft Identity Platform applications.
To get this out of the way – V2 and Microsoft Identity Platform applications are exactly the same thing. Just a rebranding, if you will.
V2 applications are a newer version of Azure AD Applications than V1.
They support more functionality, such as the ability to sign-in with corporate, personal (hotmail or xbox), or even Azure AD guest credentials. (And there’s a bunch more).
If you’re doing anything new – you pretty much don’t have a choice but to use V2 applications. And that’s a good thing.
If you’re supporting V1 apps – that’s fine too! Just know that when you start reading about the functionality and features of Azure AD applications, you need to know which version you’re on.
And which SDKs you can use depends on the Azure AD Application version – we’ll get to that.
Sometimes you’re going to hear about V1 and V2 endpoints. Well, a V1 application calls V1 endpoints and a V2 application calls V2 endpoints.
The functionality of what V1 and V2 applications can do really is dictated by the endpoints.
So you’ll hear Azure AD Application and Azure AD Endpoint versions mentioned interchangeably.
You do need to tell the SDK about the endpoint’s address. And there’s a couple variations of that (which will be covered in the next article). But know that you don’t have to invoke it directly – the SDK will take care of that for you.
And that brings us to…
The SDKs
If the various different types of Azure AD Applications and Endpoints and the terms that different but mean the same thing didn’t scare you off – wait until you see the SDKs.
First off – the SDKs are Amazing with a capital A. You can get down and dirty with the low-level specifics of handling authentication – or keep it nice and easy. Your choice.
But with choice comes… confusion?
First off – the folks who are developing the SDKs are awesome and creating them for all types of platforms. iOS, Android, .NET, JavaScript, even Python and Ruby.
Here’s what you need to know.
There’s a library called ADAL. It’s used for V1 applications. But… You don’t need to use it any longer. It still works, but if you can transition off it, may as well.
That’s because…
There’s another library called MSAL. This is for both V1 and V2 applications. It’s modern. Actively being developed. Open-sourced. Works for Azure AD and B2C (I know, we didn’t even talk about B2C – ON PURPOSE!).
You can get low-level with MSAL and it’ll do whatever you need.

But if you don’t need to get super duper low level (and you’re developing web apps)…
There’s yet another library called Microsoft.Web.Identity. This is brand new and is still in preview at the time I’m going to publish this article.
This library wraps a lot of the functionality that’s present in MSAL and it just works in tandem with ASP.NET Core.
There are even dotnet new templates for it that install the appropriate NuGets and boilerplate code.
Microsoft.Web.Identity uses MSAL under-the-hood. It’s just abstracted away.
The Talk…
That’s it!
Everything demystified, right?
Azure AD is amazingly powerful, we only touched the tip of the tip of the tip of the iceberg here. But it should give you enough info to start digging into the documentation and blogs and have a level-set of what they’re talking about.
If not – and you have questions – is there a better way for me to explain it – leave a comment! DM me on Twitter. This stuff can be confusing and having a plain ‘ol talk is the best way to lay it all out.
There’s going to be a couple of follow-up posts to this one.
The first will be creating an Azure AD Application for a .NET web app using `Microsoft.Identity.Web` and signing in.
The next will be gaining access from that app to a web API.
Then use a SPA to get access to that same web API.
Until then…
by Scott Muniz | Aug 6, 2020 | Uncategorized
This article is contributed. See the original author and article here.
Controlling the number of recipients per message that your users can send to is one of several measures email admins can use to help curtail the risk of email abuse and spamming from compromised accounts. Earlier this year the Exchange Online Transport team introduced customizable Recipient Limits in Exchange Online. With it you can customize the setting on a mailbox or mail user object, you can bulk edit multiple existing mailboxes or mail users at the same time, and you can even set the default for new ones. Yet, that update didn’t offer a single, master tenant-wide setting. It gave Exchange Online admins more control than they had before, but it still wasn’t as comprehensive as what Exchange Server on-premises offers.
Today we’re announcing the immediate availability of a super useful extension of the mailbox customizable recipient limits feature that helps deliver a more complete solution: The ability to use Remote PowerShell to customize a tenant-wide recipient limit with the MaxRecipientEnvelopeLimit property on the TransportConfig object (Set-TransportConfig -MaxRecipientEnvelopeLimit).
Similar to how it works in Exchange Server on-premises, the MaxRecipientEnvelopeLimit property is the authoritative or fall back setting for recipient limits when a mailbox’s or mail user’s RecipientLimits property is set to “Unlimited”. Now, just because it says ”Unlimited” doesn’t mean that it is. It actually means “fall back to the next higher level setting,” which for a mailbox or mail user is to fall back to the value on the tenant-level setting, the tenant’s TransportConfig MaxRecipientEnvelopeLimit setting. And “Unlimited” on the tenant-level setting, in turn, means to “fall back to the Exchange Online service-level setting” – which in the Exchange Online multi-tenant environment is currently 1,000 recipients.
Here are the guiding principles in pseudo-code style that the Exchange Online service uses to determine the maximum number of recipients a sender can send to per message:
- If the mailbox or mailuser RecipientLimits property value
- Is a numeric value then
- Use that value as the maximum number of recipients a sender can send to per message
- Else if the mailbox or mailuser RecipientLimits value is “Unlimited” then
- Use the tenant-level setting (the value on the MaxRecipientEnvelopeLimit property on the tenant’s TransportConfig) instead
- If the tenant-level setting is also “Unlimited” then
- Use the Exchange Online service-level setting (1000 as of this writing)
Note: It’s easy to fall into the mistake of thinking that the tenant-level setting is the most-restrictive setting regardless of what the mailbox or mailuser setting is. But that’s not true. As shown above, the only time the tenant-level setting is used is if the mailbox or mailuser setting is “Unlimited.” This is the same as how it works in Exchange Server on-premises.
Here are several examples of how this works:
|
Mailbox Setting
|
TransportConfig Setting
(tenant-level)
|
Behavior
|
Explanation
|
|
Set-Mailbox Mailbox1
-RecipientLimits 50
|
Set-TransportConfig
-MaxRecipientEnvelopeLimit 1000
|
Mailbox1 can send to a maximum of 50 recipients per message.
|
The mailbox setting is authoritative because the rule is if the mailbox setting is a numeric value (it’s 50) then use that. The tenant-level setting for this mailbox is thus ignored.
|
|
Set-Mailbox Mailbox1
-RecipientLimits 50
|
Set-TransportConfig
-MaxRecipientEnvelopeLimit 10
|
Mailbox1 can send to a maximum of 50 recipients per message.
|
The mailbox setting is authoritative because the rule is if the mailbox setting is a numeric value then use that. The mailbox setting is 50, so that’s the value that’s used. The tenant-level setting for this mailbox is ignored, even though it’s more restrictive than the mailbox setting.
|
|
Set-Mailbox Mailbox2
-RecipientLimits Unlimited
|
Set-TransportConfig
-MaxRecipientEnvelopeLimit 500
|
Mailbox2 can send to 500 recipients per message.
|
The mailbox setting is “Unlimited” so the rule is to use the tenant-level setting (500).
|
|
Set-Mailuser User1
-RecipientLimits Unlimited
|
Set-TransportConfig
-MaxRecipientEnvelopeLimit Unlimited
|
User1 mail user can send to 1000 recipients.
|
The Exchange Online setting (1000) is authoritative because both the mail user and tenant-level settings are “Unlimited” and thus fall back to the service level setting, 1000 recipients as of this writing.
|
So, managing recipient limits in Exchange Online now works pretty much like it does in Exchange Server on-premises. Do note that one significant difference is that while the default MaxReceipientEnvelopeLimit for new tenants in Exchange Online will still be “Unlimited”, the allowable range for customizing it in Exchange Online is 1 to 1000, while in Exchange Server on-prem the allowable range is from 0 to 2147483647.
While it might appear to be a minor update, we believe this change will prove to be quite valuable for email admins so they can more simply and flexibly manage and control a variety of recipient limits scenarios. It’s a new Exchange Online capability that continues to demonstrate our commitment to delivering more control, more “knobs and dials,” to manage your organization’s mail flow. Let us know what you think!
Kevin Shaughnessy

Recent Comments