by Scott Muniz | Aug 10, 2020 | Uncategorized
This article is contributed. See the original author and article here.
As hopefully many of you already know Exchange Server 2016 enters the Extended Support phase of its product lifecycle on October 14th 2020. That’s just a few short months away.
During Extended Support, products receive only updates defined as Critical consistent with the Security Update Guide. For Exchange Server 2016, critical updates will also include any required product updates due to time zone definition changes. With the transition of Exchange Server 2016 to Extended Support, the quarterly release schedule of cumulative updates (CU) will end. The last planned CU for Exchange Server 2016, CU19, will be released in December 2020.
There is one more consideration for this change that we want to address here today, and that is the ongoing use of Exchange Server 2016 for recipient management for hybrid organizations that have moved all their mailboxes to the cloud.
As you probably also know we have historically provided a free license for these ‘management’ servers if their only use is to properly manage Exchange attributes when recipient objects are mastered on-premises. You also know that we never provided this free license type for Exchange Server 2019.
We want to assure you that we are still committed to delivering a solution that will allow these lingering servers to be removed, but it will not arrive before Exchange Server 2016 enters Extended Support.
For this reason, we want to make our recommendation for this scenario clear. Our broad recommendation is to keep Exchange Server 2016 in production use until such point as we release a solution that allows those servers to be removed. As explained earlier, Extended Support still provides security and time zone updates and so keeping them in production and ensuring they are properly patched does not increase your risk profile in any way.
If you can’t move your mailboxes to the cloud and you plan on keeping mailboxes on-premises, then you really should be moving to Exchange Server 2019, and using that for both mailboxes and hybrid connectivity. That way you get full support including non-critical bug fixes and get ongoing product improvements.
When we have a solution available to allow any management-only servers to be removed, it may require an update to Exchange Server 2016, and in that case we may release a future CU or patch. Currently there is no plan to release future updates for Exchange 2016, but we want to assure our customers that if we need to do this to support the removal of these ‘management only’ servers, we will.
Microsoft encourages Exchange Server 2016 customers to adopt CU19 as soon as possible to ensure uninterrupted delivery of any future security related fixes. After December 15, 2020, only CU19 or its successors will receive critical updates. During the Extended Support phase, only the latest CU is eligible to receive critical updates once the standard 3 month transition period of the prior CU has lapsed.
Critical updates will continue to be made available via Windows Update and the Microsoft Download Center. Additional lifecycle information for all Microsoft products is available on support.microsoft.com.
We hope this update was informative and we look forward to hearing your feedback and answering any questions you may still have.
The Exchange Team

by Scott Muniz | Aug 10, 2020 | Uncategorized
This article is contributed. See the original author and article here.
In the previous chapter of this series, we started our investigation from an incident involving a particular mailbox that received phishing email. We saw how we can use go hunt and the in-portal schema reference to quickly pivot and deepen our investigation, utilizing query-based advanced hunting capabilities.
However, phishing isn’t the only threat impacting email—let’s look into how emails with malware are affecting our environment. Our initial mailbox asset, bamorel@mtpdemos.net, did not receive malware, but maybe other mailboxes in the organization did? Let’s check by modifying our first go hunt query to extend our search beyond the original mailbox.
let selectedTimestamp = datetime(2020-07-18T08:02:04.0000000Z);
EmailEvents
| where Timestamp between ((selectedTimestamp - 24h) .. (selectedTimestamp + 24h))
//malware emails
and MalwareFilterVerdict == "Malware"

We find a bunch of malware emails, all of them from the same sender mtpdemos@juno.com. Let’s hunt for all the attachments coming from this sender, and see if someone downloaded them to their devices.
let MaliciousSender = "mtpdemos@juno.com";
EmailAttachmentInfo
| where Timestamp > ago(30d)
| where SenderFromAddress =~ MaliciousSender
| join (
DeviceFileEvents
| where Timestamp > ago(30d)
) on SHA256
| summarize FirstAppearance = min(Timestamp) by DeviceName, SHA256, FileName

Get enriched file intel
Unfortunately, there were users that downloaded the malicious files. To quickly learn more about the files, we can use the FileProfile() function to pull in meta data from the Microsoft file reputation database:
// Get more details about the malicious files using the FileProfile() enrichment function
let MaliciousSender = "mtpdemos@juno.com";
EmailAttachmentInfo
| where Timestamp > ago(30d)
| where SenderFromAddress =~ MaliciousSender
| join (DeviceFileEvents
| where Timestamp > ago(30d)) on SHA256
| distinct SHA1| invoke FileProfile()
| project SHA1, SHA256 , FileSize , GlobalFirstSeen , GlobalLastSeen , GlobalPrevalence , IsExecutable

By invoking the FileProfile() function, we can derive additional insights from enriched information in the form of additional file hashes, size, prevalence, first and last seen, signer info, and various other attributes. For example, we can identify files that are rare or files that are very new, potentially requiring closer inspection.
Learn more about the FileProfile() function
Take action as part of the hunt
Once we’ve done sufficient investigation to verify that the files are malicious and the devices that contain them have been adversely impacted, our next step would be to ensure we respond quickly enough to minimize the impact of the malicious files. We can actually do this from the query results by selecting the records and then selecting Take actions.
let MaliciousSender = "mtpdemos@juno.com";
EmailAttachmentInfo
| where Timestamp > ago(30d)
| where SenderFromAddress =~ MaliciousSender
| join (
DeviceFileEvents
| where Timestamp > ago(30d)
) on SHA256
| summarize FirstAppearance = min(Timestamp) by DeviceName, DeviceId, SHA256, FileName

This feature lets you select particular entities to address in the selected records as well as the type of actions to take. When you proceed, the necessary actions are taken automatically and swiftly on available devices.


Key takeaways
We started our investigation from a single mailbox that was connected to an incident. Using advanced hunting, we gathered more data about the affected asset, explored other activities that might be related to asset, expand our investigation to cover other threat types, pulled in more threat intel, and took actions quickly.
During this investigation, we learned:
- How easy it is to pivot from an incident investigation into advanced hunting using go hunt
- How we can conveniently find what we need in the schema using the in-portal reference
- How quickly we can enrich an investigation using functions like FileProfile()
- How we can remediate threats directly from our hunting results by selecting Take actions
To learn more about advanced hunting in Microsoft Threat Protection and these new enhancements, go to the following links:
by Scott Muniz | Aug 10, 2020 | Alerts, Microsoft, Technology, Uncategorized
This article is contributed. See the original author and article here.
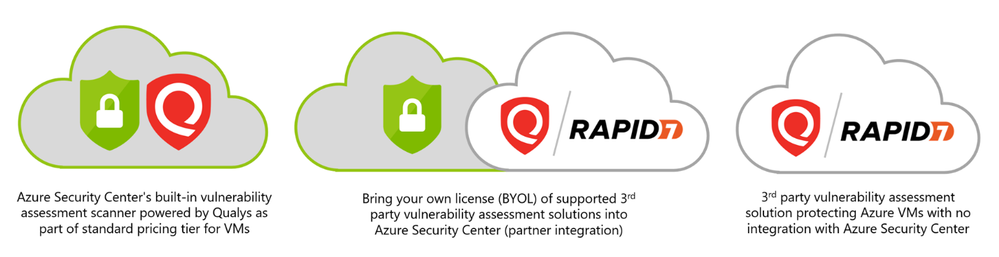
What is the built-in vulnerability assessment tool in Azure Security Center?
If you’re using Security Center’s standard tier for VMs, you can quickly deploy a vulnerability assessment solution powered by Qualys with no additional configuration or extra costs.

Qualys’s scanner is the leading tool for identifying vulnerabilities in your Azure virtual machines. Once this integration is enabled, Qualys continually assesses all the installed applications on a virtual machine to find vulnerabilities and presents its findings in the Security Center console. This offering is available to all commercial Azure customers that have enabled Azure Security Center standard pricing tier for VMs. In this post, I will focus on vulnerability scanning of virtual machines, although standard tier also offers scanning for both containers and container registries – learn more here.
How does the integration work?
Our integrated vulnerability scanner is based on 5 different stages: from discovery to findings.

[1] Discovery – To make this integration work, a policy named “vulnerability assessment should be enabled on virtual machines” which is part of the “ASC default” initiative must be enabled. Upon Azure Policy evaluation, we get the compliance data to identify potential and supported virtual machines which don’t have a vulnerability assessment solution deployed. Based on the result, we propagate the data into the recommendation so you can see all relevant virtual machines. Based on compliance data, we categorize the virtual machines as one of the following:
- “healthy” – VMs that have the extension installed and report data.
- “unhealthy” – VMs which could support the extension, but which currently don’t have it.
- “not applicable” – Where the OS type/image is not supported (for example, a virtual machine running Network Virtual Appliance (NVA), Databricks/AKS instances or Classic VMs).
[2] Deployment – This is the step where you can enable the integrated ASC vulnerability scanner by deploying the extension on your selected virtual machine/s either by using ASC console and quick fix button, or by using an automated method (see a reference below for deployment at scale).
Prerequisites for deploying the extension:
- Running VM with a supported operating system version as mentioned here.
- Azure VM agent installed and in healthy state.
- Log Analytics agent installed (formerly known as the Microsoft Monitoring Agent).
- To install using the quick fix option, you’ll need write permissions for any VM on which you want to deploy the extension. Like any other extension, this one runs on top of the Azure Virtual Machine agent.
Once all prerequisites are met, you should use our newly and consolidated recommendation “A vulnerability assessment solution should be enabled on your virtual machines”. In this recommendation, you can choose to deploy ASC integrated vulnerability scanner or 3rd party scanner (BYOL).

This recommendation installs the extension on unhealthy machines. Review the heathy and not applicable lists too.

Once the extension is deployed, you can see if it exists, by navigating to the VM page of the Azure portal, and selecting “extensions”:
- On Windows, the extension is called “WindowsAgent.AzureSecurityCenter” and the provider name is “Qualys”
- On Linux, the extension is called LinuxAgent.AzureSecurityCenter and the provider name is “Qualys”

Like the Log Analytics agent itself and all other Azure extensions, minor updates of the vulnerability scanner may automatically happen in the background; the VA agent is self-healing and self-updating to counter common issues. All agents and extensions are tested extensively before being automatically deployed. On a virtual machine (on Windows for example), you will see a process QualysAgent.exe and service “Qualys Cloud Agent” running:

When deploying a vulnerability assessment solution, Security Center previously performed a validation check before deploying. The check was to confirm a marketplace SKU of the destination virtual machine.
Recently, the check was removed and you can now deploy vulnerability assessment tools to ‘custom’ Windows and Linux machines. Custom images are ones that you’ve modified from the marketplace defaults.
[3] Scan – The gathered data collected by the agent includes many things for the baseline snapshot like network posture, operating system version, open ports, installed software, registry info, what patches are installed, environment variables, and metadata associated with files. The agent stores a snapshot on the agent host to quickly determine differences to the host metadata it collects. Such scans occur every 4 hours and are performed per VM, where artifacts are collected and sent for analysis to the Qualys Cloud service in the defined region. For virtual machines created within European regions, the gathered information is sent securely to Qualys Cloud Service in the Netherlands. For all non-EU resources, data is sent for processing in the Qualys Cloud Service in the US.
The sent artifacts are considered as metadata and the same as the ones collected by Qualys’ standalone cloud agent – Microsoft doesn’t share customer details or any sensitive data with Qualys.
[4] Analysis – Qualys analyzes the metadata, registry keys, and other information and builds the findings per VM. Findings are sent to Azure Security Center matching customer’s ID and are removed from the Qualys Cloud.
[5] Findings – You can monitor vulnerabilities on your virtual machines as discovered by the ASC vulnerability scanner using a recommendation named “Vulnerabilities in virtual machines should be remediated” found under the recommendations list. This recommendation is divided to the affected resources and security checks (also known as nested recommendations or sub-assessments).

On the affected resources section, you will find virtual machines categorized as unhealthy, healthy, and not applicable. The section named “Security Checks” shows the vulnerabilities found on the unhealthy resource. Findings are categorized by severity (high, medium, and low). Below, you can see the matching between ASC severity on the left and Qualys’ severities on the right:

If you are looking for a specific vulnerability, you can use the search field to filter the items based on ID or security check title. Selecting a security check, will open a window containing the vulnerability name, description, the impact on your resources, severity, if this could be resolved by applying patch, the CVSS base score (when the highest is the most severe one), relevant CVEs. Then, you will also find the threat, remediation steps, additional references (if applicable) and the affected resource. Once you remediate the vulnerability on the affected resource, it will be removed from the recommendation page.
Deployment at scale
If you have large number of virtual machines and would like to automate deployment at scale of the ASC integrated scanner, we’ve got you covered! There are several ways to accomplish such deployment based on your business requirements. Some customers prefer to automate deployment by executing an ARM template, others prefer automation using Azure Automation or Azure Logic Apps and others by using Azure Policy for both automation and compliance. For all these scenarios and even beyond, we encourage you to visit our ASC GitHub community repository. There, you can find scripts, automations and other useful resources you can leverage throughout your ASC deployment. Some of the methods will deploy the extension on new machines, others cover existing ones as well. There are other scenarios where customers prefer to make API calls to trigger an installation. This is also possible by executing a PUT call to one of our REST APIs, passing the resource ID to the URL. You can also decide to combine multiple approaches.
Troubleshooting
Below you will find a checklist for your initial troubleshooting if you experience issues related to the ASC vulnerability scanner:
- Are you running a supported OS version? Use the following list to quickly identify if your VMs are running a supported operating system version.
- Is the extension successfully deployed? Monitor VA extension health across subscriptions using Azure Resource Graph (ARG). ARG becomes handy if you want to validate the extension status across subscriptions is heathy for both Linux and Windows machines. Use the following query:
where type == "microsoft.compute/virtualmachines/extensions"
| where name matches regex "AzureSecurityCenter"
| extend ExtensionStatus = tostring(properties.provisioningState),
        ExtensionVersion = properties.typeHandlerVersion,
        ResourceId = id,
        ExtensionName = name,
        Region = location,
        ResourceGroup = resourceGroup
| project ResourceId, ExtensionName, Region, ResourceGroup, ExtensionStatus, ExtensionVersion

Results can be exported into CSV or used to build an Azure Monitor workbook.
- Is the service running? On Windows VMs, make sure “Qualys Cloud Agent” is running. On Linux, run the command sudo service qualys-cloud-agent
- Unable to communicate with Qualys? To communicate with the Qualys Cloud, the agent host should reach the service platform over HTTPS port 443 for the following IP addresses:
- 64.39.104.113
- 154.59.121.74
Check network access and ensure to accept the platform URL listed.
- Looking for logs? Both agent and extension logs can be used during troubleshooting. However, Windows and Linux logs can be found in different places. Here are the paths:
Windows:
- Qualys extension:
- C:Qualys.WindowsAgent.AzureSecurityCenter
- C:WindowsAzureLogsPluginsQualys.WindowsAgent.AzureSecurityCenter
- Qualys agent:
- %ProgramData%QualysQualysAgent
Linux:
- Qualys extension:
- /var/log/azure/Qualys.LinuxAgent.AzureSecurityCenter
- Qualys agent:
- /var/log/qualys/qualys-cloud-agent.log
Advanced scenarios
Qualys assessment and sub-assessments (security checks) are stored and available for query in Azure Resource Graph (ARG) as well as through the API. A great example for that is available in this blog post. Moreover, you can also build and customize your own dashboards using Azure Monitor workbooks and create such dashboard for more insights. You can easily deploy a Qualys dashboard leveraging ARG queries and workbooks which is available . Soon, you will be able to use Continuous Export feature to send nested recommendations for Qualys into Event Hub or Log Analytics workspaces.
On the roadmap
- Availability for non-Azure virtual machines
- Support for proxy configuration
- Filtering vulnerability assessment findings by different criteria (e.g. exclude all low severity findings / exclude non-patchable findings / excluded by CVE / and more)
- More items are work in progress.
Frequently asked questions
Question: Does the built-in integration support both Azure VMs and non-Azure VMs?
Answer: Our current integration only supports Azure VMs. As mentioned in the roadmap section, we do have plans to support non-Azure virtual machines in the future.
Question: Does the built-in vulnerability assessment as part of standard pricing tier also integrate into the Qualys Dashboard offering?
Answer: Vulnerability assessments performed by our built-in integration is only available through Azure portal and Azure Resource Graph.
Question: Is it possible to initiate a manual/on-demand scan?
Answer: Scan on Demand is a single use execution that is initiated manually on the VM itself, using locally or remotely executed scripts or GPO, or from software distribution tools at the end of a patch deployment job. To do so, the following command will trigger an on-demand metadata sync:
REG ADD HKLMSOFTWAREQualysQualysAgentScanOnDemandVulnerability /v "ScanOnDemand" /t REG_DWORD /d "1" /f
Question: I purchased a separate Qualys/Rapid 7 license, which recommendation should I use?
Answer: We provide additional method for customers who have purchased VA scanner separately and do not use the integrated solution. To enable 3rd-party integration, use “A vulnerability assessment solution should be enabled on your virtual machines” – this recommendation appears for both standard and free tiers. Then, select “Configure a new third-party vulnerability scanner (BYOL – requires a separate license)”. For this kind of integration, you’ll need to purchase a license for your chosen solution separately. Supported solutions report vulnerability data to the partner’s management platform. In turn, that platform provides vulnerability and health monitoring data back to Security Center.
Question: Can I combine two Qualys installation approaches so that the same VM has both the integrated scanner and the BYOL agent installed?
Answer: No, this is not supported. You can’t combine additional deployment approaches of VA while using the built-in VA capabilities provided by ASC.
In the next blog posts, we will discuss on how you can leverage integration for container and container registry images. Stay tuned!
Reviewers:
- Melvyn Mildiner – Senior Content Developer
- Ben Kliger – Senior PM Manager
- Aviv Mor – Senior Program Manager
- Nomi Gorovoy – Software Engineer
by Scott Muniz | Aug 10, 2020 | Uncategorized
This article is contributed. See the original author and article here.
LINUX Microsoft Defender ATP
CONFIGURATION OPERATION COMMANDs
Hello Blog Readers,
I summarize the Linux Configuration and Operation Command in this cheatsheet for the convenient use. Enjoy Linux ATP run!
_________________________________________________________
Linux ATP Commands
|
Group
|
Scenario
|
Command
|
|
Configuration
|
Turn on/off real-time protection
|
mdatp config real-time-protection –value [enabled|disabled]
|
|
Configuration
|
Turn on/off cloud protection
|
mdatp config cloud –value [enabled|disabled]
|
|
Configuration
|
Turn on/off product diagnostics
|
mdatp config cloud-diagnostic –value [enabled|disabled]
|
|
Configuration
|
Turn on/off automatic sample submission
|
mdatp config cloud-automatic-sample-submission –value [enabled|disabled]
|
|
Configuration
|
Turn on/off AV passive mode
|
mdatp config passive-mode [enabled|disabled]
|
|
Configuration
|
Add/remove an antivirus exclusion for a file extension
|
mdatp exclusion extension [add|remove] –name [extension]
|
|
Configuration
|
Add/remove an antivirus exclusion for a file
|
mdatp exclusion file [add|remove] –path [path-to-file]
|
|
Configuration
|
Add/remove an antivirus exclusion for a directory
|
mdatp exclusion folder [add|remove] –path [path-to-directory]
|
|
Configuration
|
Add/remove an antivirus exclusion for a process
|
mdatp exclusion process [add|remove] –path [path-to-process]
mdatp exclusion process [add|remove] –name [process-name]
|
|
Configuration
|
List all antivirus exclusions
|
mdatp exclusion list
|
|
Configuration
|
Turn on PUA (Potentially Unwanted Applications) protection
|
mdatp threat policy set –type potentially_unwanted_application –action block
|
|
Configuration
|
Turn off PUA protection
|
mdatp threat policy set –type potentially_unwanted_application –action off
|
|
Configuration
|
Turn on audit mode for PUA protection
|
mdatp threat policy set –type potentially_unwanted_application –action audit
|
|
Diagnostics
|
Change the log level
|
mdatp log level set –level verbose [error|warning|info|verbose]
|
|
Diagnostics
|
Generate diagnostic logs
|
mdatp diagnostic create
|
|
Health
|
Check the product’s health
|
mdatp health
|
|
Protection
|
Scan a path
|
mdatp scan custom –path [path]
|
|
Protection
|
Do a quick scan
|
mdatp scan quick
|
|
Protection
|
Do a full scan
|
mdatp scan full
|
|
Protection
|
Cancel an ongoing on-demand scan
|
mdatp scan cancel
|
|
Protection
|
Request a security intelligence update
|
mdatp definitions update
|
|
Protection history
|
Print the full protection history
|
mdatp threat list
|
|
Protection history
|
Get threat details
|
mdatp threat get –id [threat-id]
|
|
Quarantine management
|
List all quarantined files
|
mdatp threat quarantine list
|
|
Quarantine management
|
Remove all files from the quarantine
|
mdatp threat quarantine remove-all
|
|
Quarantine management
|
Add a file detected as a threat to the quarantine
|
mdatp threat quarantine add –id [threat-id]
|
|
Quarantine management
|
Remove a file detected as a threat from the quarantine
|
mdatp threat quarantine add –id [threat-id]
|
|
Quarantine management
|
Restore a file from the quarantine
|
mdatp threat quarantine add –id [threat-id]
|
Examples:
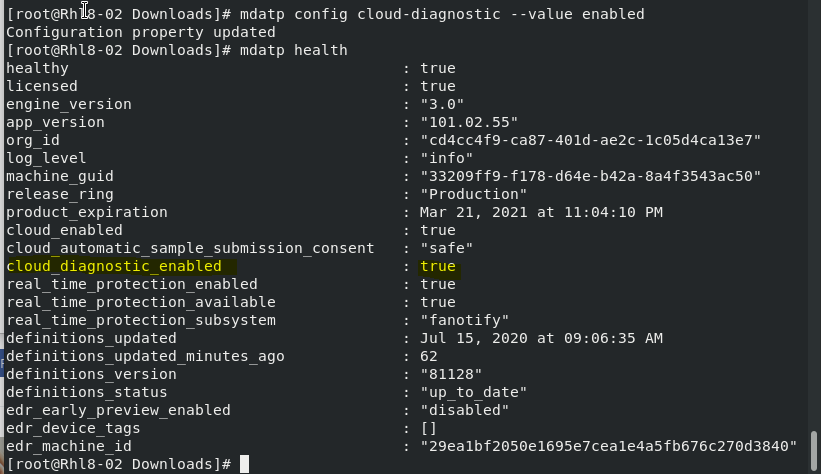
- Enable ATP Diagnostric
mdatp config cloud-diagnostic –value enabled
Checking ATP Configuration Settings:
mdatp health

- Checking ATP Virus History
mdatp threat list

- To view the Quarantine list and remove the non-threat file based on threat ID


- To Audit PUA (Potentially Unwanted Applications)

- To update ATP Definition

More info:
https://docs.microsoft.com/en-us/windows/security/threat-protection/microsoft-defender-atp/linux-resources
I hope the command list are helpful.
Disclaimer
The sample scripts are not supported under any Microsoft standard support program or service. The sample scripts are provided AS IS without warranty of any kind. Microsoft further disclaims all implied warranties including, without limitation, any implied warranties of merchantability or of fitness for a particular purpose. The entire risk arising out of the use or performance of the sample scripts and documentation remains with you. In no event shall Microsoft, its authors, or anyone else involved in the creation, production, or delivery of the scripts be liable for any damages whatsoever (including, without limitation, damages for loss of business profits, business interruption, loss of business information, or other pecuniary loss) arising out of the use of or inability to use the sample scripts or documentation, even if Microsoft has been advised of the possibility of such damages.
by Scott Muniz | Aug 10, 2020 | Uncategorized
This article is contributed. See the original author and article here.
System Center Data Protection Manager offers enterprise grade backup and recovery of critical workloads. We are excited to announce the release of Update Rollup 2 for System Center 2019 Data Protection Manager. This update rollup includes new features, critical bugs fixes and removes deployment blockers. This blog will cover the new features that are part of this release.
Support for SQL Server Failover Cluster Instance (FCI) using Cluster Shared Volume (CSV)
A lot of SQL server users are looking to deploy SQL Server on a Failover Cluster instead of using a traditional cluster storage. This is advantageous for a couple of reasons:
- Users don’t need to carve out separate LUNs for each SQL instance.
- CSV makes SQL nodes highly available, resilient and fault tolerant by automatically routing traffic in case of node failure.
Why backup is needed for SQL Server on CSV?
SQL Server on CSVs provides users with fault tolerance, high availability and resiliency, but it doesn’t guarantee that the data is safe in event of accidental deletion of data, data corruption, or ransomware attacks. In these scenarios, users would want a solution that they can use to restore their “clean” data from a previous point in time.
DPM 2019 UR2 version introduces the support for protecting and recovering SQL Server Failover Cluster Instances on Cluster Shared Volumes. If you were already using SQL Server on CSVs, you can go ahead and start protecting your SQL DBs with DPM 2019 UR2. Learn more.
Optimized Migration for Backed Up Workloads
DPM 2019 supports a key customer requirement–migration of backed up workload data. There are several reasons why backed up workload migration is needed:
- Backups take long time due to high fragmentation on current backup volume
- The current backup volume could have reached the limit of maximum allowed storage size
- The underlying storage box can have hardware issues and need to be retired
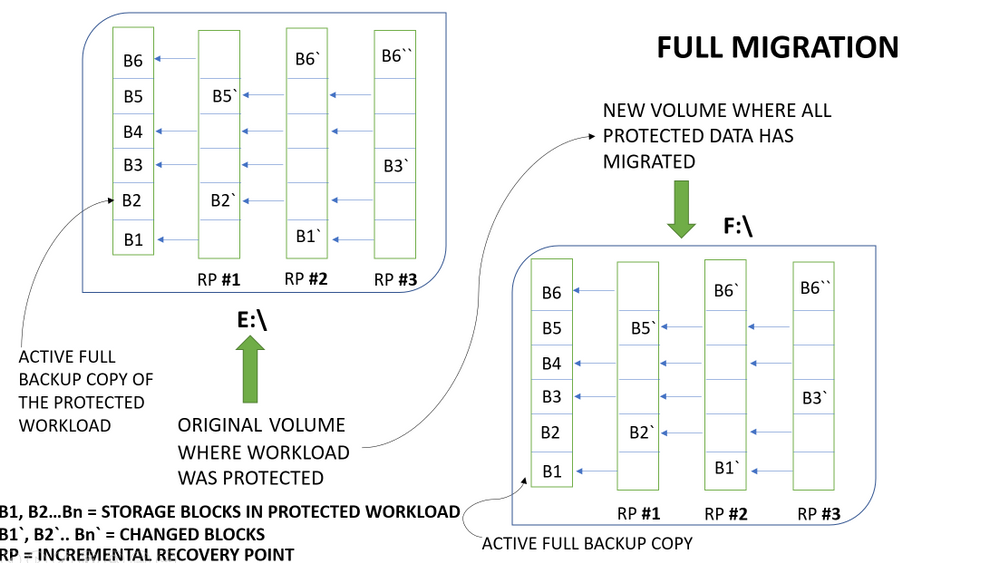
The visualization below explains how DPM currently implements backed up workload migration:

The above example represents a file which has 6 blocks of data – B1 to B6. The incremental recovery points store the changed blocks and metadata about unchanged blocks.
With this implementation of backed up workload migration, all the backup data (the full backup copy along with recovery points) is copied from the old backup volume to the new backup volume.
What’s new with DPM 2019 UR2 optimized migration?
DPM 2019 UR2 introduces the concept of optimized migration, which allows you to move protected workloads from an old volume to a new volume in a much faster way. The enhanced migration process migrates only active backup copy (Active Replica) to the new volume. All the new recovery points are created on the new volume while existing recovery points are maintained on the existing volume. This less data transfer compared to the full volume migration approach results in a faster data source migration.
The visualization below explains how DPM implements optimized migration:

With this implementation of optimized migration for backup workload data, only the full backup copy is copied from the old backup volume to the new backup volume. As the old recovery points are kept on the existing volume and only the full backup copy is migrated to the new volume, the migration process finishes fast. For more information on how to enable this feature in DPM 2019 UR2, please refer to the documentation here.
SQL Server 2019 support as DPM database
SQL Server 2019 is the latest version of SQL Server. Since a lot of SQL users have migrated to SQL 2019, DPM has also introduced support for SQL 2019 as its database starting DPM 2019 UR2 release.
Now you can install SQL Server 2019 on a remote server, or on the DPM server. The database must be installed and running before you install DPM. Learn more.
Offline Backup using Azure Data Box
With DPM 2019 UR1 we announced the preview of offline seeding using Azure Data Box integration and now with UR2, this feature is open for any DPM customer to try out.
With this integration, DPM customers can overcome the challenge of moving terabytes of backup data from on-premises to Azure storage. This also reduces the time a customer takes to onboard to Azure backup for long term retention of on-premises workload backups. This also reduces the time a customer takes to onboard to Azure backup for long-term retention of on-premises workload backups.
The below graphic illustrates how the offline seeding works for DPM customers looking to move terabytes of backup data to Azure storage. Learn More.

In addition, here is a link to the list of issues that have been fixed as part of the UR2 release for DPM.
We hope you are as excited about the release of Update Rollup 2 for DPM 2019 as we are. We will continue to work on more updates and new features, and we would love to hear your feedback in the comments section below!

Recent Comments