
by Scott Muniz | Aug 11, 2020 | Uncategorized
This article is contributed. See the original author and article here.
By: Chris Urban | PM- Intune for Education, Ele Ocholi | PM- Intune for Education & Scott Breen | PM- Intune for Education
Hi, it’s Chris Urban (Atlanta, USA), Ele Ocholi (London, UK) and Scott Breen (Brisbane, Australia) from the Intune for Education team. Thanks for joining us on our series of posts about preparing for Back-to-School! Since we’re on a team which works with school districts and institutions around the world, we’d like to share a few frequently asked questions and answers our customers have about device management in an educational setting as well as a few of the lessons learned as we all navigate Back-to-School 2020.
Preparing for a new school year is always a lot of work. For most of you, one of your tasks involves readying devices, whether they be new or existing as well as one-to-one or shared. With COVID-19, this year brings a significant set of new challenges. Some schools will return to in-person classes, others must embrace complete remote learning, and some are combining both approaches. We’ve learnt the best approach to these scenarios is flexibility and having a solution that allows you to pivot as your circumstances change.
We’re all working with customers to support their management and distribution processes of devices. All in order to empower educators and to give students engaging ways to learn.
Our experience with customers pivoting to remote learning has taught us that some of the biggest challenges have been:
- Distributing devices safely and quickly
- Repurposing existing shared devices to distribute to students, shifting to a 1:1 model
- Lack of management when devices are disconnected from school network when using on-premises management
- Password mismatch on domain-joined devices after a password change when logging on with cached credentials
- Insufficient capacity for Virtual Private Network (VPN)
- Windows Activation for Windows 10 devices that rely on an on-premises Key Management Service (KMS)
- Connectivity to on-premises resources (without a VPN)
- Internet access
Your solutions to these problems may vary depending on your situation, but we thought we would start off with the Top 5 things you can do to prepare for device management for remote learning using Intune for Education and Microsoft Endpoint Manager:
1. Get your devices managed
- For new PCs or those moving to Azure Active Directory:
- For existing computers connected to Active Directory or Configuration Manager:
- For devices joined to Active Directory:
- Get your devices hybrid Azure AD joined.
- Enroll in Intune using Group Policy.
- For customers with Configuration Manager:
- Configure co-management so you can use Intune to manage devices while they aren’t connected to the school network, and/or;
- Configure a cloud management gateway so you can continue to approve software update, deploy software and retrieve inventory from devices that are not connected to the school network.
- For iPadOS devices, setup device management for Apple School Manager devices and enroll.
2. Re-purpose existing devices
A key scenario we’ve seen is schools repurposing devices previously used as shared devices for use in a 1:1 scenario. If you previously used Set Up School PCs, you might have configured the device for Shared PC mode which prevents the student from performing certain actions like configuring OneDrive or keeping files locally.
For these devices you could choose to:
- Reset the PC and use a new provisioning package that is catered more to 1:1 usage.
- Configure user-driven Autopilot, reset the PC and have the student log on during the Out-of-Box Experience.
- Leave the devices configured as a shared device and distribute to students.
3. Configure settings for the devices
Intune for Education allows a device administrator to manage features on devices and define how your users can work with their devices. These Windows and iOS/iPadOS settings can be assigned to a user and/or a device through the use of Azure Active Directory groups.
- When assigned to users in a group, the settings will follow the user no matter what device they are using.
- When assigned to devices in a group, the settings will apply to the device no matter who signs into the device.
Examples of settings which are common in school districts we’ve worked with include:
- Accounts and sign-in: Configure preferred Azure Active Directory tenant domain – targeting devices using this setting, students no longer need to type in “user@school.edu” but type in just “user”. This reduces keystrokes and mistakes, allowing students to log in quickly.
- Apps: for Windows devices, block access to administrative apps – when targeting non-administrator accounts, this will prevent users from running the Command Prompt, PowerShell and Registry Tools.
- Power and sleep: when targeting devices, this configures turning off device display, putting device to sleep, putting device in hibernation as well as blocking users from changing the administrative settings.
Intune for Education is a curated experience of the settings which have been requested from institutions around the world. It has Express configuration which is a quick way to enable the recommended common settings on a device. With that being said, the Microsoft Endpoint Manager admin center has additional built in settings, as well as the ability to create custom settings.
4. Deploy and Manage Apps, Microsoft Office, and Microsoft Edge
As outlined above, apps are deployed via group assignment. If an app is assigned to a user group, the app will not start the evaluation, downloading and installation until after the user logs in, so the app may not be available for a user to interact with immediately Depending on your needs, you may choose to target apps to device groups rather than user groups. Also consider the size of the app as well as potential connectivity the end user may or may not have. This will affect installation times. Another way to speed up deployments is to assign the core items that all users need to the “All devices” group.
Intune for Education supports deploying and managing these types of apps:
- Microsoft Office and Microsoft Edge desktop apps
- Microsoft Store apps
- Web apps
- Windows desktop apps (.msi)
- iOS VPP and Store apps
If you have additional app or platform needs, the Microsoft Endpoint Manager admin center includes Android store apps, managed Google Play apps, macOS, Microsoft Edge, Defender ATP (macOS) as well as Win32 apps (.exe). If there is a need to install apps in a certain order, Intune offers the ability to set up app dependencies.
5. Distribute your devices
With our larger device deployments, some lessons were:
- Deployment times should include disinfecting the device and associated peripherals.
- If possible, your plan should include distributing from multiple sites. This allows for granular contact tracing logs as well as redundancy if one site gets closed due to infection.
- Multiple sites allow for less traffic into a single, physical distribution site.
Looking for more info?
Microsoft has a lot of detailed sets of documentation on the Microsoft Docs page; our goal is to pull together sets of documentation so you have a single jump off point into those various areas.
The first area we would like to introduce on that page is the Microsoft Education area. In the IT Admins area of that microsite, we break down a workflow of steps grouped into phases. Our main focus, initially, will be in Phase 2 – Device Management. (See image below for site navigation.)

As we’ve engaged with customers around the world, it’s driven us to these Top 5 lessons learned.
Additional guidance has been published for M365 EDU deployment during COVID-19 which revolves around remote learning and Microsoft Teams.
If you are new to device management with Microsoft Endpoint Manager and Intune, we won’t be covering the fundamentals here but please start by checking out how to get started with Intune for Education.
Many of you may work with a partner or vendor for handling your IT needs. If your vendor needs to be introduced to Intune for Education and learn more, there’s a great set of intro videos online created by Joe from our team on the Intune Partner channel here.
We’re going to go technically deeper into the topics mentioned in the Top 5 and more so join us for our next post on enrolling Windows devices with provisioning packages and/or Set Up School PCs in the next few days.
by Scott Muniz | Aug 11, 2020 | Azure, Microsoft, Technology, Uncategorized
This article is contributed. See the original author and article here.
We are bringing this blog post to continue the learning about the protection that Azure Security Center offers for the SQL IaaS VMs. As you learnt in this blog post, Azure Security Center protects SQL servers hosted on either Azure VMs, Azure Arc and on-premises.
SQL Server on Azure Arc
While hybrid approaches bring greater power and flexibility, they also present greater complexity. Azure Arc was announced at Ignite 2019 to better address these challenges. Using Azure Arc, organizations can deliver a broader range of services while simplifying matters of management and security. Azure Arc provides deeper integration across all your Azure environment. Essentially Azure Arc allows organizations to use Azure’s management technologies (“control plane”) to centrally administer public cloud resources along with on-premises servers, virtual machines, and containers. All of Azure’s AI, automation, compliance and security best practices are now available to manage all of their distributed cloud resources, and their underlying infrastructure, which is known as “connected machines.” Additionally, several of Azure’s AI and data services can now be deployed on-premises and centrally managed through Azure Arc, enhancing local and offline management and offering greater data sovereignty.
Utilize Azure Security Center to produce a comprehensive report of vulnerabilities in SQL Servers and get advanced, real-time security alerts for threats to SQL Servers and the OS. Azure Security Center centralizes all security policies and protects the entire managed environment. When Security Center is enabled, the Azure monitoring agents will report data back from the servers, networks, virtual machines, databases, and applications. The Azure Security Center analytics engines will ingest the data and use AI to provide guidance. It will recommend a broad set of improvements to enhance security, such as closing unnecessary ports or encrypting disks and more. Azure Arc extends these security features to connected machines and services to protect all registered resources.
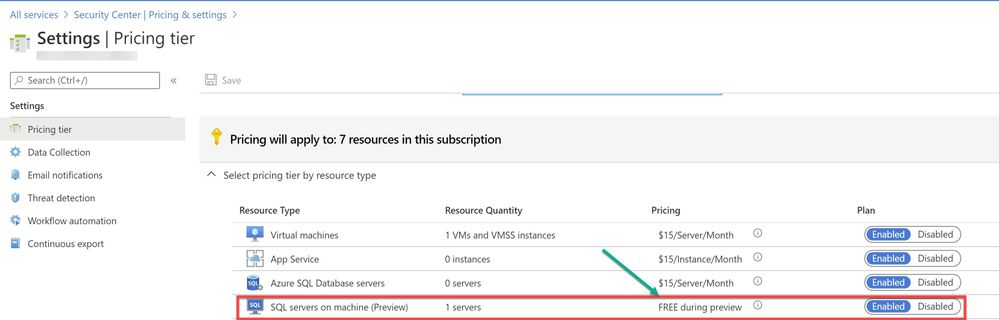
To use this threat detection capability, you need to enable the SQL servers on machine threat bundle in Azure Security Center pricing tier as shown in ‘Image 1’:

Image 1: Azure Security Center Pricing Tier
If your SQL server is hosted on Azure Arc machine and if you have auto-provisioning option enabled, Log Analytics agent will be automatically installed in your machine. If Otherwise, you can deploy the Log Analytics agent using the Security Center recommendation “Log Analytics agent should be installed on your Windows-based Azure Arc machines (Preview)”. Alternatively, you can install the agent manually in two easy steps by adding the Log Analytics VM extension. Refer to this article for step-by-step procedure to enable extension from portal/JSON/PowerShell.
A PowerShell script was used in this case to simulate a SQL injection attack scenario on the SQL server running on Azure Arc.
Injection flaws allow attackers to relay malicious code through an application to another system. These attacks include calls to the operating system via system calls, the use of external programs via shell commands, as well as calls to backend databases via SQL (i.e., SQL injection). Attackers can go around authentication and authorization of a web page or web application and retrieve the content of the entire SQL database. SQL injection is a particularly widespread and dangerous form of injection. The consequences are particularly damaging, as an attacker can obtain, corrupt, or destroy database contents. Security Center detects unusual and potentially harmful attempts to access SQL servers based on behavior analysis using machine learning.
In this scenario, Azure Security Center detected the threat and provided an alert with details of the machine, attacker activity, host information and more as shown in ‘Image 2 & Image 3’

Image 2: Security Alert, Alert details

Image 3: Security Alert, Take Action
NOTE: As of June 2020 release, Two new recommendations have been added to help deploy the Log Analytics Agent to your Azure Arc machines and ensure they’re protected by Azure Security Center:
- Log Analytics agent should be installed on your Windows-based Azure Arc machines (Preview)
- Log Analytics agent should be installed on your Linux-based Azure Arc machines (Preview)
These new recommendations will appear in the same four security controls as the existing (related) recommendation, Monitoring agent should be installed on your machines: remediate security configurations, apply adaptive application control, apply system updates, and enable endpoint protection. The recommendations also include the Quick fix capability to help speed up the deployment process.
In the next blog posts, we will discuss on how you can leverage Azure Security Center to protect your SQL IaaS VMs hosted On-premises. Stay Tuned!!
Special thanks to:
Yuri Diogenes, Senior PM, CxE Security – ASC Team for reviewing this post.
by Scott Muniz | Aug 11, 2020 | Uncategorized
This article is contributed. See the original author and article here.
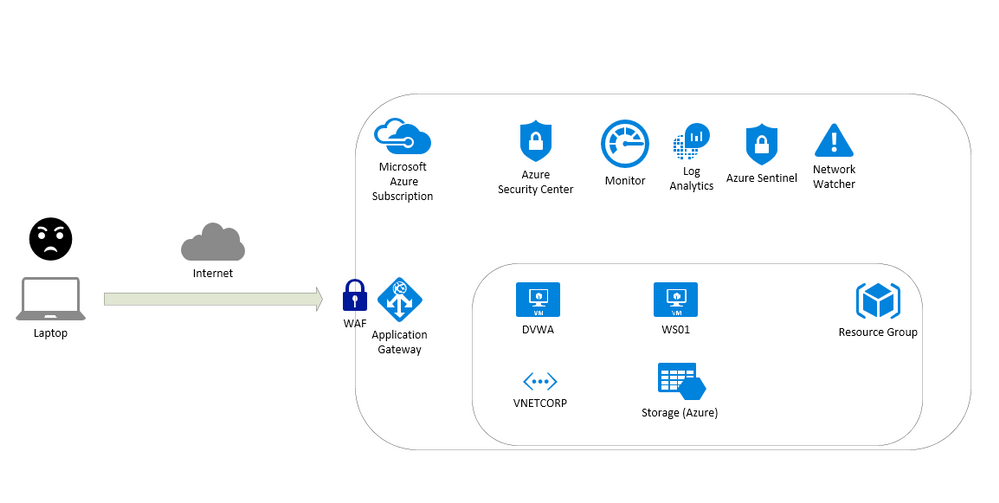
This article is about a content for workshops and contain instructions to test resources on Azure like:
- Application Gateway
- Build secure, scalable, and highly available web front ends in Azure
- Web Application Firewall (WAF)
- A cloud-native web application firewall (WAF) service that provides powerful protection for web apps
- Log Analytics
- Full observability into your applications, infrastructure, and network
- Azure Security Center
- Unify security management and enable advanced threat protection across hybrid cloud workloads
- Azure Sentinel
- Put cloud-native SIEM and intelligent security analytics to work to help rptect your enterprise
- Network Watcher
- Network performance monitoring and diagnostics solution
To test this scenario a virtual machine running UBUNTU with DVWA (Damn Vulnerable Web Application) will be used to detect vulnerabilities. Also ARM Templates are available here: https://github.com/fabioharams/azsecurityworkshop/tree/master/template
This environment will support other workshops (under development):
- Monitoring virtual machines
- Monitoring network
Contributors
Overview of the environment

Prepare the environment
Create a Resource Group
e.g.: LABSECURITY
You can use any public region because the features on this lab doesn’t require an specific region.

Create VNET and Subnets
Create a VNET in the same region of Resource Group with the following settings bellow:
- Name: VNETCORP
- Region: e.g. EAST US
- IPv4 Address Space: 10.0.0.0/16
- Subnets:
- default: 10.0.0.0/24
- AppGw: 10.0.1.0/24
- AzureBastionSubnet: 10.0.2.0/24
- DDoS Protection: Basic
- Firewall: Disabled
- Tags: None
Note: you can create Bastion Host (and the Subnet) during the creation of VNET. I recommend you to do this later because you can use the same steps to do in other VNETs. Feel free to do if you have more experience on Azure VNET

Create Linux VM for DVWA
- Create a Ubuntu Server 18.04 LTS from Azure Portal


- user: Azuser1
- password: Azsecworkshop!


Enable Azure Bastion
Follow these steps to use Azure Bastion. This is importante because the VM was created without Public IP address.
- On Azure Portal click on “Create a resource” and then type BASTION . Click “Create”


Want more information? Here you can find about how to deploy Azure Bastion. Just remember to use Microsoft Edge/Chrome and disable Pop-ups
Link: https://docs.microsoft.com/en-us/azure/bastion/bastion-create-host-portal
Start the lab
Step 1 | Install DVWA on UBUNTU
DVWA (Damn Vulnerable Web Application) is a PHP/MySql web application very popular to train security specialists against vulnerabilities. For more information about DVWA please click here.
Thomas Laurenson created a nice post about how to install DVWA on UBUNTU and you can use to do the same on Azure. If you want more details you can find here:
https://www.thomaslaurenson.com/blog/2018/07/12/installing-and-configuring-damn-vulnerable-web-application/
- Connect to Ubuntu VM using Azure Bastion
Open Azure Portal, select the Ubuntu Virtual Machine created previously (DVWA), click Connect and select Bastion. Insert the following credentials bellow and then click Connect
- username: Azuser1
- password: Azsecworkshop!
Note1: if the new tab doesn’t open just check if your browser is not blocking Pop-Ups
Note2: Attention – Linux is case sensitive for username


- Update Ubuntu
It’s recommended to update Ubuntu (or any Virtual Machine) after installation. Execute the following command to update
sudo apt update && sudo apt upgrade -y
- Download MySQL, PHP and Apache
These packages are required to install DVWA. Just execute the follwing command. Press Y to confirm:
sudo apt install apache2 mysql-server php php-mysqli php-gd libapache2-mod-php git
Return to home folder
cd ~
- Clone the DVWA repository:
git clone --recurse-submodules https://github.com/ethicalhack3r/DVWA.git
- Remove the default web page created by Apache
sudo rm /var/www/html/index.html
- Copy the downloaded files to a new folder and after that change to folder
sudo cp -r ~/DVWA/* /var/www/html/
cd /var/www/html
- Copy the config file for DVWA
sudo cp config/config.inc.php.dist config/config.inc.php
Done! now you can connect from other Virtual Machine on Azure (using Azure Bastion) and test if DVWA is up and running (the setup for DVWA require a browser). The DVWA virtual machine doesn’t have a Public IP Address so you will need a VM with browser to access and finish the configuration (or adjust anything else you want on DVWA)
- Create a Windows Server 2016/2019 VM using the following parameters:
- Computer name: WS01
- Vnet: VNETCORP
- Subnet: Default (10.0.0.0/24)
- Public IP Address: None
- Configure Network Security Group (NSG): LABSEC
- Public Inbound Ports: None
- OS Disk Type: Standard SSD
- Username: Azuser1
- Password: Azsecworkshop!
Note: The NSG LABSEC and Vnet/Subnet already exists and must be used to accomplish other labs.
- Check DVWA
- Open Azure Portal and then select the WS01 VM. Click on Connect button, input the credentials used on Step 8 and click Connect. The Server Manager will appear.

On the left side of Server Manager click on Local Server. Click on IE Enhanced Security Configuration. Change to *Off for both Administrators and Users.


- Check the Private IP Address of DVWA VM
Open Azure Portal, click on DVWA virtual machine and take note of Private IP Address. Probably the IP address will be 10.0.0.4 .

Use VM01 to check if DVWA is up and running. Connect to VM01 using Azure Bastion, open Internet Explorer and then type 10.0.0.4 on URL. This will open the DVWA login screen.
Note: Do not click on Create / Reset Database yet because you first need to setup permissions

- Access DVWA using Azure Bastion
Connect on DVWA VM using Azure Bastion and type the following commands
cd /var/www/html
sudo chmod 777 /var/www/html/hackable/uploads/
sudo chmod 777 /var/www/html/external/phpids/0.6/lib/IDS/tmp/phpids_log.txt
sudo chmod 777 /var/www/html/config
Do not disconnect. You will continue on next step
Open vi with sudo and edit the settings for pho file
sudo vi /etc/php/7.2/apache2/php.ini
Find line 837 and change the parameter allow_url_include = Off to allow_url_include = On
Exit vi by pressing ESC button and type :wq
Now you can access again the DVWA VM through Azure Bastion. Type the following commands to setup the required permission:
sudo mysql -uroot
DROP USER 'root'@'localhost';
CREATE USER 'root'@'localhost' IDENTIFIED BY 'p@ssw0rd';
GRANT ALL PRIVILEGES ON . TO 'root'@'localhost' WITH GRANT OPTION;
FLUSH PRIVILEGES;
exit
Now you are ready to return to VM01 and create the database
Open Azure Portal , select VM01 and connect using Azure Bastion. Once you are connected then open Internet Explorer and access the URL http://10.0.0.4.

Click Create / Reset Database. You will see that the database is created and will be redirected to login screen again. Logon again and the DVWA page will appear.

At this moment we have our DVWA VM ready. Follow the next steps to prepare the monitoring.
Step 2 | Create Log Analytics workspace
All logs will be forwarded to Log Analytics and it’s a requirement for Azure Sentinel, Network Watcher, etc. Follow the steps bellow to create your Log Analytics Workspace.
- Create Workspace
Open Azure Portal, click New and type Log Analytics Workspace . Click Create and use these parameters:
Note: Make sure to use the same Resource Group and Region


Step 3 | Deploy Application Gateway w/ Web Application Firewall(WAF)
Azure Application Gateway is a web traffic load balancer that enables you to manage traffic to your web applications.Also includes Web Application Firewall (WAF), a service that provides centralized protection of your web applications from common exploits and vulnerabilities.
- Deploy Application Gateway w/ WAF
For this workshop you will deploy Application Gateway w/ WAF V1 to detect attacks to DVWA VM. The reason to use Application Gateway V1 instead of V2 is about the possibility to restrict access to specific public IP address. Application Gateway will publish a Public IP Address but it’s not so simple to restrict wich IP Address can access this environment. It’s very useful if you want to test for a long time but don’t want anyone from internet to access the DVWA (the credentials to access DVWA are simple). Using Application Gateway V1 it’s possible to restrict this traffic using Network Security Group (NSG). Of course it means that you need to change your NSG Rule every time your Public IP Address (from your ISP connection) change. If you don’t need this control then you can create your Application Gateway w/ WAF V2.
- Open Azure Portal, click Create a resource and type Application Gateway . Click Create


Click Next: Frontends
- Use the following parameters for Frontends
- Frontend IP address: Public
- Public IP Address: click Add new


Click Next: Configuration
Click Add a routing rule

- Use the following parameters for Add a routing rule
- Rule name: RULEDVWA
- Listener name: LISTENERDVWA
- Frontend IP: select Public
- Protocol: HTTP
- Port: 80
- Listener type: Basic
- Error page url: No
- Click Backend targets
- Target type: Backend pool
- Backend target: select BACKENDDVWA
- HTTP settings: click Add new
- HTTP settings name: HTTPSETTINGSDVWA
- Backend protocol: HTTP
- Backend port: 80
- Cookie-based affinity: Disable
- Connection draining: Disable
- Request time-out (seconds): 20
- Override backend path: blank
- Override with new host name: No
- Click Add

Click Next: Tags
Click Next: Review + create
Click Create
Wait few minutes to finish the deployment (˜10min) and then click on APPGW (located on your Resource Group). You can see the public IP address assigned to App Gateway. Take note of this IP address and then access using Internet Explorer on VM01. This is just a test to make sure that the traffic to DVWA is handled by Application Gateway w/ WAF.

Note: This Frontend public IP address is fake.
-
Restrict access to Application Gateway (optional)
As explained before if you want to restrict wich IP address from internet can access the DVWA then you need to configure the Network Security Group. If not just ignore this step.
- Open Azure Portal and then click Create a resource. Type Network security group and then click Create

- Use the following parameters for Create network security group
- Resource Group: LABSECURITY
- Name: APPGWLABSECURITY
- Region: East US
- Click Next: Tags
- Click Next: Review + create
- Click Create

Now you can open again the Resource Group LABSECURITY and click on NSG APPLABSECURITY
- Open NSG APPGLABSECURITY and use the following rules (only Inbound Security rules)

Rule AppGwProbe

Rule AccessFromHome

Rule AzureLoadBalancerProbe

Rule YouShallNotPass

Note: You must change your rule AccessFromHome (field Source IP address) and use your Public IP address that you are using. You can easily find this just openning Google and typing what is my ip. This is the IP Address that you will need to insert on Source IP address field.

Note: Now you have Application Gateway forwarding to DVWA VM and only allowing access from your Public IP. Next step you will forward logs from NSG and Application Gateway to Log Analytics.
Step 4 | Forward Logs
Network Watcher is a network performance monitoring and diagnostics solution on Azure. We will use this solution to forward NSG Logs and Diagnostic logs to Log Analytics workspace.
Firts create a storage account. This will be used to retain logs.
- On Azure Portal click Create a resource and type Storage account. Click Create

- Use the following parameters for Basics
- Resource Group: LABSECURITY
- Storage account name: storagelabsecurity
- Note: you can use other name here, just remeber to take note
- Location: East US
- Performance: Standard
- Account kind: StorageV2 (general purpose v2)
- Replication: Locally-redundant storage (LRS)
- Access tier (default): Hot
- Click Next: Networking

- Use the following parameters for Networking
- Connectivity method: Public endpoint (all networks)
- Routing preference: Microsoft networking routing (default)
- Click Next: Data protection

- Use the following parameters for Data protection
- Blob soft delete: Disabled
- File share soft delete: Disabled
- Versioning: Disabled
- Click Next: Advanced

- Use the following parameters for Advanced
- Secure transfer required: Enabled
- Blob public access: Disabled
- Minimum TLS version: Version 1.0
- Large file shares: Disabled
- Hierarchical namespace: Disabled
- Click Review + Create
- Click Create


- Enable Network Watcher on your region

Note: if you cannot enable Network watcher then just follow this documentation to manually register.
- Forward NSG flow logs
- Locate the menu Logs and then click on NSG flow logs. Select the Resource Group LABSECURITY. The NSG APPGLABSECURITY will shown.

- Click on APPGLABSECURITY NSG and use the following parameters:
- Status: ON
- Flow Logs version: Version 2
- Storage Account: select storagelabsecurity or any other name that you had choosen before
- Retention: 30
- Traffic Analytics status: On
- Traffic Analytics processing interval: Every 1 hour
- Note: you can change later to “every 10min” but for the first ingestion is recommended to wait at least few hours before making any change
- Log Analytics workspace: select WORKSPACESECURITY01
- Click Save

- Forward Diagnostics logs
- Locate the menu Logs and then click on Diagnostic logs. Select the Resource Group LABSECURITY.

- Click on APPGW and then on + Add diagnostic setting

- Use the following parameters:
- Diagnostic settings name: APPGWDIAG
- Check all 3 checkboxes for log
- also check AllMetrics for metric
- on destination details select Send to Log Analytics. Make sure that WORKSPACESECURITY01 . Click Save

- Enable Diagnostic logs for the rest of the resources
Repeat the steps for all resources. Use the same Storage Account and Log Analytics Workspace. You can use any name for Diagnostics settings name you want. After configuring all resources you will have something like this:

- (Optional) Enable Traffic Analytics
If you have time just wait few hours and click on Traffic Analytics option on Logs. This dashboard show all the traffic to your public resources on Azure. Also you can check malicious flow to your resources on Azure, etc.


Step 5 | Configure Security Center
Security Center can monitor both Azure and on-premises resources. First it’s necessary to onboard the Azure Subscription to Standard,
- Onboard Azure Subscription
Follow the steps bellow to enable Standard Tier. By default any Azure subscription is Free.
Link: https://docs.microsoft.com/en-us/azure/security-center/security-center-get-started
- Add Azure Application Gateway WAF source
On Azure Security Center click on Security Solution (located on RESOURCE SECURITY HYGIENE). Click on ADD button on Azure Application Gateway WAF. After that click on Create

- Enable data collection on Log Analytics workspace
- Click on Pricing & settings and then click on your workspace WORKSPACESECURITY01

- Click on Standard and click Save

- On the left side click on Data collection and select All Events . Click Save

Step 6 | Configure Azure Sentinel
Now you can connect Log Analytics Workspace to Sentinel. Follow the steps bellow:
- Open Azure Portal and type Sentinel on Search bar.Click on Azure Sentinel.
- On Azure Sentinel workspaces click on +Add button, select WORKSPACESECURITY01 and click again on Add Azure Sentinel button.

- The Azure Sentinel dashboard will appear

On the left side click on Data connectors (Configuration panel). Select Azure Security Center and then click on Open connector page (right side).

- Click on Connect.

This step may not be required if you had previously configured Diagnostic Logs for Application Gatewa. Inf not just follow here: on the left side click on Data connectors (Configuration panel). Select Microsoft web application firewall(WAF) and then click on Open connector page (right side).

- On Azure Sentinel click on Workbooks (located at the left side | Threat management). On Templates click on Microsoft Web Application Firewall (WAF) – firewall events and then click on Save (rigth side)

- A pop-up will appear to Save workbook to… and you can choose the same region.
After saving you can click on View saved workbook on the right side.

- Repeat the steps to add other 2 workbooks missing:
- Microsoft Web Application Firewall (WAF) – gateway access events
- Microsoft Web Application Firewall (WAF) – overview
Step 7 | Test attacks
Simulate attacks
All the commands to test are available on OWASP Foundation website (link bellow)
Warning: Don’t do this on any other resource instead of this lab
127.0.0.1; ls -al
system("cd /var/yp && make &> /dev/null");
%’ or 1=’1
SELECT * FROM members WHERE username = 'admin'--' AND password = 'password'
SELECT /*!32302 1/0, */ 1 FROM tablename
SELECT @@hostname;
SELECT grantee, privilege_type, is_grantable FROM information_schema.user_privileges WHERE privilege_type = ‘SUPER’;SELECT host, user FROM mysql.user WHERE Super_priv = ‘Y’; # priv
- Vulnerability: Cross-Site Scripting
<script>alert(“voce foi invadido”)</script>
Step 8 | Detect attacks
Sample queries to detect actions blocked by WAF. More queries available bellow .
- List all actions blocked by WAF:
search * | where (action_s == "Blocked")
- Matched/Blocked requests by IP
AzureDiagnostics | where ResourceProvider == "MICROSOFT.NETWORK" and Category == "ApplicationGatewayFirewallLog" | summarize count() by clientIp_s, bin(TimeGenerated, 1m) | render timechart
More documents and links about this topic
Links to presentations – MS Ignite
Create a Microsoft TechCommunity account to access these contents (it’s free)
Azure Networking Basics https://myignite.techcommunity.microsoft.com/sessions/83202?source=sessions
Modernize your SIEM in the cloud with Azure Sentinel https://myignite.techcommunity.microsoft.com/sessions/79817?source=sessions
Protect your cloud workload from threats using Azure Security Center https://myignite.techcommunity.microsoft.com/sessions/81972?source=sessions
Get visibility into your hybrid network with Network Watcher https://myignite.techcommunity.microsoft.com/sessions/83951?source=sessions
Using Azure Web Application Firewall to protect your web applications and web APIs https://myignite.techcommunity.microsoft.com/sessions/82947?source=sessions
by Scott Muniz | Aug 11, 2020 | Uncategorized
This article is contributed. See the original author and article here.
A long-awaited blog on System Center Service Manager!
We know that System Center Service Manager is built around Information Technology Infrastructure Library (ITIL) standards and Microsoft Operational Framework (MOF). We also know that Service Manager contains the primary ITIL components for Incident, Problem, Service Request, Change & Release Management.
But what is new?
On Aug 5th 2020, we released Update Rollup 2 for Service Manager and there is more. We released a new version of Exchange Connector (4.0) which adds support to OAuth 2.0 based authentication to connect with Exchange Online. And lastly, we also released a new Management Pack for System Center Service Manager. Phew!
The updates that we have brought about in UR2 are in line with trending technologies and our effort in keeping Service Manager as one of the top ITSM products. Let me walk you through some of the important updates.
Supportability for MSOLEDBSQL
As part of the announcement made here which refers to “The previous Microsoft OLE DB Provider for SQL Server (SQLOLEDB) and SQL Server Native Client OLE DB provider (SQLNCLI) remains deprecated and it is not recommended to use either for new development work.”, Service Manager team has added support for MSOLEDBSQL driver and we highly recommend users to adopt it. However, Service Manager is still operational with SQL Native Client.
Supportability with SCCM 1806 to 2002
Between SCCM 1806 to 2002, there are changes introduced in few column DataTypes in SCCM Database. This schema change was causing incompatibilities in SCCM Connector of Service Manager. We have now accommodated the schema change and enabled support for SCCM 1806 to 2002 version.
OAuth support in Exchange Connector
Basic authentication access for EWS will be disabled in second half of 2021 as per the announcement, the authentication protocol for accessing the EWS needs to accommodate OAuth 2.0 in order to avoid disruption. Exchange Connector 4.0 contains all the previous fixes and adds support to OAuth based authentication for EWS to connect to Exchange Online. This release supports System Center Service Manager 2016 and later versions.
Note: This change applies only to Office 365 mailboxes and not to on-premises Exchange Server mailboxes, which shall continue to honor basic authentication access for EWS
All the above updates and bug fixes are signs of continuous Improvement lifecycle that we want to bring about in Service Manager Product Roadmap. Having said that, there were numerous set of improvements in the previous Update Rollup too, check here. As always, one of the key ingredients to deliver high impactful product features is user feedback. Feel free to share your views and any updates that you are looking forward to in the comments section below. Any form of feedback is critical which helps us shape better products for future.

Recent Comments