by Scott Muniz | Jul 28, 2020 | Uncategorized
This article is contributed. See the original author and article here.
Digital clutter is an ever-increasing challenge. It’s one of the reasons why modern life feels so busy and chaotic. Microsoft To Do is committed to providing a complete task management solution that keeps people at the center. To Do helps people focus on and keep track of what matters, in work and in life. Our 3 key promises are: 1) collect tasks from different sources, 2) show urgent and important tasks, and 3) help users complete them (coming soon).
To fulfil our first promise, we’re integrating To Do with the Microsoft 365 suite of applications and making it available in key user workflows. Following up on the full Outlook/To Do integration, Tasks in Teams is rolling out today and will continue through Septermber. With this launch, To Do is now available in Microsoft Teams .
To Do is already integrated with Planner – tasks assigned to you in Planner boards show up in the “Assigned to you” list. To Do is also available in Microsoft Launcher and any task added via Cortana gets added to To Do. By Q121, we will support @mentions in Excel, Word, and PowerPoint, which means that whenever someone @mentions you, the tasks you’re mentioned in will automatically appear in your “Assigned to you” smart list. We’re also working on adding your reading lists from Edge as tasks. More integrations are on the way to make To Do the place for all your tasks.
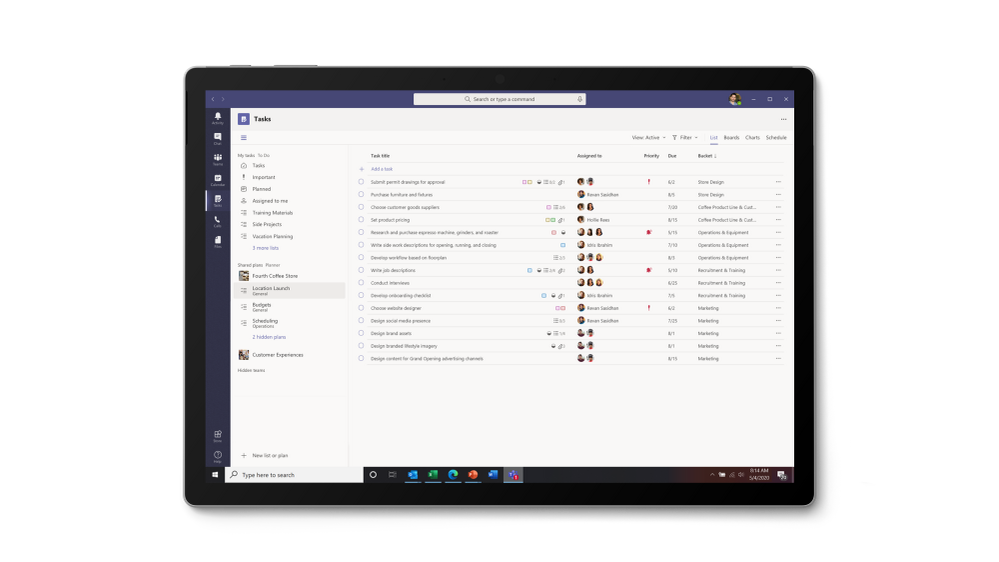
 Tasks in Teams provide consolidated view of your To Do and Planner tasks
To Do is much more than a to-do list organizer. It’s an intelligent fabric that collects and connects tasks across the Microsoft 365 suite of applications. For example, the Insights add-in program for Outlook extracts important commitments or follow-ups from your Outlook messages and, with a click, adds them to To Do. In addition, the My Day smart list has task suggestions collected from across Microsoft 365 to help you prioritize and complete important tasks for your day. Moreover, you can also share lists with coworkers to get more done together. You can easily switch to your personal account and organize your tasks outside of work.
 Quick access to To Do tasks is live for Outlook Web users
To Do is built on the Microsoft Exchange platform, and it meets all security and privacy standards by design like your Outlook inbox. Organization admins can easily grant or remove access to To Do for their employees. We imagine a future where all your tasks in Microsoft 365 apps are collected automatically in To Do so you can focus on what matters and save time every day.

To Do complies with information governance and eDiscovery features of Office 365
We’ll post updates just like this on the Tech Community blog to let you know about new features that you can try in To Do. Check back here for regular posts and check out our Release Notes for more information about updates and fixes. In the meantime, we want to hear from you! Tell us what you think about the Teams integration and let us know what you’re looking forward to next via UserVoice or write to us (todofeedback@microsoft.com).
by Scott Muniz | Jul 28, 2020 | Uncategorized
This article is contributed. See the original author and article here.
This new world of work can feel scattered. Even if you’re an old pro at working from home, things have changed. Your calendar is filled with meetings, you’re constantly managing requests from your team—not to mention your actual work. At times (or all the time), it can feel impossible to manage your ever-growing list of priorities, especially since those too are scattered across your calendar, Word docs, spiral notebooks, and sticky notes.
In this new normal, Microsoft’s vision for a unified tasks experience, which we first announced at Ignite last year, is more relevant than ever. Since then, we’ve made significant progress in creating a coherent, integrated, and intelligent experience to help you stay organized. Microsoft Teams, Microsoft Outlook, Microsoft Planner, Microsoft To Do, and Office—specifically, Word, Excel, and PowerPoint—all play a role in the Microsoft 365 tasks experience.
We’re celebrating progress in this space with the launch of a dedicated Microsoft 365 tasks experience webpage, where you can read about all the app connections that bring unified task management to life. But don’t go yet! Read on to see what we’ve been up to since Ignite and to learn more about our vision for this effort.
Teams: manage all your individual and team tasks in one place
If you’re like us, Teams is the nucleus of your workday, especially now that so much of our work is done remotely. So, it’s no coincidence that our unified tasks effort also centers around Teams, which brings tasks from both Planner and To Do into Tasks in Teams. First announced at Ignite last year, Tasks in Teams started rolling out to our customers today and will continue through the end of September. You can read more about the rollout here.

We’ve made some exciting additions to the Tasks in Teams experience since the Ignite announcement. Here’s short summary of those changes, which are covered more extensively on our dedicated Microsoft Docs page.
- Task publishing. Designed for companies that need strong communication between corporate and a large, geographically dispersed Firstline Workforce, task publishing lets you create tasks at the corporate level and push those tasks to targeted locations of their Firstline Workforce. Store managers can easily assign tasks to individual employees, while Firstline Workers can see a simple prioritized list of those tasks on their personal or company-issued mobile device. This task flow delivers an easy way for corporate and Firstline Workers to drive the right actions like sales promotions needed for business success. If you’re interested in task publishing—this feature is currently in private preview—please fill out this form to nominate your company.

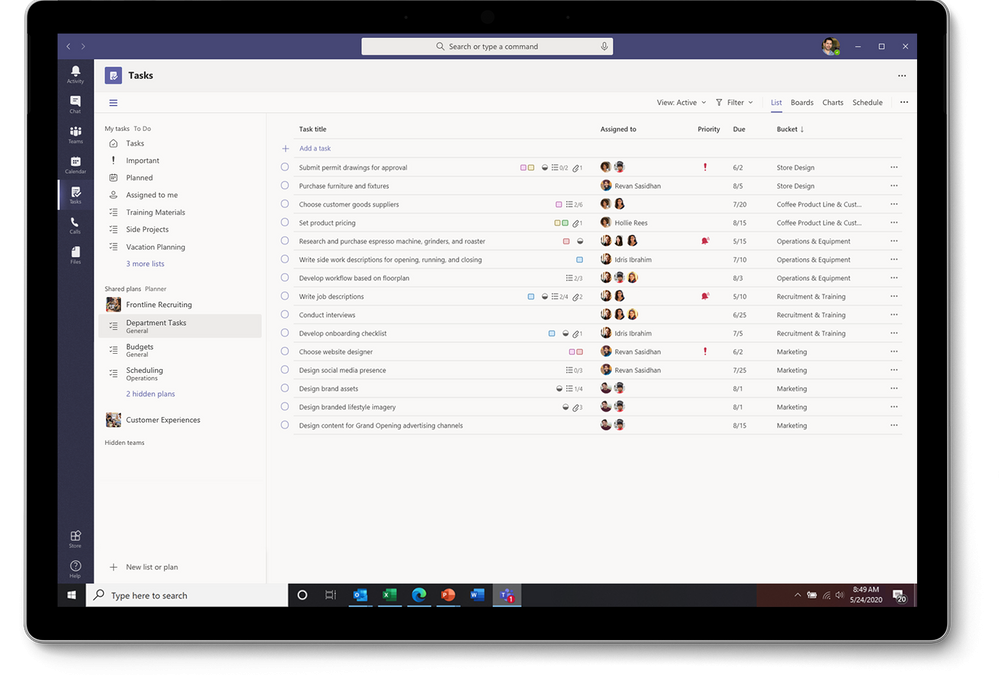
- List view. Tasks in Teams includes the traditional Board, Charts, and Schedule views from Planner, plus the new Lists view, adding another option for visually managing all your tasks.
- Edit multiple tasks at once. List view also comes with bulk editing capabilities, where you can select multiple tasks and make the same edits to all of them simultaneously. This feature supports changes for progress, priority, due date, and more depending on what task list you’re looking at.
- APIs and Power Automate. You can use Graph API and Power Automate integrations for Planner and To Do to surface tasks created in other apps in Tasks in Teams. Read more about these APIs on our respective Planner and To Do pages, but note that the existing To Do API will soon get updated to a new one. For Power Automate, search “Planner” or “To Do” on the homepage for a host of premade workflow templates.
Outlook: take control of your entire day
Outlook is more than email and calendar: it’s your personal organizer, where you manage your day around work and life commitments—often in the context of tasks. Like Tasks in Teams, Outlook is another hub for the Microsoft 365 tasks experience, where integrated task management capabilities leverage familiar and intelligent solutions to streamline your workday’s commitments.
- My Day. Through My Day in Outlook, you can quickly see what your day looks like without disrupting your email workflow. My Day has two tabs: a calendar for creating and viewing meetings and events, and the To Do tab, lets you manage your individual tasks and lists. Any changes are synced to all your task lists across Microsoft 365.
- Tasks from email. Turn an email into a task or event by dragging and dropping it into My Day, flagging it in your Outlook message list, or selecting the Create a Task option in the email itself. For help while you’re away from your computer, use Play My Emails in Outlook mobile to flag emails for your To Do list or ask Cortana to add an email to your tasks list.

- Tasks from To Do in Search. When you open Search in Outlook mobile, it will proactively pull your top three tasks, regardless of where you created them, and add them to the Search home page. You can easily check them off your list as you go, or quickly open the To Do app to edit or add new tasks.
- Cortana Briefing email. To help you prepare for upcoming meetings and stay on top of commitments, the personalized Cortana Briefing email appears automatically in your Outlook inbox around the start of your workday. In that email, Cortana recommends action items from previous threads that you can add as tasks to To Do.
- MyAnalytics. If you’re using the MyAnalytics Insights add-in in Outlook, the “View outstanding tasks” insight reminds you of tasks that you’ve agreed to do during the last 14 days. You can also see inline suggestions to review suggested outstanding tasks for the person who sent the email or calendar invitation.
Planner and To Do: powering the Microsoft 365 tasks experience
The sub-headline says it all: Planner and To Do power the Microsoft 365 tasks experience. It’s from these apps that your team and individual tasks appear in Teams and Outlook. But that doesn’t mean they’re going away; on the contrary, Planner and To Do are critical to the success of this task management motion, so we’re as dedicated as ever to their evolution.
Planner is your go-to app for team tasks. Built around the Kanban approach to task management for teams, Planner lets you easily create plan boards and populate them with information-rich task cards that include files, checklists, labels, and more—everything you need to see tasks through to completion. The entire board can be organized around buckets and filtered based on priority, assignee, and other details. As your plan gains momentum, you can check the entire effort’s progress in the visual Charts view, where premade pie and bar charts provide quick status for all your plan’s tasks and team members.

On the personal side of tasks is To Do, your go-to app for individual tasks. The perfect tool for homing in on your day’s top priorities, To Do helps create sanity in this new world of work. The To Do experience starts with My Day, where you can enter tasks you’d like to focus on for the day. These tasks can be manually added on your tablet or phone, or by asking Cortana to add one for you, and then tracked in Outlook. Added tasks are synced across Microsoft 365. This integration extends to Planner: tasks assigned to you there show up in the Assigned to you smart list. You can easily switch between your work and personal accounts on Android and Windows devices, too. But the best part? The To Do app is free, which means your family and friends with a Microsoft account can use it to coordinate on everything you love in your personal life. You can even share lists between your personal and work accounts, a highly requested feature that we’ve started rolling out this month.

Word, Excel, PowerPoint: capture tasks without switching apps
Tasks can originate from anywhere at any time. This is particularly problematic if you need to break concentration from whichever Office document you’re in to assign that task through another app. But those were the old days; these days—these new Microsoft 365 tasks experience days—you can assign tasks using comment @mentions directly in Word, Excel, and PowerPoint.
This capability is now rolling out in Word and Excel for the web, with PowerPoint for the web availability coming soon. In the future, these tasks will also show up in Planner and To Do.

@mention task assignments trigger email notifications with a link to the comment in the document. The email notification shows your comment alongside the associated Word sentence, Excel cell, or PowerPoint slide. Add to that Microsoft’s threaded comments experience, and task assignees have all the context they need to get started on the assignment. The person you @mentioned can also respond to the comment directly from their email notification without opening the associated doc.
@mention task assignments, which are a logical extension of a familiar feature (i.e., in-app comments), are a perfect example of the work we’re doing around the Microsoft 365 tasks experience. As we build out this motion, look for similar capabilities that bring task management coherence and integration to your everyday productivity apps.
Continuously connecting the dots
This unified tasks experience is a year old, but we’ve only just begun. Microsoft’s mission is to empower every person and organization to achieve more, and we believe streamlining task management advances this goal. This starts with what you’ve read here: connecting the apps and services you use most into a coherent, integrated, and intelligent experience. This is especially important in this new, often-scattered world of work.
We hope you’ll continue to follow us on this journey through the Microsoft 365 tasks experience webpage. This experience is part of a larger collaborative work management initiative that we just launched last week at Microsoft Inspire. You can watch the 30-minute presentation video about that effort here. And as always, if you have ideas for improving your productivity, drop us a line on the various product UserVoice pages (Teams, Outlook, Planner, To Do, Word, Excel, PowerPoint).
by Scott Muniz | Jul 28, 2020 | Uncategorized
This article is contributed. See the original author and article here.
Making security easy to use is crucial because hard-to-use security is likely to be neglected entirely. SCRAM with channel binding is a variation of password authentication that is almost as easy to use, but much more secure.
In basic password authentication, the connecting client simply sends the server the password. Then the server checks that it’s the right one, and allows the client to connect. Basic password authentication has several weaknesses which are addressed with SCRAM and channel binding.
In this article, I’ll show you how to set up authentication using SCRAM with channel binding. I implemented the client connection parameter channel_binding in PostgreSQL 13, due to be released in late 2020 (PostgreSQL 13 is in beta now). SCRAM and Channel Binding have already been supported in several releases, but this new connection parameter is necessary to realize the security benefits of SCRAM and Channel Binding.
First, before diving in to the tutorial, some background on SCRAM and Channel Binding.
Disclaimer: This article is just a how-to. As with any security decision, you should perform your own analysis to determine if it’s right for your environment. No security feature is right in all cases.
The SCRAM authentication method in Postgres
SCRAM is a secure password authentication protocol that can authenticate the client. It has several advantages over basic password authentication:
- does not reveal the user’s cleartext password to the server
- is designed to prevent replay attacks
- enables the use of Channel Binding (see next section)
- can support multiple cryptographic hash functions
- currently, PostgreSQL only supports SCRAM using SHA-256
For these reasons, in PostgreSQL, the scram-sha-256 password auth method is strongly recommended over md5 or password.
The first part of this tutorial can be used to set up SCRAM even if you don’t use channel binding.
Channel Binding with SCRAM
In many cases, it’s just as important for the client to authenticate the server, as it is for the server to authenticate the client; this is called mutual authentication. Without mutual authentication, the server could be a malicious imposter or you could be exposed to a MITM attack.
Channel Binding is a feature of the SCRAM protocol that allows mutual authentication over an SSL connection, even without a Certificate Authority (which is useful, since it can be difficult to configure a Certificate Authority in some environments).
It is not recommended to rely on Channel Binding if using clients earlier than version 13.
When using channel binding, you should specify channel_binding=require in the connection string (see connection parameters), which tells the client to demand channel binding before the connection succeeds. Alternatively (or additionally), you can set the PGCHANNELBINDING environment variable to require. Without one of these options set, the client may not adequately authenticate the server, undermining the purpose of channel binding.
How to know if your client supports the channel_binding parameter
First, determine the client driver that your application is using. Typically, the client driver will depend on the language you are using, and you can find it on this list of client drivers . If your client driver is listed as using libpq (the official PostgreSQL client library), that means that it will support the channel_binding connection parameter as long as you are using at least version 13 of libpq. libpq ordinarily comes from an operating system package; for instance, on Ubuntu, look at the version of the package postgresql-client.
If your driver does not use libpq, it may still support the new connection parameter; consult your driver’s documentation for details. For instance, rust-postgres supports the channel_binding connection parameter even though it doesn’t use libpq.
Tutorial on setting up SCRAM with channel binding in PostgreSQL 13
1. Initial Postgres Setup
- Install the Postgres 13 beta and make sure the newer versions of the
postgres and psql binaries are in your PATH. If compiling from source, be sure to use the --with-openssl option.
- Run
initdb -D data -k to initialize a new data directory
pg_ctl -D data -l logfile start to start the server- Make sure you can connect:
psql "host=localhost dbname=postgres user=myuser"
- Type
q at the prompt to quit
pg_ctl -D data stop
2. Configure for SCRAM authentication and safely add a user
- Edit
data/postgresql.conf and add the line password_encryption = scram-sha-256 at the bottom.
- Edit
data/pg_hba.conf to set at least one authentication method to safely use for an initial superuser connection. This is needed to set up at least one user with a SCRAM password, see pg_hba.conf documentation to see the options. In my environment, allowing local connections with trust is secure enough for the initial setup:
- Start Postgres:
pg_ctl -D data -l logfile start
createuser -P myuser
- May need to supply additional options if not using a
local connection.
createuser has important advantages over using manual SQL commands from psql to create the user:
- It prompts for the password, so the plain text password never ends up in the process title, the shell history, or the psql history.
- It cryptographically hashes the password before sending it to the server, so that the server never sees the plaintext password.
- Stop Postgres:
pg_ctl -D data stop
3. Configure pg_hba.conf
Edit pg_hba.conf, and make sure to create an entry that allows TCP/IP connections (one of the records that begins with host...), otherwise SSL won’t be used and Channel Binding won’t work.
Here’s the pg_hba.conf that I’m using for this demo:
host    all             all             127.0.0.1/32            scram-sha-256
host    all             all             ::1/128                 scram-sha-256
You may consider using hostssl instead to reject non-SSL connections. I am allowing non-SSL connections to demonstrate connection failures that can happen when channel binding is required but SSL is off.
If you only allow connections using scram-sha-256, then all users must have a SCRAM password set, or they won’t be able to connect.
4. Start the server and verify that you can connect using SCRAM
pg_ctl -D data -l logfile startpsql "host=localhost dbname=postgres user=myuser"
pg_ctl -D data stop
5. Configure SSL and require channel binding
NOTE: generate the SSL key and certificate according to the best practices in your organization; the instructions below are just for demonstration purposes.
- Generate key and cert:
openssl req -newkey rsa:2048 -nodes -keyout server.key -x509 -days 365 -out server.crt
chmod 400 server.keymv server.key data/mv server.crt data/- Edit
data/postgresql.conf and add the line ssl = on at the bottom.
6. Connect to the server
Make sure you follow the directions to configure pg_hba.conf above.
pg_ctl -D data -l logfile startpsql "host=localhost dbname=postgres user=myuser sslmode=disable"
- should prompt for password and succeed
psql "host=localhost dbname=postgres user=myuser sslmode=require"
- should prompt for password and succeed
psql "host=localhost dbname=postgres user=myuser sslmode=disable channel_binding=require"
- should prompt for password and then fail because channel binding requires SSL; but we have disabled SSL and required channel binding
psql "host=localhost dbname=postgres user=myuser sslmode=require channel_binding=require"
- should prompt for password and succeed
pg_ctl -D data stop
Note that SCRAM in general does not require SSL to be used, but Channel Binding does require SSL.
7. Always Require Channel Binding
Edit your environment to set PGCHANNELBINDING=require so that all clients connecting will require channel binding.
How Channel Binding relates to a Certificate Authority
Note that we didn’t have to configure a Certificate Authority (CA) . A CA is another way for the client to authenticate the server, but it can be difficult to set up and maintain in some environments.
But if you do have a CA in your environment, you can combine it with SCRAM and Channel Binding to authenticate the server based on two separate mechanisms (which can enhance security in case one is compromised). To do so, set sslmode=verify-full or sslmode=verify-ca along with channel_binding=require in your connection parameters.
You can also use the clientcert auth option in pg_hba.conf, to tell the server to verify the client’s certificate against the CA. But note that this auth option doesn’t verify that the CN of the client certificate matches the connecting username (to do that, you need to use the cert auth method, which means you aren’t using SCRAM or any other password authentication).
Importance of the client connection parameter
It’s important to set channel_binding=require in your connection string, otherwise the client may be fooled into not performing Channel Binding at all, and thus not authenticating the server.
The PostgreSQL authentication protocol and libpq were primarily designed around the server authenticating the client (i.e. the server doesn’t trust the client). But the client implicitly trusts the server, attempting to authenticate itself using any mechanism the server requests, and establishing the connection as soon as the server is satisfied. Methods to authenticate the server require the client to explicitly demand them—for instance, by setting sslmode=verify-full in the connection string. Channel Binding is no different: you need to set channel_binding=require.
If this step is neglected, then all a malicious server needs to do to draw in an unsuspecting client is to immediately send an AuthenticationOk message, indicating that the server is satisfied with the connecting client. The client will skip the SCRAM protocol entirely (including Channel Binding), connect to the server, and could begin issuing queries that contain sensitive data to this malicious server.
Or worse, without channel_binding=require, the server could instead send an AuthenticationCleartextPassword message. The client will respond by (you guessed it!) sending the server the cleartext password, even though the user had otherwise configured SCRAM, and thought that at least their cleartext password was safe. This not only undermines Channel Binding, it undermines the entire purpose of SCRAM.
Use SCRAM and remember to set channel_binding=require
SCRAM is a huge improvement over traditional password authentication, and SCRAM with channel binding is even better. But as we can see, PostgreSQL users need to be careful to use it correctly to get the full benefit.
Setting channel_binding=require (or at least setting the environment variable PGCHANNELBINDING to require) is a critical step to protect yourself against certain kind of attacks, and it is available with PostgreSQL client version 13.
About the Author
I am on the Postgres team at Microsoft, and I’m also a PostgreSQL committer. See Microsoft Azure Welcomes PostgreSQL Committers, which introduces me along with fellow committers Andres Freund, Thomas Munro, and David Rowley.

by Scott Muniz | Jul 27, 2020 | Uncategorized
This article is contributed. See the original author and article here.
In this two-part series, we’re going to look at how we can manage SharePoint using PowerShell. This is highly focused on SharePoint Online, but if the cmdlets are available, it also applies to SharePoint on-premises. We’ll start with the basics, and then get some real-world scenarios scripts in part 2 to get you started with your daily management tasks. I’ll also you give some tips along the way to make your life easier.
Let me start by asking this: Have you ever been curious enough to look at how many SharePoint on-premises PowerShell cmdlets are available? If not, I can tell you there are 800+ of them. Now, have you been curious enough to look at how many PowerShell cmdlets are available to manage SharePoint Online?

Well, that’s a big drop isn’t it?! In SharePoint on-premises, there are a lot of commands to configure Search, Service Applications, interact with SQL databases, or other features provided by SharePoint.
With SharePoint Online, we don’t need to do all that. Microsoft manages everything, and we don’t need to worry about databases for instance.
So, what now?
There is another PowerShell module out there… And if you’ve never heard of it, you’re totally missing out!
SharePoint PowerShell PnP (Patterns & Practices) is a module created by a community member (Erwin Van Hunen, MVP) to fill a gap in the management of SharePoint when using only PowerShell.
Currently, there are 492 cmdlets available (v.3.23.2007.1) and the prefix used is ‘PnP’ (i.e.: Get-PnPList).
If you don’t have a native cmdlet, you can still use Client-Side Object Model (CSOM), or Server-Side Object Model (SSOM). However, as administrators, we might know PowerShell, but not be proficient in the other methods.
Note: In this module, you’ll also notice that there are Microsoft Teams cmdlets, which are starting to surface with the July 2020 version!
How can I use it?
To start benefiting from this great module, we first need to install it. We have a few ways to do that.
- Download the .msi
- Install from the PowerShell Gallery
This module is available for SharePoint 2013/2016/2019, and SharePoint Online. It’s important to refer to the official documentation because some commands might be available for a module but not the other.
Once installed with your favorite method, we need to connect to SharePoint Online (make sure you’ve got at least the SharePoint admin role assigned). Depending on the action we want to perform, we can connect to the SharePoint Admin Center, or to a particular site. At its most basic form, connecting would look like this:
$creds = Get-Credential
Connect-PnPOnline -Url "https//<TENANT-NAME>.sharepoint.com/sites/<YOUR-SITE>" -Credential $creds
Spoiler (Highlight to read)
Want a tip? If you enter your credentials in your Windows Credential Manager under “Windows Credentials –> Add a generic credential”, you won’t need to use the -Credential parameter!
Want a tip? If you enter your credentials in your Windows Credential Manager under “Windows Credentials –> Add a generic credential”, you won’t need to use the -Credential parameter!
If your account has multi-factor authentication (MFA) enabled, use the -UseWebLogin parameter. I’d encourage you to visit the Connect-PnPOnline documentation because there are plenty of other ways to connect!
Connect to the SharePoint Admin Center
Depending on which site you’re connected to, you get different results. What I mean is, by connecting to the SharePoint Admin Center you won’t be able to interact much with library content, or fields. But connecting to the Admin Center can give us information about the tenant settings.
Let’s connect to the Admin Center, and run Get-PnPTenant to get some information at the tenant level.
Connect-PnPOnline -Url "https://m365x141782-admin.sharepoint.com/"
Get-PnPTenant

As we are connected to the top-level site (admin one), we can also get all our site collections using the Get-PnPTenantSite cmdlet.
Connect to a Specific SharePoint Site
This is where you’re going to send most of your requests. Use the following to connect to your target site:
Connect-PnPOnline -Url "https://m365x141782.sharepoint.com/sites/Contoso"
Again here, I’m not using the -Credential parameter because my credentials are stored in the Credential Manager on my machine.
Spoiler (Highlight to read)
Want a Tip? If you ever forget on which site you’re connected to, you can run `Get-PnPContext`, and look at the ‘Url’ property.
Want a Tip? If you ever forget on which site you’re connected to, you can run `Get-PnPContext`, and look at the ‘Url’ property.
That’s it for this first part. Part 2 will explore how to interact with sites content! Stay tuned.

by Scott Muniz | Jul 27, 2020 | Uncategorized
This article is contributed. See the original author and article here.
We were recently alerted to an issue whereby a device in the Microsoft Endpoint Manager admin console was showing “failed” for their Windows Update status.
Upon investigation, we discovered that the device was not missing any updates – everything had successfully applied. However, we did find two error codes on the device, which then were calculated by Intune as “failed”. After the policy was re-evaluated, then the device returned to healthy.
Here’s the steps we took to replicate this experience:
- Create a basic Windows Update ring policy and apply to Windows 10 devices.
- Trigger a check for updates and refresh the device.
- Download Psexec.exe
- Run psexec /sid PowerShell.exe from an elevated command prompt or elevated PowerShell window. A new PowerShell instance will open, running in system context.
- Run the following command in the system-context PowerShell window you created in step 4:
gwmi MDM_Update_FailedUpdates01_01 -Namespace ROOTCIMV2mdmdmmap
If nothing is returned, the device does not currently have a failed update.
If Windows Update returns one of the two error codes as you can see on the device, then you’ll see “failed” in the console:
HResult : -2145082874
InstanceID : ec67ed82-8cf6-4fa9-86bf-efdb4e7b5d00
ParentID : ./Vendor/MSFT/Update/FailedUpdates
State :
HResult : -2145082858
InstanceID : 33e3f18f-c868-4d00-8266-01c100acf444
ParentID : ./Vendor/MSFT/Update/FailedUpdates
State :
These two error codes are specific to Windows Update being too busy. It’s rare, but there are times that the service will return these codes. If you run into this, both the Intune policy refresh and then likely the Windows Update policy refresh will need to trigger to ensure policy is evaluated and updated. For more info on Intune policy refresh timelines, see:
https://docs.microsoft.com/mem/intune/configuration/device-profile-troubleshoot#how-long-does-it-take-for-devices-to-get-a-policy-profile-or-app-after-they-are-assigned
Follow Intune Support as a Feature on Twitter as @intunesuppteam for helpful articles, release info, and more!


Recent Comments