by Scott Muniz | Jun 17, 2020 | Uncategorized
This article is contributed. See the original author and article here.
In March, we announced that we would pause optional non-security update releases (also referred to as “C” and “D” releases) for all supported versions of Windows client and Windows Server to give organizations time to focus on business continuity in the face of the global pandemic. Based on feedback and the ongoing stabilization of business continuity, we will resume optional releases in July of 2020 for Windows 10 and Windows Server, version 1809 and later, to once again provide you with the ability to test planned non-security fixes targeted for the next month’s Update Tuesday (or “B”) release. We are also instituting a few changes to simplify the update process and help you continue to stay current with Windows 10 and Windows Server.
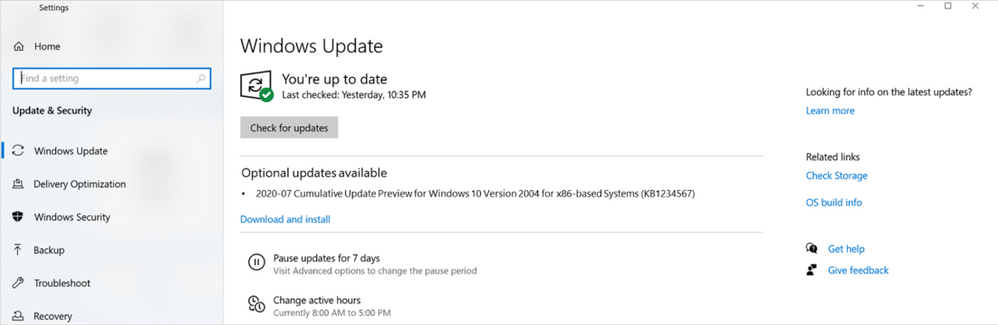
First, in response to feedback, these validated, production-quality optional releases will be now called “Preview” releases for clarity, and will be offered only for Windows 10 and Windows Server, version 1809 and later. You will see the naming change reflected in the release title as shown in the example on the Windows Update page in Settings below:

Second, to simplify update management for IT, these “Preview” releases will be delivered in the “C” week only. There is no change to the cumulative monthly security updates (also referred to as the “B” release or Update Tuesday release). These releases will continue to contain all previous updates to keep your users protected and productive.
Third, if you use Windows Server Update Services (WSUS) to manage updates, you will no longer see “Preview” (or “C”) releases for Windows 10 or Windows Server in the WSUS channel. This ensures a consistent update management experience across all supported versions of Windows in your environment.
Finally, for those in the Windows Insider Program or Windows Insider Program for Business, in-development versions of these non-security updates will be released to the Release Preview Channel in the “B” week.
For more information about the various types of Windows updates (such as critical, security, driver, service packs, and so on, please see Description of the standard terminology that is used to describe Microsoft software updates. To find out when new content is published to the Windows release information message center, follow @WindowsUpdate.
by Scott Muniz | Jun 17, 2020 | Uncategorized
This article is contributed. See the original author and article here.

Let’s start!
The first step is to download and install the Go language that is available at: https://golang.org/ .
Go is an open source programming language that makes it easy to build simple, reliable, and efficient software.

Launching Windows Terminal from Windows Explorer Address Bar
I am pretty sure that you already know that typing CMD or PowerShell.exe on the Windows Explorer address bar will open the respective prompts in the same folder that it was displayed on Windows Explorer.
But how to achieve the same behavior with Windows Terminal?
If you type wt on the address bar, Windows Terminal will not be launched in the same folder that Windows Explorer. In fact, Windows Terminal will be opened in the folder defined in the default profile.

:triangular_flag: To open Windows Terminal in the same folder of Windows Explorer you need to run the following command:
wt -d .

In case you don’t like to type the parameters for the wt command, you can use the language Go to reduce it to only a single command.
:folded_hands: I would like to thank my friend and teammate Alexandre Teoi that shared with me his implementation using Go to avoid having to pass parameters to wt command.

You can find Teoi’s solution on GitHub: https://github.com/DevelopersCommunity/wtd .
The implementation is straightforward. The wtd.go file, available on GitHub, is used to run the wt -d . command:

Once you have installed Go, run the following code to compile and install packages:
go install github.com/DevelopersCommunity/wtd
:triangular_flag: It is also possible to clone the repository and install the App locally:
go install wtd.go
Now you can use wtd instead of wt to open Windows Terminal from Windows Explorer address bar without having to worry about pass the parameters.

Automating Windows Terminal launching
The idea of this session is to demonstrate how to open Windows Terminal with three panels opened running different commands.

The first thing that you need to do is to create the following three profiles on Windows Terminal to host each panel.

Follows the code that must be included in the session profiles of the settings.json file of Windows Terminal:
{
    "guid": "{0879968C-03C7-4B16-BF02-49CBF6046F59}",
    "fontFace" : "Cascadia Code PL",
    "name": "Pane1",
    "backgroundImage": "C:podcastWindows Terminalwindows.png",
    "commandline": "powershell.exe -noexit -command c:usersluisdempane1.ps1"
},

{
    "guid": "{C7A929B8-F4F5-4B30-9AE4-761BD582B036}",
    "fontFace" : "Cascadia Code PL",
    "name": "Pane2",
    "backgroundImage": "C:podcastWindows Terminallinux.png",
    "commandline": "powershell.exe -noexit -command c:usersluisdempane2.ps1"
},

{
    "guid": "{F7F214CA-48DF-4CB2-8B21-54D195867B14}",
    "fontFace" : "Cascadia Code PL",
    "name": "Pane3",
    "backgroundImage": "C:podcastWindows Terminallinux.png",
    "commandline": "powershell.exe -noexit -command c:usersluisdempane3.ps1"
}
In my sample, I am running a PowerShell script for each profile (Pane1, Pane2 and Pane3).
The content of those scripts are:
Pane1.ps:
#First part
get-process

#Second part

[void][System.Reflection.Assembly]::LoadWithPartialName('System.Windows.Forms')
[System.Windows.Forms.SendKeys]::SendWait("%{RIGHT}")

[void][System.Reflection.Assembly]::LoadWithPartialName('System.Windows.Forms')
[System.Windows.Forms.SendKeys]::SendWait("%+{UP}")

[void][System.Reflection.Assembly]::LoadWithPartialName('System.Windows.Forms')
[System.Windows.Forms.SendKeys]::SendWait("%+{UP}")

[void][System.Reflection.Assembly]::LoadWithPartialName('System.Windows.Forms')
[System.Windows.Forms.SendKeys]::SendWait("%+{UP}")
The first part (#First part) is used to list all the processes running and the second part (#Second part) is used to invoke the short keys responsible to change the panel size.
%{RIGHT}: is used to invoke the Shift+Right Arrow to change the focus to the right pane.
%+{UP}: is used to invoke the ALT+Shift+Up Arrow to change the vertical size of the pane.
Pane2.ps:
wsl cowsay "Welcome to Windows Terminal"
wsl
wsl
Pane3.ps:
wsl cmatrix
wsl
Finally we can use Go to create the App that will open Windows Terminal with the three new profiles running in different panes.
The idea is to run the following command:
wt -p "Pane1" `; split-pane -p "Pane2" `; split-pane -H -p "Pane3"
All you have to do is to create a file, like wtp.go and implement the following code:
package main

import (
    "fmt"
    "os/exec"
)

func main() {
    cmd := &exec.Cmd{
        Path: "cmd",
        Args: []string{"/c", "start", "wt", "-p", "Pane1", "`;", "split-pane", "-p", "Pane2", "`;", "split-pane", "-H", "-p", "Pane3"},
    }
    if err := cmd.Start(); err != nil {
        fmt.Printf("Error: %sn", err)
    }
}
Follows the wtp.go file opened on Visual Studio Code:

Once we have the file, we need to compile and install the App through the following command:
go install wtp.go
Now, all you have to do is to execute wtp to launch this customized Windows Terminal:

This post is just to demonstrate how to use Go language to customize some actions to open Windows Terminal.
It is possible to achieve the same behavior using other languages. :beaming_face_with_smiling_eyes:
I hope you enjoyed this post. :thumbs_up:

by Scott Muniz | Jun 17, 2020 | Uncategorized
This article is contributed. See the original author and article here.
The rise of cryptographically secured decentralized systems has excited a new generation of users, developers, and businesses about applications that can radically change our daily lives. While it’s easy to get caught up in what could be, our work on decentralized identity is motivating us to tackle tough challenges (some decades old) that hinder adoption.
We believe empowering users with ownership and control over their digital identities could better the lives of everyone on the planet by unlocking new applications and services that are more private and secure. As we strive to realize this ideal, the decentralized systems we’re leveraging face many of the same challenges users, developers, and businesses in the cryptocurrency ecosystem have struggled with in the decade since Satoshi’s first transaction on Bitcoin.
One of the more significant challenges of these decentralized systems is their reliance on users retaining private keys and other secrets to realize the unique benefits they provide, as is the case with owning and controlling a Decentralized Identifier (DID). The long-standing problem of users retaining cryptographic secrets has led to the adoption of several schemes (largely driven by the cryptocurrency community) that attempt to provide a somewhat better experience than raw private key retention. Software and hardware wallets use two primary recovery schemes today: BIP 39 mnemonic phrases and Shamir Secret Sharing constructions. In the next section, we’ll shed light on how these two commonly used schemes work before contrasting them with the scheme we’ve been working on.
Recovery schemes commonly used today
Mnemonic phrase schemes (e.g., BIP 39) generate a set of 12-24 randomly selected words from a corpus that form a secret seed. While these mnemonic schemes map an unmemorable secret to words, affording some degree of memorability and human error correction (e.g., illegibly written words can be deduced), successful regeneration of the secret requires the user to produce all the words in their exact form and order. These requirements make mnemonic schemes rather unwieldy in practice.
Mnemonic phrase schemes result in the following feature profile (green = positive, red = negative):

Shamir secret sharing schemes use polynomial interpolation as a basis for dividing a secret into N shares, wherein some subset threshold of T shares must be recombined in any order to regenerate the secret. The user can distribute the resulting shares in different ways, for example, storing shares on different devices, hiding paper printouts of shares in different physical locations, or sending shares to a set of collaborators for future retrieval. Typically, this scheme is used for what’s known as ‘social recovery’ models, where you use an app to distribute shares to selected friends or contacts. While this common secret sharing scheme affords the user some flexibility by only requiring them to reproduce a subset of shares, in any order, the shares themselves are long, cryptographically random strings, which makes human recollection of shares impossible.
Shamir secret sharing schemes result in the following feature profile (green = positive, red = negative):

Both schemes provide various advantages over simply attempting to remember or store long, unmemorable secret strings of random numbers and letters, but the approaches come with almost diametrically opposed trade-offs. With mnemonic phrases, inputs are words, which increases memorability, but users must correctly reproduce all words in the exact order in which they were generated. Secret sharing schemes, on the other hand, only require the user to reproduce a threshold subset of shares, in any order. Unlike mnemonic phrases, however, the shares are long, random strings of letters and numbers, not words or other human-friendly inputs.
Venturing beyond the status quo
The Standards & Open Source team in Microsoft’s Identity division has been working with cryptographers in Microsoft Research to explore schemes that can deliver the desirable features of both schemes described above in a single mechanism. Our goal is to enable users to encrypt a secret with a wide, flexible array of N inputs (words, images, etc.) and recover their encrypted secrets using only a T threshold subset of those inputs. We also want to include all other desirable features and characteristics from the schemes in use today. Ideally, the scheme we produce should exhibit the following feature profile:

I’m excited to share our first output of this exploration: a whitepaper describing our construction of a ‘Fuzzy Vault’ scheme that fulfills the feature requirements listed above. Esha Ghosh and other contributors from Microsoft Research developed the construction and subsequently produced a working implementation internally at Microsoft. Along with the whitepaper, we’re announcing our commitment to developing an open source implementation of the scheme within this Decentralized Identity Foundation repository: Fuzzy Encryption.
The ‘Fuzzy Vault’ construction we developed relies on elements of schemes previously described in literature. This encryption scheme uses polynomial encoding to generate an encrypted payload of secrets (or other data) using a set of selected inputs, requiring only a subset to decrypt the payload. The scheme provides information theoretic security similar to that of Shamir secret sharing, and incorporates the following features and attributes:
- It’s an encryption scheme – unlike a BIP39 mnemonic, the scheme isn’t a direct representation of a seed/key. Since it actually encrypts data, it can protect more than just private keys. This means the scheme includes a two-factor assumption, where an attacker must not only guess the correct inputs, but also possess the encrypted file to use them.
- Inputs can be anything – you can use a traditional word-based corpus (Diceware’s 7776 word list) and randomly select from it, or create your own corpuses composed of any mix of stringifiable values, like words, images, GPS coordinates, etc.
- It tolerates an error threshold – unlike a BIP39 mnemonic, you don’t need all inputs to decrypt the encrypted vault file. The scheme supports the same threshold feature as Shamir secret sharing schemes. For example, you may configure the scheme to select 16 inputs and set a threshold of 4 errors, meaning only 12 of the inputs would be required to decrypt the vault file.
- Inputs are order agnostic – unlike a BIP39 mnemonic, you don’t need to recombine inputs in the same order in which they were generated.
- It supports enhanced social recovery – the scheme can still be used in ‘social recovery’ implementations, but the shares can be human-friendly inputs, which makes it easier for share recipients to retain them.
To get a sense of the entropy hardness the scheme produces, assume you used the scheme to encrypt secret data with 20 randomly selected words from the EFF Diceware Long List of 7776 words and set a threshold tolerance of 5 errors (meaning 15 of the 20 words are required to decrypt). Under this configuration, the scheme would produce an encrypted payload with 90 bits of security, which is outside the attack range of any known computational system.
We’d like to thank everyone in DIF, the wider Identity community, and the cryptocurrency ecosystem who have highlighted the critical need for user-friendly secret recovery. Please join us in DIF and contribute to our open source effort to address the ecosystem-wide challenge of secret recovery.
Daniel Buchner
Decentralized Identity / Microsoft Identity
Esha Ghosh
Cryptographer / Microsoft Research
Image/Icon Credits:
prettycons from www.flaticon.com
Freepik from www.flaticon.com
Becris from www.flaticon.com
Smashicons from www.flaticon.com
by Scott Muniz | Jun 17, 2020 | Uncategorized
This article is contributed. See the original author and article here.
PowerPoint Presenter Coach arrives on Android devices just in time for your next big presentation
Last fall, we brought our virtual Presenter Coach to PowerPoint for the web. We are excited to announce it is now generally available on your Android device – both in the PowerPoint app and in the new Office mobile app.
This feature uses AI to help you hone your public speaking skills by providing on-screen guidance on your pacing, use of inclusive language or profanity, and noting use of filler words and culturally insensitive phrases. At the end of each session, it also provides a detailed report with metrics for additional practice and reflection.
In a world where many of us are in more online meetings than ever before – in April Teams users conducted 4.1 billion minutes of meetings in a single day! – we hope this feature can help take the pressure off your next big presentation and help you refine your public speaking skills over time.
How to use Presenter Coach on mobile
Simply open any presentation in your PowerPoint stand-alone app or Office Mobile app, tap on the more actions menu (three dots), tap “rehearse with coach,” and tap “start rehearsing” when ready. As you speak, Coach will provide you with real-time feedback, and it will also generate a summary report when you finish that provides specific feedback to your practice session. You’ll be able to take your practice wherever you are – whether on a walk, in the passenger seat of a car on a road trip, or even if you’re just sitting on the couch after a long day and don’t want to take your laptop out!
Tips & Tricks
We recommend that you rehearse in a quiet place. To enjoy the full Presenter Coach experience, make sure your mobile is not on silent mode. Try to speak as if you were in front of an audience or giving a presentation remotely for others.
After you close the rehearsal report, it disappears. If you want to save a copy of it, take a screenshot.
Get started
We are excited about the new experiences in PowerPoint and hope you will love them too. Please don’t hesitate to tell us what you think! Download either the PowerPoint Android App, or the Office Mobile App, so you can experience Coach on-the-go! Presenter Coach will be available for iOS in the coming months.
by Scott Muniz | Jun 17, 2020 | Uncategorized
This article is contributed. See the original author and article here.
As noted in the What’s New in Microsoft Teams | May 2020 blog, we recently started rolling out Teams and Skype Inter/Op. Today we are happy to share the roll out is complete – Teams users can now chat and call millions of Skype users around the world.
We know there is a large ecosystem of small and medium businesses using Skype as their collaboration tool. Many of our Microsoft 365 customers value being able to do business with this ecosystem. Scenarios such as securely communicating with vendors, suppliers, contractors, project managers and HR interviews are just some of the reasons why this is important. Usage is growing with thousands of messages being sent every day.
Remote workers using Teams will also be pleased to know we support this on a variety of devices: mobile (Android and iOS), Web, Windows, and Mac. For an optimal Skype experience, we recommend version 8.58 and later. We also are targeting support for Teams Phones by the end of June.
Let’s understand the capabilities that are supported.
Teams Users searching for Skype Users
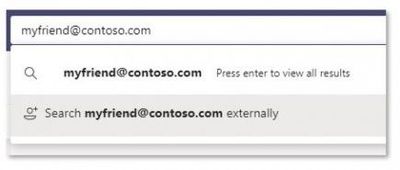
It starts with Teams or Skype users wanting to collaborate together directly. Teams users can invite a Skype colleague by using the search bar or simply start a chat. The Skype user then accepts the request and both users can chat, call or share video. Alternatively, the Skype user can also block the request if they so choose.

Skype users searching for Teams users
Skype users can reach out to collaborate by sending a request. The Teams user is warned this is an external user and then they can accept or block. Admins can also block at the tenant level – see below for more information.

Chatting, Audio, and Video
Once users are connected – they can easily chat back and forth. It is encrypted at rest and in transit so both parties can securely communicate. Today simple text is supported but we are looking at enhancing that based on feedback. And it’s easy to add audio and/or video to the chat for a full collaborative calling experience.

Easily Managed by Users and Admins
Individual Teams users can easily block any requests with a simple right-click. This lets them control which Skype users they will collaborate with.
Teams Administrators can also easily control usage at the tenant level. A single switch can be set to off and block all Skype users from communicating with tenant users. And for admins who prefer PowerShell this is easy to configure as well.

If you have Teams deployed in your organization and need to provide access to Skype users, please give it a try. It’s easy to use and support. Be sure to read our documentation for it here. We would love to hear your use case for it – post a comment below.

Recent Comments