Tagging Azure Resources with a Creator
This article is contributed. See the original author and article here.
Hello everyone, my name is Anthony Watherston and I am a Senior Premier Field Engineer in Melbourne Australia. A question was recently raised by a colleague about how we can tag an Azure resource with the name of the person who created it. This would prove especially helpful in the case of resources that are older than the default activity log retention time where the owner cannot be identified from the initial creation event. Azure Policy would normally be used to update tags however policies can only act on the properties of the resource itself – the caller is only exposed through the activity log event which creates the resource.
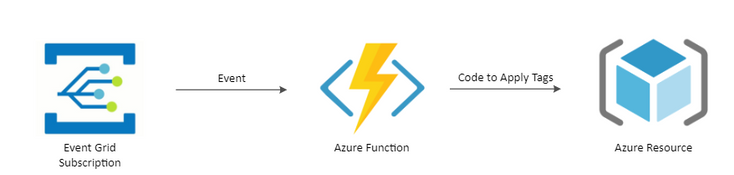
Enter Event Grid Subscriptions and Azure Functions. Each time an activity occurs in an Azure subscription an event is generated, and we can subscribe to that event using an Event Grid Subscription – part of the information captured in this event will be the user who is making the call. The subscription will help me to identify that an event has occurred, and because it is only going to deploy a tag the code should be minimal so I can use an Azure Function.
So, my flow looks like this: –

You can clone or download the project at https://github.com/anwather/TagWithCreator and check out the code but let us go through the main parts.
I built my function using PowerShell because it is easiest for me – you can create a function by following the quick start guide at Quickstart: Create a function in Azure using Visual Studio Code but instead of selecting a HTTP trigger I chose an Event Grid trigger. The extension provided in Visual Studio Code will create all the necessary files and even provide you with a sample of what an Event Grid event looks like in a file called sample.dat.
The main script code is at /functions/TagWithCreator/run.ps1.The events are passed into the function as an object already so I can just get the fields I want out of the event and assign them to variables to use later.
$caller = $eventGridEvent.data.claims.name
Write-Host "Caller: $caller"
$resourceId = $eventGridEvent.data.resourceUri
Write-Host "ResourceId: $resourceId"
The script checks if a tag exists on the object before applying – if it needs to make change then I am using the Update-AzTag cmdlet to apply the tag.
if (!($tags.TagsProperty.ContainsKey('Creator')) -or ($null -eq $tags)) {
    $tag = @{
        Creator = $caller
    }
    Update-AzTag -ResourceId $resourceId -Operation Merge -Tag $tag
    Write-Host "Added creator tag with user: $caller"
}
else {
    Write-Host "Tag already exists"
}
As far as the code is concerned there is nothing else that is any different to a normal PowerShell script but be aware that it executes using PowerShell 6 so any Windows PowerShell commands that are specific to Windows will not work.
The Azure Function handles all the connections to Azure using a managed identity which will be created when we deploy it – I also assign permissions to that identity so it can make the changes to the resources.
By default, the scaffolded Azure Function will download the entire Az module on each cold start of the function which adds time to the execution, so to improve performance I specify each module and version required in requirements.psd1
# This file enables modules to be automatically managed by the Functions service.
# See https://aka.ms/functionsmanageddependency for additional information.
#
@{
    'Az.Accounts'  = '1.8.0'
    'Az.Resources' = '2.0.1'
}
Apart from writing the actual code in run.ps1 and changing the requirements.psd1 file there are no other changes to be made to the scaffolded code – easy!
Deploying the Azure Function requires the following resources in Azure – a Storage Account, App Service Plan, Function App, Application Insights, and the Event Grid Subscription. The first four objects are created using an Azure Resource Manager template and I have put instructions to create the Event Grid Subscription later.
The steps to deploy the ARM template and function code are as below: –
1. Ensure that you have the latest version of the Az PowerShell modules available.
2. Connect to Azure using Connect-AzAccount
3. Modify the /environment/deploy.ps1 script and change the values where indicated.
$resourceGroupName = "awfunctionsdev"            # <-- REPLACE the variable values with your own values.
$location = "australiasoutheast"                 # <-- Ensure that the location is a valid Azure location
$storageAccountName = "awfunctionsdev"           # <-- Ensure the storage account name is unique
$appServicePlanName = "AustraliaSoutheastPlan"   # <--
$appInsightsName = "awfunctionsdev"              # <--
$functionName = "awfunctionsdev"                 # <--
4. From a PowerShell prompt change into the /environment directory.
5. Run the deploy.ps1 script. The output should be like below.

This script will create a resource group, deploy the ARM (Azure Resource Manager) template, change the permissions for the managed identity created for the app service and finally compress and publish the Azure Function. All that is left to do is create the Event Grid Subscription and start sending events.
To create the subscription, follow the steps below: –
- In the Azure Portal click in the search bar at the top and enter “event grid subscriptions” – select the item that appears with that name.
- Click the + button next to Event subscription
- Fill out the details as in the image below with a couple of points to note: –
- “Topic Type” should be subscription and select your subscription – you will have to do this for each subscription you want to monitor.
- “Filter To Event Types” – you should only select “Resource Write Success”
- Select “Azure Function” as the “Endpoint Type” and then follow the pop-out blade to select your function.
- Click on “Filters”
- In the “Advanced Filters” section add a key and value as below. This will stop the subscription from sending events for when a tag is written and retriggering the function app.


Note: There is also an ARM template to deploy the Event Grid subscription in the GitHub repository in the eventgrid-arm branch.
Time to test – I can create a simple virtual machine using the New-AzVM command. As resources are created, they will send events which are picked up by the Event Grid Subscription. Each event is then sent to the Azure Function endpoint which applies the tag if it does not already exist.

So, there it is – a way to tag resources with the name of the creator, it is important to point out a few caveats around this solution.
- It will not apply a tag if a creator tag already exists
- If you deploy objects using a service principal, you may not see a name appear in the tag – instead, it will show the application Id for the service principle.
- If an object is updated by any process this can cause the tag to be applied – it does not know if a resource is pre-existing before the function was implemented. If you wanted to deploy this in your environment, you could apply a policy to tag every object with a Creator tag and a default value before implementing the function. That way if someone makes changes to an already existing object the function will not alter the tag. You would then remediate all objects and disable the policy before creating the Event Grid subscription.
- If you wanted to scope this to only tag virtual machines when they are created you could add another filter to the Event Grid subscription, like the image below.

- My testing cases are small and in no way should reflect your own testing.
Thanks for reading this post, if there are any issues or you would like to contribute to the code please submit a PR (pull request) or issue on the Github page.
Disclaimer:
The sample scripts are not supported under any Microsoft standard support program or service. The sample scripts are provided AS IS without warranty of any kind. Microsoft further disclaims all implied warranties including, without limitation, any implied warranties of merchantability or of fitness for a particular purpose. The entire risk arising out of the use or performance of the sample scripts and documentation remains with you. In no event shall Microsoft, its authors, or anyone else involved in the creation, production, or delivery of the scripts be liable for any damages whatsoever (including, without limitation, damages for loss of business profits, business interruption, loss of business information, or other pecuniary loss) arising out of the use of or inability to use the sample scripts or documentation, even if Microsoft has been advised of the possibility of such damages.


Recent Comments