by Scott Muniz | Jun 24, 2020 | Uncategorized
This article is contributed. See the original author and article here.
Welcome to this month’s edition of the ADX newsletter! Due to the global impact of the ongoing Covid-19 situation we decided to group the April to June newsletters into one edition.
In a combined effort with the Bing team we made a Covid-19 dataset available to everyone to experiment with and write your own KQL queries on top, be sure to check that out here.
This months’ topics are around business continuity and disaster recovery, new features in KQL and for performance improvements as well as multiple tutorials on machine learning in Azure Data Explorer and tutorials that show how to move data into ADX from various sources. Also, the tip of the month demoes the Row-Level Security feature along with some extended functionality.
These topics are grouped into (1) addressing enterprises and security needs (2) cost reduction and performance (3) cluster health and support (4) expanding the ingestion interfaces (5) new language capabilities (6) enhancing the data science capabilities, (7) new tools capabilities and visualizations options and (8) the tip-of-the-month.
Enterprise and Security
Business Continuity Guidelines for Azure Data Explorer
Business continuity in Azure Data Explorer refers to the mechanisms and procedures that enable your business to continue operating in the face of a true disruption.
This overview describes the capabilities that Azure Data Explorer provides for business continuity and disaster recovery. Learn about options, recommendations, and tutorials for recovering from disruptive events that could cause data loss or cause your database and application to become unavailable.
Cost reduction and performance
Query results cache
We recently launched this new feature that allows you to use a query results cache which can help you experience better query performance and lower resource consumption. By setting the new ‘query_results_cache_max_age’ option as part of a query you can use the cache, like this:
set query_results_cache_max_age = time(5m);
GithubEvent
| where CreatedAt > ago(180d)
| summarize arg_max(CreatedAt, Type) by Id
If your query is determined to be compatible with a cached result (see the documentation for the criteria) and your defined age timespan for the cached data also applies, it will return data from the cache, otherwise the query will be run against the database normally.
Read all about it in the documentation here.
New Partitioning Policy
With this new ability you are now able to define custom partitioning policies for your tables after ingestion to speed-up queries working with high-cardinality keys. This can be especially useful in certain time-series and IoT scenarios, specifically to improve performance of queries which are known to be narrowed to a small subset of values in the partitioned column(s), and/or aggregate/joins on a high cardinality string column. Docs can be found here.
Also, operators like summarize, join or make-series have been adapted to take advantage of these new partitioning policies, significantly improving performance.
Cluster Health and Support
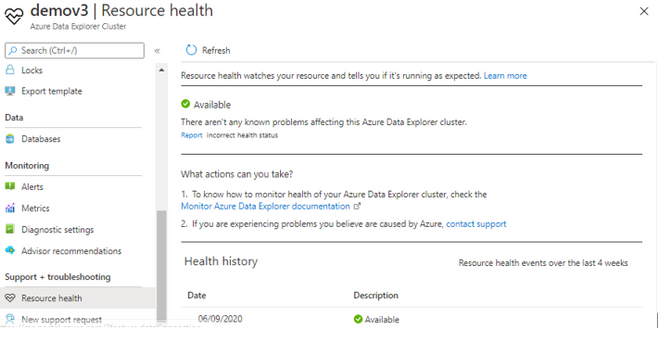
Resource health
With this new ability you will now be able to better understand your cluster health.
Resource health lets you also monitor the health and set alerts when the cluster is not healthy.

Azure Support Center Solutions
With this new ability, you will be able to automatically get your cluster diagnosed for any known issues and be provided automatically with solutions to these issues. This feature is surfaced both as part of the “Diagnose and Solve Problems” blade or through the “New Support Request” blade.
In the “Diagnose and Solve Problems” blade you will be provided with common problems, and based on the problem you choose we will automatically try to detect issues on your cluster, and will be provide you with recommended common solutions to the issue.

Similarity, in “New Support Request” blade, as part of opening a support ticket you will be provided with automatic solutions that could handle your cluster issues, per the issue you are experiencing.

Data ingestion
New and extended ingestion formats
- Apache Avro ingestion has been updated with extended compatibility, see here.
This new implementation of the Apache Avro format parser is based on the official open source library, which provides support for both box logical types and snappy compression codec support.
- W3CLogFile format is now also supported. This new addition allows you to work with Web log files specified by the W3C.
This is a commonly used format in web server logging. We got many requests from customers working with CDN’s asking for an ability to ingest Web log data into Kusto, so this new engine addition now enables this functionality. Even better, leveraging this feature in combination with the external table feature, web log files can now be queried directly from an external storage.
OneClick ingestion updates
The OneClick ingestion tool now supports ingesting from a specific blob storage container, ingesting all of the blobs stored there (up to 10.000).
Extended Event Grid Ingestion experience
Based on a lot of customer feedback, we made the process of creating an Event Grid ingestion into ADX easier. You are now able to create new blob data connection, connect it to a storage account and select whether you would like to create the relevant resources in the database manually (in advance) or have the wizard create them automatically for you.

Step-by-Step: Kafka – ADX Integration Tutorial
We recently published an instructional hands on lab demonstrating Kafka integration with Azure Data Explorer through our KafkaConnect sink. The detailed workshop goes through the steps of setting up an HDInsight Kafka Cluster and using it to transfer data from an Azure Databricks Spark cluster to an Azure Data Explorer cluster.
There’s also an extensive blog post about this topic available here.

Step-by-Step: Kubernetes Container Log Analytics with Fluent-Bit in ADX
This second hands-on lab demoes how to leverage Fluent-Bit for log collection and forwarding, Azure Event Hub as streaming source, and data ingestion into Azure Data Explorer with our Azure Event Hub integration.
HowTo: Ingesting XML data into Azure Data Explorer
An interesting new blog post details the parse_xml() functionality of ADX. Many customers face the problem of having to ingest and parse XML in many use-cases, this functionality allows to work with XML data to get into the right target format.
New Kusto language capabilities
Expanded geospatial query and map capabilities
In our March newsletter we highlighted the new geospatial query capabilities in ADX. This month, we added two more functions for geospatial calculations, geo_point_to_s2cell(), which calculates the S2 cell token string value for a given geographic location, and geo_s2cell_to_central_point(), which returns the geospatial coordinates of the center of the given S2Cell. This further enhances the recently added S2Cell calculation capabilities in KQL.
Furthermore, by adding functions like geo_point_in_circle and geo_polygon_to_s2cells we support the implementation of geospatial joins in KQL. This enables scenarios where it is necessary to join a dimension with a fact table based on a location information.
// Storm events per state.
let join_level = 5;
US_States
| project State = features.properties.NAME, polygon = features.geometry
| extend covering = geo_polygon_to_s2cells(polygon, join_level)
| mv-expand covering to typeof(string)
| join kind = inner hint.strategy = broadcast
(
    StormEvents
    | project BeginLon, BeginLat
    | extend covering = geo_point_to_s2cell(BeginLon, BeginLat, join_level)
) on covering
| where geo_point_in_polygon(BeginLon, BeginLat, polygon)
| summarize count() by tostring(State)
We also expanded the map visualization options in Kusto Explorer, extending it with pie charts and scatterplots. Blog post here.

New IPv6 capabilities
We recently added extended functionality for working with IP addresses in KQL. Capabilities for matching and comparing IPv6 addresses have been added, check out the full set of functions here.
Data science
Python Plugin Generally Available (GA)
The Python Plugin feature is now generally available (GA) and now also features integration into the ADX Azure Portal. It supports running Python code embedded in Kusto Query Language (KQL). The plugin runtime is hosted in a sandbox, an isolated and secured environment hosted on ADX existing compute nodes.
It can run in distributed mode on multiple cluster nodes in parallel and can be debugged in Visual Studio Code. Be sure to read through the blog post with examples to celebrate the GA status, which you can find here.
It is now also configurable from the ADX Azure Portal:

Develop your ML model in Azure Machine Learning, score it in Azure Data Explorer
In many use cases Machine Learning models are built and applied over data that is stored and managed by Azure Data Explorer (ADX). Azure offers a comprehensive framework for the training of your ML models across the whole machine learning lifecycle, Azure Machine Learning Service.
In a recent blog entry, we highlight how you can leverage these models with your data stored within ADX for IoT, log analysis, etc. use cases. Read through this step-by-step guide to learn how to efficiently score your data in near-real time using the KQL python plugin.
The guide will lead you through the whole process in three steps:
- Develop your ML model in AML in Python
- Export the model to Azure blob container
- Score new data in ADX using the inline python() plugin
Tools and Visualization
Use Kibana on top of your Azure Data Explorer data
Kibana is a very popular tool to query and analyze data on top of Elasticsearch as part of the ELK stack. By popular demand we built the Kibana-Kusto Bridge (K2Bridge) to enable querying of data in Azure Data Explorer clusters with Kibana.

The K2Bridge solution is a proxy capable of communicating with Kibana and translate its queries to KQL. The solution currently targets the “Discover” tab in Kibana to enable users to quickly and interactively explore their data. It supports the filters as well as the search box with both simple term search and Lucene expressions.
Blog entry here, GitHub Repository here, Documentation page here.
Azure Data Explorer dashboards in Public Preview
ADX dashboards is a new, native way to build advanced visualizations within the Web Explorer UI. This second tab gives you the option to visualize the queries you wrote on the query pane in dynamic dashboards and also share them with team members or other AAD groups, which makes analyzing data in ADX much easier for data analyst teams. Read all about it in the announcement blog post here, and the documentation page here.

Improvements in Kusto Explorer
Various new features are available in Kusto Explorer (see “What’s new” in Kusto Explorer’s “Help” menu!) Three highlights this month:
- There is a new “Issues” tab that shows details that need attention in the currently highlighted query, such as unknown table/column/variable references, performance tips or syntax issues in various categories and severity levels.

- Added an option to copy query results to clipboard as markdown. The option is accessible from the “File” ribbon under “Clipboard” and using the shortcut Alt + Shift + R.

- Also, new features for CSV output from Kusto Explorer have been added in the “Save Data” ribbon. With the “Run Query into CSV” option you can export query results directly into a .csv file, allowing for larger result set sizes than the result set visualisation in the Explorer.

- You can now rename tabs in Kusto Explorer by right-clicking on the tab and selecting “Rename Document tab” or by using shortcut Ctrl + F2.
Web Explorer “Me”-Control
A much-requested feature has been added to the web explorer. In the top right corner, you can now view account details of the currently logged in user as well as switch users and tenants on the fly within the ADX Web UI.

Public Preview of the Azure Data Explorer Go SDK
We are currently working on the Azure Data Explorer Go SDK. If you are interested in trying out the SDK, here are the details. It is in public preview starting now! Also check out all other available SDKs and APIs here.
Public Preview of the Azure Data Explorer PowerShell SDK and CLI SDK
We released both PowerShell and CLI SDKs for management operations.
If you are interested using it, you can download it here:
- Download PowerShell SDK.
Azure Data Explorer PowerShell SDK documnetation.
- Download Azure CLI – Then run “az extension add -n kusto”.
Azure Data Explorer CLI SDK documentation.
Use the KQL-Magic within Azure Data Studio
The Azure Data Studio team has been hard at work integrating the KQL-Magic into the latest version (1.17.0) of their client. You can combine Python and Kusto query language (KQL) to query and visualize data using rich Plot.ly library integrated with render commands. Supported data sources with KQL-magic include Azure Data Explorer, Application Insights, and Azure Monitor logs.
The documentation is available here.

Tip of the month : Row-Level Security
A few months back we started the public preview of the row level security policy feature. Using RLS you can control which users can view certain rows in a table, and you can also mask the data they see. For example, you can set an RLS policy that masks personally identifiable information (PII), enabling developers to query production environments for troubleshooting purposes without violating compliance regulations. (See documentation page here).
Using multiple tables in one RLS policy
We are happy to announce that we recently added the capability to reference more than one table in a RLS policy definition. This enables using lookup tables to determine user access, which allows keeping this logic in a central place. You can see an example of that in the code below!
In addition, while this was a much requested feature, some users also approached us and asked if they have to define a separate function for RLS for every single table, even if they only want to replicate the same requirement across multiple different tables.
The short answer is: No!
You can do it by define a function that receives the table name as a string parameter, and references the table using `table(TableName)`. Then in the different RLS queries used by the different table call this function with the table name here is an example:
(Note: The full code to try this out on your own cluster is at the end of this example!)
Example: Using one function for RLS on multiple tables and using a mapping reference table
Let’s assume we want to make sure that the sales representatives in the company can only query data regarding customers in their designated countries and also have a few details of them masked, like the credit card number.
We define two functions that are used as RLS for a consistent view on customer and sales tables based on security groups. An easy way would be per table like this, assuming we have a mapping that links the sales rep to their country:
.create-or-alter function GetSalesDataForSalesRep() {
    Sales
    | where country in (
        (UserToCountryMapping
        | where username == current_principal_details()["UserPrincipalName"]
        | project country) )
    | extend creditcardinfo = "****"
}

.alter table Sales policy row_level_security enable "GetSalesDataForSalesRep"
In a similar way, we would create an almost identical function for all other tables that the sales reps need to access:
.create-or-alter function GetCustomerDataForSalesRep() {
    Customers
    | where country in (
        (UserToCountryMapping
        | where username == current_principal_details()["UserPrincipalName"]
        | project country) )
    | extend creditcardinfo = "****"
}

.alter table Customers policy row_level_security enable "GetCustomerDataForSalesRep"
But you can also do it using just one function like this on both tables with the respective table name as an input parameter.
For example, you can define your function like this:
.create-or-alter function GetMaskedDataForSalesRep(TableName: string) {
    table(TableName)
    | where country in (
        (UserToCountryMapping
        | where username == current_principal_details()["UserPrincipalName"]
        | project country) )
    | extend creditcardinfo = "****"
}
Then configure RLS on multiple tables this way:
.alter table Sales policy row_level_security enable "GetMaskedDataForSalesRep ('Sales')"
.alter table Customers policy row_level_security enable "GetMaskedDataForSalesRep ('Customers')"
Note that this works even though the two tables Sales and Customers have different table schemas, they only share two common columns called “country” and “creditcardinfo”.
Full example code:
//list your current principal name to use for this example on your cluster
print current_principal_details()["UserPrincipalName"]

//create the sales table, containing sales data and the credit card info used for the order
.create table Sales (ordernumber:string, item:string, amount:float, customernr:string, country:string, creditcardinfo:string)

//ingest sample data
.ingest inline into table Sales <|
"OR1000","ProductA",1399,"C100","Germany","3470-345356-3435-298"
"OR1001","ProductB",499,"C101","USA","2342-113511-1109-123"
"OR1002","ProductA",1399,"C102","Spain","7845-234688-2911-133"
"OR1003","ProductC",749,"C101","USA","3455-238473-4434-991"

//create the customers table, containing customer reference data along with their default credit card info
.create table Customers (customernr:string, country:string, name:string, address:string, creditcardinfo:string)

//ingest sample data
.ingest inline into table Customers <|
"C100","Germany","Schmidt","Landstrasse 10","3470-193242-2934-199"
"C101","USA","Stevens","Second Ave 10","1231-937411-3912-501"
"C102","Spain","Garcia","Via Augusta 3","3891-284059-3692-779"

.create table UserToCountryMapping (username:string, country:string)

.ingest inline into table UserToCountryMapping <|
"<enter your principal name>","Germany"

//RLS policy 1
.create-or-alter function GetSalesDataForSalesRep() {
    Sales
    | where country in (
        (UserToCountryMapping
        | where username == current_principal_details()["UserPrincipalName"]
        | project country) )
    | extend creditcardinfo = "****"
}

//activate the policy on the table
.alter table Sales policy row_level_security enable "GetSalesDataForSalesRep"

//RLS policy 2
.create-or-alter function GetCustomerDataForSalesRep() {
    Customers
    | where country in (
        (UserToCountryMapping
        | where username == current_principal_details()["UserPrincipalName"]
        | project country) )
    | extend creditcardinfo = "****"
}

//activate the policy on the table
.alter table Customers policy row_level_security enable "GetCustomerDataForSalesRep"

//try it out!
Sales

Customers

//disable the policies again to try the new way
.alter table Sales policy row_level_security disable "GetSalesDataForSalesRep"

.alter table Customers policy row_level_security disable "GetCustomerDataForSalesRep"

//RLS policy combined
.create-or-alter function GetMaskedDataForSalesRep(TableName: string) {
    table(TableName)
    | where country in (
        (UserToCountryMapping
        | where username == current_principal_details()["UserPrincipalName"]
        | project country) )
    | extend creditcardinfo = "****"
}

//activate the new policy on the tables
.alter table Sales policy row_level_security enable "GetMaskedDataForSalesRep('Sales')"

.alter table Customers policy row_level_security enable "GetMaskedDataForSalesRep('Customers')"

//try it out!
Sales

Customers


Recent Comments