This article is contributed. See the original author and article here.
INTRODUCTION
While using Azure DevOps Continuous Integration and Continuous Delivery (CICD) pipelines, most of the documentation and articles show how to use Office 365 Command Line Interface (CLI) to upload, add and deploy the SPFx packages. It’s because Office 365 CLI is a cross-platform command line tool and thus you get the benefit of using either a Windows or a Linux machine as your build agent. To login with Office 365 CLI using username and password:
login --authType password --userName user@contoso.com --password pass@word1
There are ways to secure the password in Azure DevOps using variables or Azure Key Vault. However, enterprise organizations who are still not comfortable to use passwords and looking for other like certificates.
With this blog post I highlight two aspects:
- How to setup Office 365 CLI with Azure AD App and Certificate based authentication and
- How to login using O365 CLI and certificates in Azure DevOps YAML pipelines
You can find the documentation on how to use certificate to login using Office 365 CLI. This article goes into detailed steps complementing the documentation. I will also touch upon some issues that I faced while setting this up.
Note: Another advantage that you get from following these steps will be the ability to define fine grained permissions limited for the required for use case (Example: deploy to SPO app catalog).
CERTIFICATE GENERATION
- Create self-signed certificate of type Personal Information Exchange (PFX) or Privacy Enhanced Mail (PEM)
- For windows, install openssl client. I used: http://slproweb.com/products/Win32OpenSSL.html
Instructions are assuming openssl client is extracted to c:OpenSSL folder.
NOTE: After trying couple of openssl clients, I had success with this ssl client. I hope that saves some time for you in researching which client works. If you WSL enabled/configured, then this is a non-issue.
- Navigate to the OpenSSL bin directory.
- c:OpenSSLbin in our example.
- Right-click the openssl.exe file and select Run as administrator.
- Enter the following command to begin generating a certificate and private key
openssl req -x509 -sha256 -nodes -days 365 -newkey rsa:2048 -keyout privateKey.key -out certificate.cer
- You will then be prompted to enter applicable Distinguished Name (DN) information, totaling seven fields:
- Once completed, you will find the certificate.crt and privateKey.key files created under the OpenSSLbin directory.
- Create a new Personal Information Exchange (.PFX) file using the certificate and private key as inputs from above step.
openssl pkcs12 -export -out protected.pfx -inkey privateKey.key -in certificate.cer -password pass:pass@word1
NOTE: I’d would like to highlight and note that I spent many hours troubleshooting an issue related to this command. If you use double quotes for the password string as documented (Example: openssl pkcs12 -export -out protected.pfx -inkey privateKey.key -in certificate.cer -password pass:”pass@word1″ ), the quotes are also considered to be part of the password.
- At this point the protected.pfx file can be used to log in the Office 365 CLI. We will come back to this step later.
Artifacts from this section:
- Certificate.cer
- privateKey.key
- protected.pfx
AZURE AD APPLICATION REGISTRATION
- Creating AAD app is well documented in many articles, so I sparsely documented it here. Also, please check out Garry Tinder’s post which goes into details on how to create AAD app to log in using Office 365 CLI.
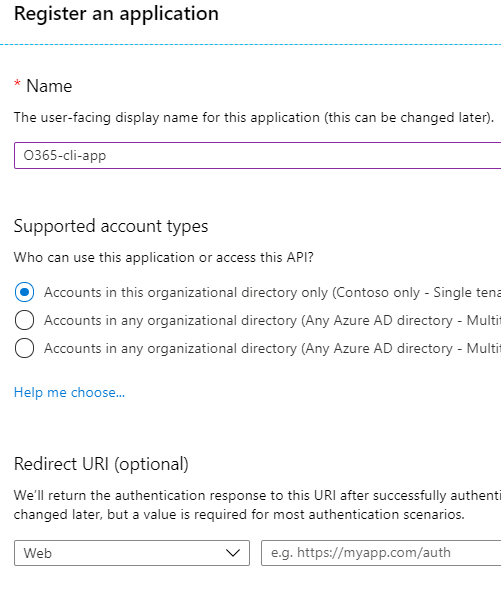
- Create new Azure AD App with a valid name. Leave all other fields/options as-is.

- Save the app id and tenant id.

- Give below “application” permissions to the app

NOTE: Microsoft Graph permission is not a prerequisite. Ignore it.
- Make sure the Admin Consent is provided for all the permissions.
- Go to “Certificates & Secrets” and choose “Upload certificate” to upload the certificate.cer file created in step 7 in first section.

NOTE: Instead of upload certificate, it’s also possible to manually update the manifest file.
- Save the thumbprint to use later.
Artifacts from this section:
- App Id
- Tenant ID
- Thumbprint
TEST LOCALLY
- Before we can use these artifacts in Azure DevOps pipeline, lets test locally to ensure the certificate is usable with Office 365 CLI login. We need to make the AAD App ID and the Tenant ID available to Office 365 CLI using environment variables. If you are looking to script this or looking for steps to do in other operating systems, I’d refer to Garry Tinder’s blog post.
- Add below environment variables on your PC.
- OFFICE365CLI_AADAPPID = App Id
- OFFICE365CLI_TENANT = Tenant ID

- Test your certificate by trying to login using O365 CLI in terminal window (PS or Command Win)
login --authType certificate --certificateFile C:OpenSSL-Win64binprotected.pfx --thumbprint 5D500FE3BTRUNCATED563173009BC --password pass@word1
Note: Change the certificateFile, thumbprint, password as per your environment
- Run some sample commands. Example:
- Status
- Spo app list

USE CERTIFICATE IN AZURE DEVOPS PIPELINE
- In this section, we will configure Azure DevOps repository so that the pipelines can use the certificate when logging with Office 365 CLI. Here is a demo repository on GitHub that contains two files:
- SPFX Package file (sppkg file)
- This is a sample SPFx application customizer extension that adds Azure Application Insights to SPO sites. Note: It can be any other SPFx package file.
- Azure-pipelines.yml
- YAML pipeline that uses the certificate to login using Office 365 CLI. This pipeline takes the SPFx package, uploads, deploys to SharePoint Online App Catalog site.
- SPFX Package file (sppkg file)
- First, we need to upload the certificate to the repository. Open your Azure DevOps (ADO) project. Go to Pipelines > Library page.
- Select “Secure files” tab. Use the + Secure file button to upload the pfx file.

- Below you can see the sample entries (script tasks) that you can use in your YAML pipelines to access the certificate from the secure files store.
- script: echo Building!

    - task: DownloadSecureFile@1

      name: caCertificate

      displayName: 'Download CA certificate'

      inputs:

        secureFile: 'protected.pfx'

    - script: |

        echo Found cert at $(caCertificate.secureFilePath)

 ##

    ## login to Office 365 CLI

 ##

    - script: o365 login $(o365_app_catalog_site_url) --authType certificate --certificateFile $(caCertificate.secureFilePath) --thumbprint $(cert_thumbprint) --password pass@word1

      displayName: Login to Office365
- When the pipeline executes the first time, you will see a prompt to approve the usage of the certificate. See below screenshot:


SAMPLE PIPELINE
Below you can see the Azure pipeline in full. You can access this pipeline on GitHub here.
trigger:
  branches:
    include:
      - '*'

variables:
  OFFICE365CLI_AADAPPID: '80fdc955-8677-4251-8d49-050d02071c15'
  OFFICE365CLI_TENANT: '216e190d-67e4-4a6e-98bd-15b8468e5928'
  o365_app_catalog_site_url: 'https://YOURTENANT.sharepoint.com/sites/APPCATALOGSITENAME'
  o365cli_app_catalog_scope: 'tenant'
  node_version: '10.x'
  cert_thumbprint: '5D500FE3B7543FCC61D4DCFD0C164563173009BC'
  spfx-pkg: 'azure-app-insights.sppkg'

pool:
  vmImage: ubuntu-latest

stages:
- stage: Build
  jobs:
  - job: BuildJob
    steps:
    - script: echo Building!
    - task: DownloadSecureFile@1
      name: caCertificate
      displayName: 'Download CA certificate'
      inputs:
        secureFile: 'protected.pfx'
    - script: |
        echo Found cert at $(caCertificate.secureFilePath)
    ##
    ## specify which node version to use
    ##
    - task: UseNode@1
      displayName: Set to Node.js $(node_version)
      inputs:
        version: $(node_version)
      condition: ne('$(node_version)', '')

    ##
    ## install Office 365 CLI
    ##
    - script: sudo npm install --global @pnp/office365-cli
      displayName: Install Office365 CLI

    ##
    ## login to Office 365 CLI
    ##
    - script: o365 login $(o365_app_catalog_site_url) --authType certificate --certificateFile $(caCertificate.secureFilePath) --thumbprint $(cert_thumbprint) --password pass@word1
      displayName: Login to Office365

    ##
    ## upload *.sppkg to the target app catalog
    ##
    - script: o365 spo app add --filePath $(spfx_pkg) --appCatalogUrl $(o365_app_catalog_site_url) --scope tenant --overwrite
      displayName: Upload SharePoint package to Site Collection App Catalog

    ##
    ##deploy the package
    ##
    - script: o365 spo app deploy --name $(spfx_pkg) --appCatalogUrl $(o365_app_catalog_site_url) --scope tenant
      displayName: Deploy SharePoint package
Thanks for reading. I hope this helps you out.
Disclaimer
The sample scripts are not supported under any Microsoft standard support program or service. The sample scripts are provided AS IS without warranty of any kind. Microsoft further disclaims all implied warranties including, without limitation, any implied warranties of merchantability or of fitness for a particular purpose. The entire risk arising out of the use or performance of the sample scripts and documentation remains with you. In no event shall Microsoft, its authors, or anyone else involved in the creation, production, or delivery of the scripts be liable for any damages whatsoever (including, without limitation, damages for loss of business profits, business interruption, loss of business information, or other pecuniary loss) arising out of the use of or inability to use the sample scripts or documentation, even if Microsoft has been advised of the possibility of such damages.
Brought to you by Dr. Ware, Microsoft Office 365 Silver Partner, Charleston SC.

Recent Comments