This article is contributed. See the original author and article here.
The use of virtual hostnames with SAP systems is a familiar approach to SAP customers, allowing the decoupling of actual SAP Server hostnames from the hostname referred to by the SAP instance. It provides a degree of abstraction allowing for simpler virtualization, naming conventions, hardware lifecycles, organizational policies, datacenter migrations and Disaster Recovery.
This blog post will provide step-by-step instructions on how to reliably deploy an Azure VM with the actual VM Server hostname, as well as the SAP Virtual hostname on a single network interface. These instructions only apply to Windows Operating system.
NOTE: Please note that the configuration described in this article does not apply to servers using Windows Server Failover Clustering (WSFC) which can provide high availability to SAP Database and SAP Central Services servers(A/SCS.) This configuration can be applied to SAP Application Servers and 2-tier SAP systems (Application, and SCS servers installed on a single VM.)
More detail
When migrating to Microsoft Azure, many customers choose to use a single network interface for their SAP VMs, as it simplifies automation of deployments and management. A common design misconception is that multiple network interfaces increase network throughput, however in Microsoft Azure, unlike many on-premises configurations, Azure Virtual Machines can scale network bandwidth to their potential maximum for that VM size with just a single network interface. There is no need for multiple network interfaces to scale bandwidth.
As detailed in SAP Note 2109662 – Windows returns wrong IP address as source IP however, the SAP installation will throw an error unless Windows IP addresses and the DNS registration of VM hostname and the SAP Virtual hostname are configured properly.
This configuration is detailed in SAP Note 1564275 – Install SAP Systems Using Virtual Host Names on Windows, however this blog will focus on how to accomplish this specifically in Microsoft Azure.
Technical Solution
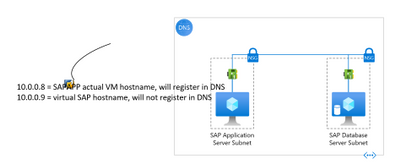
In this blog we will use the example of an SAP App server with 1 Network Interface attached and the following configuration:
- Subnet:
- Name = App
- CIDR = 10.0.0.0/26
- Netmask = 255.255.255.192
- Default Gateway (1st IP address of subnet) = 10.0.0.1
- IP address/FQDN:
- 10.0.0.8 = sapapp.contoso.local (<- VM fully qualified domain name)
- 10.0.0.9 = sapvhost.contoso.local (<- SAP virtual fully qualified domain name)
Figure 0: A layout of what we want to achieve
First, let us look at the updates needed from the Portal.
When you are adding an additional IP configuration to the Azure NIC from Microsoft Azure portal, you can add an additional IP configuration on the Home > Network interface > “NIC Name” > IP configurations blade in the following way:

Figure 1: Open NIC configuration blade and click “Add”

Figure 2: adding second IP configuration in the add ipconfig blade
Now we move to the VM and RDP into it. The first thing you will notice once you boot-up is that, only one IP configuration is visible in the VM. The reason is that Azure DHCP, by default, assigns the primary IP configuration from the Azure NIC to the network interface within the VM. The secondary IP configurations must be manually assigned at the VM OS level.

Figure 3: Output of “ipconfig /all” on the VM
Now that we are on the VM, let us walk through the steps needed to allow us to use SAP virtual hostnames on Windows.
- Windows Servers provide a convenient capability to register each of its assigned IP addresses in DNS. This means that some of the default options allow Windows Server machines to automatically register the IP addresses of the network adapters in DNS after a server restart. To prevent this, you must unset the “Register this connection’s addresses in DNS” option for the network adapters. This setting can be found on the DNS tab of the Advanced TCP/IP Settings property window for TCP/IPv4. This is a very important step, if we do not unset the option the Windows DNS client service registers both IP addresses for the Windows host name in DNS resulting in name resolution issues.

Figure 4: Uncheck the checkbox highlighted to prevent auto registration of IP addresses.
- Make sure that the Remote registry service is enabled and running. This would be required to make changes in the registry to update the properties of the network adapters registered with DNS.
HKEY_LOCAL_MACHINESYSTEMCurrentControlSetServicesTcpipParametersDNSRegisteredAdapters{<36 character GUID corresponding to the network adapter that TCPIP was bound to>}
- Now we add the additional IP configuration on the network card
- On the “General” tab of the TCP/IPv4 properties, change the IP address acquisition to manual. This is because, as explained above, Azure DHCP only propagates the primary IP configuration to the network adapter, and we want both the IP addresses assigned to it.

Figure 5: Set the IP addresses manually
Note: If you set this properly, you will experience a short disconnection to your RDP session and connect back. If you did not set any of the properties correctly, you will not be able to connect back until the VM is rebooted.
- In the “IP Settings” tab of the advanced settings property window, you should see the manually entered IP address.

Figure 6: the primary address should show up on the “Advanced” properties window
- Add the additional IP address by clicking “Add”. The “IP settings” tab should look like below before clicking OK.

Figure 7: After adding the secondary IP configuration on the network adapter
- Next, we set “SkipAsSource” to “True” (default is “False”) for the secondary IP Address i.e., 10.0.0.9, which we added in the above step. We do this to prevent the secondary IP address from registering in DNS automatically. If “SkipAsSource” is set to “True”, then that IP address will not be registered in DNS and will not be used for host initiated outgoing communications, unless an application specifically binds to it. The preferred way to do this is via PowerShell (as shown below).
#Get interface alias, ip addresses and the skip as source before starting
Get-NetAdapter | Get-NetIPAddress | `
    Where-Object -FilterScript { $_.AddressFamily -eq "IPv4" } | `
    Select-Object InterfaceAlias, IPAddress, SkipAsSource

$primaryIP = "10.0.0.8" #replace with your primary ip
$netInterface = "Ethernet 3" #replace with your network adapter name

# get all the IP addresses on the interface, filtered by IPv4 and excluding
# the $primaryIP
[array]$IPs = Get-NetIPAddress -InterfaceAlias $netInterface | ``
    Where-Object { $_.AddressFamily -eq "IPv4" -and $_.IPAddress -ne $primaryIP }

# set primary IP SkipAsSource to false
Set-NetIPAddress -IPAddress $primaryIP -InterfaceAlias $netInterface -SkipAsSource $false

# set other IP addresses with SkipAsSource equal to true
Set-NetIPAddress -IPAddress $IPs.IPAddress -InterfaceAlias $netInterface -SkipAsSource $true

#check all properties are set properly
Get-NetAdapter | Get-NetIPAddress | `
    Where-Object -FilterScript { $_.AddressFamily -eq "IPv4" } | `
    Select-Object InterfaceAlias, IPAddress, SkipAsSource
Once we complete running the code, the output from the Get-NetAdapter command above should look like this:

Figure 8: setting “SkipAsSource” to True on the secondary IP address of the NIC
- At this point we can create the Host (A) records in DNS for the Virtual Hostnames. For the reverse lookups to work, we need to ensure the flag; “Update associated pointer (PTR) record”, is set on both the addresses.

Figure 9: Host (A) records in DNS for the server and virtual hostnames

Figure 10: setting to update the PTR records in DNS
- On the VM, we need to notify Windows that the Virtual Hostname being used is actually an alternate name for the computer. We do this by adding a new multi-string value ‘BackConnectionHostnames’ under the “HKEY_LOCAL_MACHINESYSTEMCurrentControlSetControlLsaMSV1_0” key. You can use the below PowerShell for doing this, change the sapvhost and sapvhost.contoso.local to the virtual hostnames’ short-name and FQDN.
New-ItemProperty -Path 'HKLM:SystemCurrentControlSetControlLsaMSV1_0' `
                 -Name "BackConnectionHostNames" `
                 -Value "sapvhost","sapvhost.contoso.local" `
                 -PropertyType MultiString
Note: This setting would not need a server restart to work. You can complete all the steps and reboot the machine
- Now that we have notified Windows that the machine has alternate names, we need to also tell Windows to allow inbound connections which are directed to this Virtual Hostname. We do this by adding a DWord value called ‘DisableStrictNameChecking’ under the key “HKEY_LOCAL_MACHINESYSTEMCurrentControlSetServiceslanmanserverparameters”
New-ItemProperty -Path 'HKLM:SYSTEMCurrentControlSetServiceslanmanserverparameters' `
                 -Name "DisableStrictNameChecking" `
                 -Value "1" `
                 -PropertyType DWord
- At this point, we can reboot the VM.
- Once the VM is back online, we can log back in and do some validations
- Let us check if the ipconfig shows both the IP Addresses. We can do this after adding the second IP on the NIC as well.

Figure 11: validating that the second IP shows up in ‘ipconfig /all’ command
- Validate that reverse lookup works for the secondary IP

Figure 12: validating that reverse lookup works for secondary IP
- Check that the DisableStrictNameChecking and BackConnectionHostnames settings are working by running “net view virtualhostname” and browsing to the virtual hostname through the command prompt. Ideally, run these from a different machine to check further.

Figure 13: checking the shares are available by running net view command
- Another good test is to open the Computer Management MMC and open the virtual hostname from Action -> Connect to Another Computer -> virtual host name. If you can browse the ‘Local Users and Groups’ and ‘Services and Applications’, it is a good sign and SAPinst should be successful.

Figure 14: Test connecting to SAP virtual hostname from MMC
- Once all the tests from above tests have succeeded, we can start with the SAP installation using the virtual hostname now by running SAPinst from an administrative command prompt and execute the following command: SAPinst.exe SAPINST_USE_HOSTNAME=<virtualname>.
Summary
To recap the configuration above, here are the 6 basic steps required on the Windows virtual machine to prep it for SAP installation using virtual hostnames with a single network interface:
- Uncheck the “Register this connection’s addresses in DNS” setting on the primary NIC
- Add a second IP address configuration through the Azure Portal, and then within the VM add the second IP address to the Network Interface’s IPv4 properties
- Follow SAP Note 2109662 – using PowerShell set the “SkipAsSource” property on the second IP address (desired outcome: first IP address à SkipAsSource=false; secondary/virtual IP address à SkipAsSource=true)

Figure 15: After setting SkipAsSource, the interface details
- 10.0.0.8 = actual VM hostname, will automatically register in DNS
- 10.0.0.9 = virtual SAP hostname, will not automatically register in DNS, we will manually create this DNS record
- Maintain the registry entries:
- HKEY_LOCAL_MACHINESYSTEMCurrentControlSetServiceslanmanserverparametersDisableStrictNameChecking = 1 (Type: DWORD)
- HKEY_LOCAL_MACHINESYSTEMCurrentControlSetControlLsaMSV1_0BackConnectionHostnames = FQDN short hostname (Type: Multi-string value)
(ex: sapvhost.contoso.local sapvhost <Not a space, but a carriage return between these>)
- Re-set the “Register this connection’s addresses in DNS” setting on the primary NIC
- Outcome:
- VM Primary IP Address (10.0.0.8) will register in DNS with actual VM hostname
- You must manually create an A-record for the VM secondary IP Address 10.0.0.9 and the virtual SAP Hostname
To ensure you have completed these steps correctly you can validate the configuration by:
- DNS forward lookup (e.g., “nslookup sapvhost.contoso.local”)
- DNS reverse lookup (e.g., “nslookup 10.0.0.9”)
- Browse to the sapvhost.contoso.local UNC address through either the command prompt or File Explorer.
After executing this set of steps on your VM, you are now prepared to start the SAP installation by starting SAPinst on the VM using virtual hostnames. Start SAPinst from an administrative command prompt and execute the following case-sensitive command: SAPinst.exe SAPINST_USE_HOSTNAME=<virtualhostname>.
References
- SAP Note 1564275 – Install SAP Systems Using Virtual Host Names on Windows
- SAP Note 2109662 – Windows returns wrong IP address as source IP
- SAP workload planning and deployment checklist – Azure Virtual Machines | Microsoft Docs
- Azure virtual machine network throughput | Microsoft Docs
- Configure IP addresses for an Azure network interface | Microsoft Docs
- Multiple IP addresses for Azure virtual machines – Portal | Microsoft Docs
Brought to you by Dr. Ware, Microsoft Office 365 Silver Partner, Charleston SC.

Recent Comments