This article is contributed. See the original author and article here.
In this tutorial, you learn to:
- Set up an Azure Static Web Apps site for a Vanilla API sample app
- Create a Bitbucket Pipeline to build and publish a static web app
Prerequisites
- Active Azure account: If you don’t have one, you can create an account for free.
- Bitbucket project: If you don’t have one, you can create a project for free.
- Bitbucket includes Pipelines. If you haven’t created a pipeline before, you first have to enable two-step verification for your Bitbucket account.
- You can add SSH Keys using the steps here
NOTE – The static web app Pipeline Task currently only works on Linux machines. When running the pipeline mentioned below, please ensure it is running on a Linux VM.
Create a static web app project in Bitbucket
NOTE – If you have an existing app in your repository, you may skip to the next section.
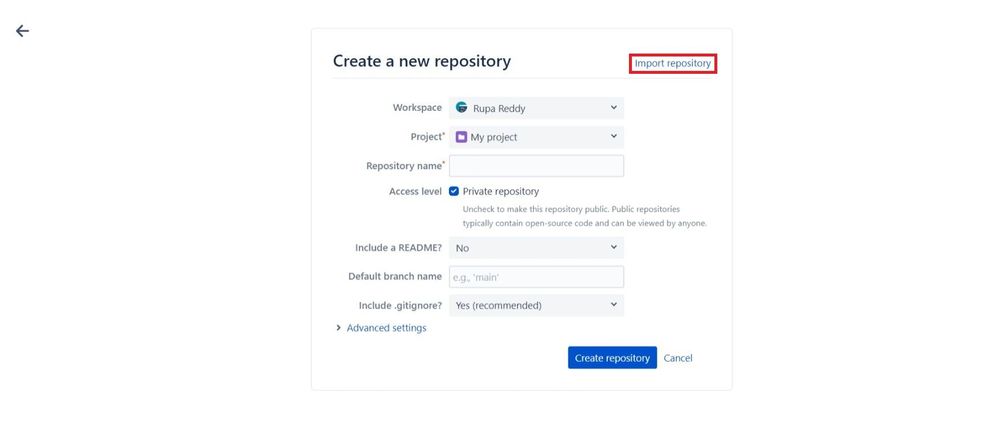
- After creating a new project, select Create repository and then click on Import repository.
- Select Import repository to import the sample application.

- In Old repository URL, enter https://github.com/staticwebdev/vanilla-api.git.
- Choose your project and name your repository.
- Select Import repository.
Create a static web app
- Navigate to the Azure portal.
- Select Create a Resource.
- Search for Static Web Apps.
- Select Static Web Apps.
- Select Create.
- Create a new static web app with the following values.
|
|

- Select Review + create
- Select Create.
- Once the deployment is successful, select Go to resource.
- Select Manage deployment token.
- Copy the deployment token and paste the deployment token value into a text editor for use in another screen.
NOTE – This value is set aside for now because you’ll copy and paste more values in coming steps.

Create the Pipeline in Bitbucket
- Navigate to the repository in Bitbucket that was created earlier.
- Select Pipelines on the left menu.
Ensure that you have enabled two-step verification for your bitbucket account.
- Select Create your first pipeline.

- In the Create your first pipeline screen, select Starter pipeline.

- Copy the following YAML and replace the generated configuration in your pipeline with this code.
pipelines: branches: main: - step: name: Deploy to test deployment: test script: - pipe: microsoft/azure-static-web-apps-deploy:dev variables: APP_LOCATION: '$BITBUCKET_CLONE_DIR/src' API_LOCATION: '$BITBUCKET_CLONE_DIR/api' OUTPUT_LOCATION: '$BITBUCKET_CLONE_DIR' API_TOKEN: $deployment_token
NOTE – If you are not using the sample app, the values forAPP_LOCATION,API_LOCATION, andOUTPUT_LOCATIONneed to change to match the values in your application.
Note that you have to give the values forAPP_LOCATION,API_LOCATION, andOUTPUT_LOCATIONonly after$BITBUCKET_CLONE_DIRas shown above. i.e.$BITBUCKET_CLONE_DIR/<APP_LOCATION>
The API_TOKEN value is self-managed and is manually configured.
Property | Description | Example | Required |
app_location | Location of your application code. | Enter / if your application source code is at the root of the repository, or /app if your application code is in a directory called app. | Yes |
api_location | Location of your Azure Functions code. | Enter /api if your app code is in a folder called api. If no Azure Functions app is detected in the folder, the build doesn’t fail, the workflow assumes you don’t want an API. | No |
output_location | Location of the build output directory relative to the app_location. | If your application source code is located at /app, and the build script outputs files to the /app/build folder, then set build as the output_location value. | No |
- Select Add variables.
- Add a new variable in Deployments section.
- Name the variable deployment_token (matching the name in the workflow).
- Copy the deployment token that you previously pasted into a text editor.
- Paste in the deployment token in the Value box.

- Make sure the Secured checkbox is selected.
- Select Add.
- Select Commit file and return to your pipelines tab.
- You can see that the pipeline run is in progress with name Initial Bitbucket Pipelines configuration.
- Once the deployment is successful, navigate to the Azure Static Web Apps Overview which includes links to the deployment configuration. Note how the Source link now points to the branch and location of the Bitbucket repository.
- Select the URL to see your newly deployed website.

Clean up resources
Clean up the resources you deployed by deleting the resource group.
- From the Azure portal, select Resource group from the left menu.
- Enter the resource group name in the Filter by name field.
- Select the resource group name you used in this tutorial.
- Select Delete resource group from the top menu.
Additional resources
- If you need help getting started with Pipelines, see Create your first pipeline.
Brought to you by Dr. Ware, Microsoft Office 365 Silver Partner, Charleston SC.

Recent Comments