This article is contributed. See the original author and article here.
Out of the box, Azure Sentinel provides 90 days of data retention for free. In some parts of the world and within certain industries, there are regulations that organizations must adhere to which require data retention up to 7 years or longer. The current challenge is that the max retention for Log Analytics workspaces is 2 years. There has been a need for a solution that will allow for more time and cost saving by moving logs to cold storage. This blog is going to detail how logs from a Log Analytics workspace can easily be moved into long-term cold storage in order to comply with retention standards as well as reduce costs using this Playbook.
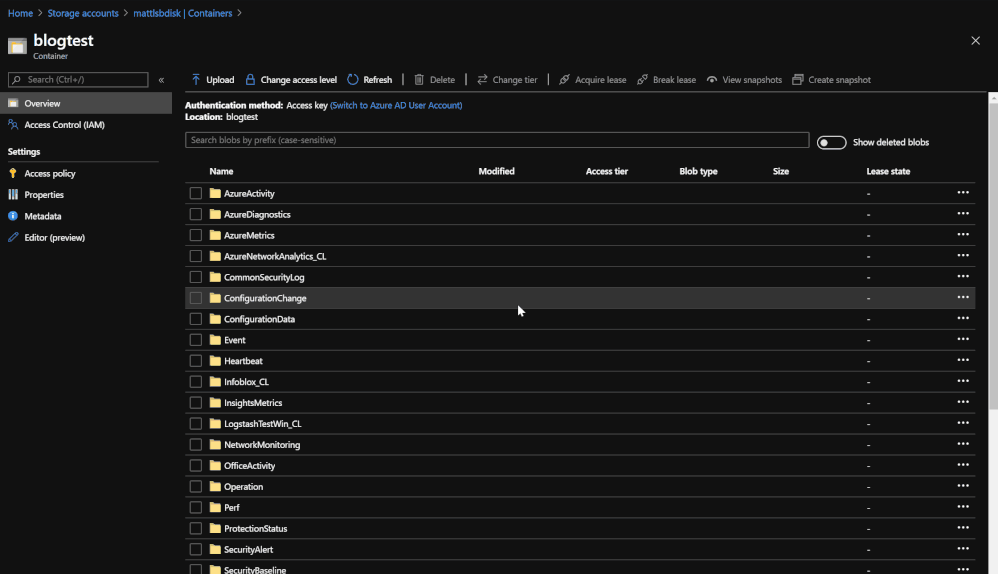
End Results:

This post is going to be in-depth as it breaks down how the Playbook is going to operate.
TL:DR The end result once the Playbook is run is a folder system with Blobs within a storage account and container. The folders are labeled with and contain the data types that have been chosen for back up. Each Blob in the folder will contain a backup of logs for each data type in hourly blocks. Each Blob can be queried in a Log Analytics workspace using the externaldata operator and a SAS token URL generated for the Blob.
Link for the Playbook if needed: https://github.com/Azure/Azure-Sentinel/tree/master/Playbooks/Move-LogAnalytics-to-Storage
*Note: If your Blobs are a size of 2B, there was no information for that time block or data type.
Pre-requisites:
- Log Analytics Workspace
- Azure Storage Account or permissions to create a new one
- One storage container or permissions to create one
- The Logic App
For auditing and investigative purposes, raw data and logs may need to be stored long term for regulatory compliance. This can be achieved through a Playbook that queries the logs from the workspace that are about to expire and moves them to a storage account of your choosing. The Playbook utilizes Log Analytics API when performing the query. An important piece of information to note is that the API has a limitation of 500,000 rows of data per request. This means that if any data type contains more than 500,000 rows of information, it will require the Playbook to run a Log Analytics API pull more than once to get the data. In order to avoid this issue, the Playbook breaks up data for each day into hourly blocks in order to efficiently and carefully back up all desired data. Each time that the Playbook is run, it reviews each data type within your workspace that should be backed up, goes through the logs for those data types, and moves the logs to storage, labeling each backup with the data type, the date of the log, and the hour for the time block.


The app is comprised of many steps and variables in order for it to work. The pieces are the following:
- Recurrence trigger – Automatically run the app daily without needing manual input.
- hoursCount – Counter variable that is used for tracking which hour the Playbook is on for exporting data. Starts at 0 for midnight and caps at 24.
- startDate – Oldest date in a range that the queries will be using. Value is set to the current date minus 89 days (formatDateTime(addDays(utcNow(), -89),’yyyy-MM-dd’)). This serves as the starting point for the time range to pull data from.
- endDate – Similar to startDate, this variable serves to be the tail end of the time range. This value is set to the current date minus 88 days (formatDateTime(addDays(utcNow(), -88),’yyyy-MM-dd’)). The time range between startDate and endDate are now 89 days ago and 88 days ago. The purpose for this is to move logs to storage 24 hours before they are deleted from the workspace.
- excludedDataType – This variable is used to hold a list of data types that should not be backed up when running the Playbook. The list of options will be used in the query that checks to see which data types should be backed up. It is recommended that the data types chosen are logs that are noisy or are not important.
- Query #1 – This query sets which log types should not be included based on the excluded variable. The query then checks the usage details to see which data is present in the workspace between 89 days ago and 88 days ago.
- Compose – Composes the data for parsing for future use in the app.
- Parse JSON – Parses the message from the query so that each item from the query results can be referenced later in the Playbook. The sample JSON for the step is provided in the template.
- All of the details are then passed into a ForEach loop that then goes into an until loop that checks if hoursCount is 24. Each time that the logs are exported for a data type, it will increment the counter by 1 until it hits 24, then moves onto the next data type.
- Query #2 – This query takes in the value of each data type and takes the logs from hours 0-23 for the day in hourly blocks.
- Compose #2 – The results are composed into a message for sending to the Blob.
- Create Blob – A new Blob is created with the title of the data type, the date, and the hour for which the logs are from. These results are sent to the new Blob and will be housed in the container that you have named.
Depending on how much data is within each table, the Playbook can take 2 to 10 minutes per table depending on how much each table has.
Deployment of the Template:
There are two options for deploying the template:
- deployment button directly in GitHub
- manual deployment via deploying the JSON of the Playbook in the Azure Portal
If using the manual option, please refer to the README for the Playbook.
Using an Existing Storage Account:
In the event that an existing storage account is preferred, it can be set up within the Playbook. The following must be done:
- Go to the Azure Portal
- Go to the Playbook
- Go to Logic App Designer
- Go into the loop
- Go to the Blob action
- Click on ‘change connection’
- Click add new
- Choose the desired storage account
- Give the connection a name
- Click create
- Update the container name to be one from the existing storage account
Granting Permissions:
The Playbook is going to need proper permissions to run. It requires at least Blob Storage Contributor in order to create new Blobs within the data container. In order to provide the permissions:
- Go to the Azure Portal
- Go to Logic Apps
- Choose the Logic App
- Go to identity
- Enable ‘system assigned’ identity
- Click save
- Go to either the subscription or the resource group that the storage account that is being used is in
- Go to access control
- Click add
- Choose add role assignment
- Under ‘assign access to’ choose Logic App
- Find your Logic App
- Select it
- Choose the role ‘Blob storage data contributor’
- Click assign
Query the data:

Once the data is in storage, it is still possible to query the day but in a smaller capacity. Querying the data now uses an operator called ‘externaldata’ which requires you to use a SAS token URL generated by the Blob in order to pull the data from it. The process also requires that each column be defined so that it can properly map the data to the correct column. An example of what the query would look like would be:
- let ActivityLogs = externaldata (TimeGenerated:datetime, OperationName:string, OperationNameValue:string, Level:string, ActivityStatus:string, SubscriptionID:string)[@”SAS TOKEN URL FOR BLOB”] with (format=”multijson”,recreate_schema=true); ActivityLogs
This query
- Creates a variable that will become the table
- Establishes what the columns will be and their value type
- Once the columns are made, the SAS token URL is inserted
- Multiple URLs can be inserted in order to pull from multiple Blobs. Just separate the two by a comma and have them in their own quotations
- [@”link 1”,”link 2”]
- The query then calls the table that you have created, this pulls in the logs from the Blob and routes the data to the columns that were created
This query is going to pull the AzureActivity information from the Blob and maps the data to the associated columns. It is recommended to base your schema on the existing tables that were backed up in order to avoid any issues with parsing the data. In this case, AzureActivity was used as the reference for the associated logs that were in storage.
More information about external data: https://docs.microsoft.com/en-us/azure/data-explorer/kusto/query/externaldata-operator
Summary:
With this Playbook, you now have control over logs being moved into long-term storage. This will be handy for existing data that is in the workspace that Sentinel is using when the retention period for the data runs out. This, in combination with the ability to query data from cold storage, allows for regulatory compliance and reduced costs while maintaining Sentinel log and Log Analytics usage for business operations.
This solution would not have been possible without the effort and great help from @Matt Egen, @Chris Boehm , and Rin Ure.
Brought to you by Dr. Ware, Microsoft Office 365 Silver Partner, Charleston SC.

Recent Comments