This article is contributed. See the original author and article here.
Introduction
This is John Barbare and I am a Sr. Customer Engineer at Microsoft focusing on all things in the Cybersecurity space. In this tutorial I will walk you through the steps of configuring and enabling Microsoft Defender for Endpoint in Microsoft Endpoint Manager (MEM). The name has been rebranded from Microsoft Defender ATP to Microsoft Defender for Endpoint but inside the portal(s) the name has not changed as of this publication. For this demo, I will show you how to configure almost all settings in the MEM console with the exception of making sure Intune is set to on in Microsoft Defender for Endpoint so all systems are properly synchronized. With that said, let’s get started and see MEM’s awesome capability of the Endpoint Security tab and start protecting your endpoints. For licensing information visit the product licensing terms and Microsoft 365.
Enable Microsoft Defender for Endpoint
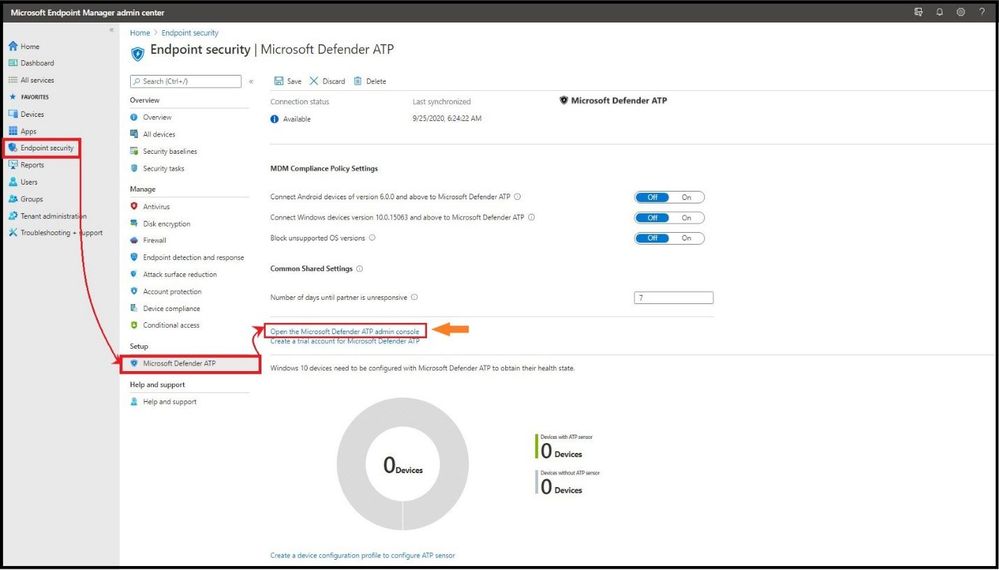
The first item you want to do is login into Microsoft Endpoint Manager admin center and select the Endpoint Security tab on the main column and then under Setup, select Microsoft Defender ATP. Under Common Share Settings select Open the Microsoft Defender ATP admin console.

This will take you straight to Microsoft Defender Security Center. On the left hand side select Settings, and then Advanced Features, and make sure Microsoft Intune connection is toggled to the on position and select Apply to save the settings.

When you established the connection between Intune and Microsoft Defender for Endpoint, Intune received a Microsoft Defender for Endpoint onboarding configuration package from Microsoft Defender for Endpoint. You deploy this configuration package to your Windows devices with a device configuration profile for Microsoft Defender for Endpoint.
Head back over to MEM and under the same Microsoft Defender ATP settings we will configure the MDM Compliance Policy Settings. You have three choices to choose from depending on your organization’s specific security requirements. You can choose from the following:
- Set Connect Windows devices version 10.0.15063 and above to Microsoft Defender ATP to On
- Set Connect Android devices of version 6.0.0 and above to Microsoft Defender ATP to On
- Block unsupported OS versions
If you are only connecting to a Windows device, it is only necessary to turn on the “Set Connect Windows devices version 10.0.15063 and above to Microsoft Defender ATP to On” to the on position. Once you have your organization’s configurations set to on, go ahead and select save.

As you can see, the connector settings have been saved successfully as seen in the top right after selecting save with a green check mark.

After setting your organization’s configurations to On in the above steps, other applicable devices which are already being managed by Intune, as well as new devices you enroll in the future will be automatically connected to Microsoft Defender for Endpoint for the intent of compliance.
Onboarding a Windows 10 2004 Machine
For this demo, I will be onboarding Microsoft Defender for Endpoint to a new Windows 10 version 2004 machine using MEM.
The configuration package configures devices to communicate with Microsoft Defender for Endpoint services to scan files, detect threats, and other security related items.
One of the best features about the MEM and Microsoft Defender for Endpoint synchronization is after your organization onboards a device using the configuration package, you will never have to do it again.
From the MEM admin center, select Devices, Configuration profiles, + Create Profile, and select Windows 10 and later for Platform.

Under Profile select Microsoft Defender ATP (Windows 10 Desktop), and select Create.

This will take you to the basics page and put a good name and description of your profile and select next.

For configuration settings, select the configurations that work best for your company and select next.

For Assignments, select either all users, all devices, or all users and devices. If you have groups to exclude, select exclude and add the groups to the list and select next.

For Applicability Rules it will give you three options to choose from: Rule, Property, and Value. An example would be to create a rule that has the OS edition of WIN 10 EDU, WIN ENT, WIN 10 PRO , WIN 10 PRO EDU, and WIN 10 PRO WKS. Select next when complete.

Review your new policy that you created that defined all the correct parameters in your policy before selecting create.

As seen on the upper right, the MDATP WIN 10 Desktop profile was successfully created.

Confirming The Windows Device Was Successfully Onboarded in MEM
Go to Endpoint Security, then Microsoft Defender ATP and it will show you the device (or your devices) that have been onboarded successfully with the sensor as seen below.

Confirming in Microsoft Defender Security Center
Click on https://securitycenter.windows.com/ and select Configuration Management tab on the bottom. The machines that fit the criteria based on the OS versions in the created policy will show up inside the portal as seen below.

To see the machines that were onboarded and other information, one can select the Device Inventory tab and confirm by Machine Name, Health state, and when it was last seen online to confirm.
Quick Video Demo
To see this in action, click here for a video walkthrough from a demo from Microsoft’s Product Group. Enjoy!
Conclusion
Thanks for taking the time to read this blog and I hope you had fun reading how to onboard WIN 10 devices to Microsoft Defender for Endpoint without downloading or deploying a package as everything is done inside MEM. This configuration that was demoed configures your devices to communicate with Microsoft Defender for Endpoint services to scan files and detect threats. The device is also configured to report to Microsoft Defender for Endpoint the devices risk level based on compliance policies you will create. Hope to see you in the next blog and always protect your endpoints!
Thanks for reading and have a great Cybersecurity day!
Follow my Microsoft Security Blogs: http://aka.ms/JohnBarbare
Brought to you by Dr. Ware, Microsoft Office 365 Silver Partner, Charleston SC.

Recent Comments