This article is contributed. See the original author and article here.
Hello IT Pros,
I have combined the information for Security Team who monitor, respond and manage ATP Portal on a daily basis. Please check it out and give your feedback.
===================
ALERT MANAGEMENT
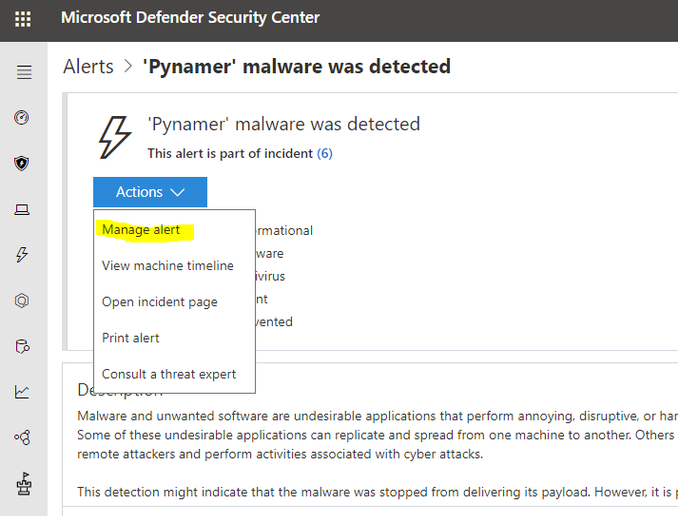
The Alert response could be done as follows:
|
Change Status of Alert (by your IT Security Team Member) Alert Status AlertActionManage AlertStatus
|
New, In Progress Resolved |
|
Alert Classification AlertActionManage AlertClassification |
true/false |

ALERT SUPPRESSION RULE
Defender ATP lets you create suppression rules for specific alerts that are known to be innocuous such as known tools or processes in your organization.
- Suppression rules can be created from an existing alert. They can be disabled and reenabled if needed.
- The rule will not affect existing alerts already in the queue, prior to the rule creation.
- The rule will only be applied on alerts that satisfy the conditions set after the rule is created.
You can choose to suppress alerts on this machine or suppress alert in entire organization


|
Detection Rule (Customized Detection Rule by running Query) |
Action applied to threat detection once it is discovered · With the query in the query editor, select Create detection rule and specify Detection name, Frequency — interval for running the query 1-24hrs, Alert title — title displayed with alerts triggered by the rule, Severity level, Category,Description, Recommended actions —enter your comment on additional actions that responders might take in response to an alert · Save |
|
Suppression Rule
|
You can create an alert suppression condition based on : File SHA1, File name – wildcard supported, Folder path – wildcard supported, IP address, URL – wildcard supported, Command line – wildcard supported · Select the Trigerring IOC (Indicator of Compromise) · Specify the action and scope on the alert
|
|
Indicator of compromise (IoCs) |
Indicator of compromise (IoCs) is used for detection and for blocking You could create IoC based on file hash, External IP address, URL |
All ATP documents are at : https://docs.microsoft.com/en-us/windows/security/threat-protection/microsoft-defender-atp/microsoft-defender-advanced-threat-protection
Create indicators for files
You can prevent further propagation of an attack in your organization by banning potentially malicious files or suspected malware. If you know a potentially malicious portable executable (PE) file (.exe and .dll file), you can block it. This operation will prevent it from being read, written, or executed on machines in your organization.
There are two ways you can create indicators for files:
- By creating an indicator through the settings page
- By creating a contextual indicator using the add indicator button from the file details page
Prerequisite:
- The Defender Antimalware client version must be 4.18.1901.x or later.
- Windows 10, version 1703 or later.
Important
- The allow or block function cannot be done on files if the file’s classification exists on the device’s cache prior to the allow or block action
- Trusted signed files will be treated differently. Microsoft Defender ATP is optimized to handle malicious files. Trying to block trusted signed files, in some cases, may have performance implications.
Create an indicator for files from the settings page
- In the navigation pane, select Settings > Indicators.
- Select the File hash tab.
- Select Add indicator.
- Specify the following details:
- Indicator – Specify the entity details and define the expiration of the indicator.
- Action – Specify the action to be taken and provide a description.
- Scope – Define the scope of the machine group.
- Review the details in the Summary tab, then click Save.
Create a contextual indicator from the file details page
One of the options when taking response actions on a file is adding an indicator for the file.
Create indicators for IPs and URLs/domains (preview)
Microsoft Defender ATP can block what Microsoft deems as malicious IPs/URLs, through Windows Defender SmartScreen for Microsoft browsers, and through Network Protection for non-Microsoft browsers or calls made outside of a browser. You can now allow or block IPs, URLs, or domains through the settings page or by machine groups.
Prerequisites:
- URL/IP allow and block relies on the Microsoft Defender ATP component Network Protection to be enabled in block mode. For more information on Network Protection and configuration instructions, see Protect your network.
- The Antimalware client version must be 4.18.1906.x or later.
- Supported on machines on Windows 10, version 1709 or later.
- Ensure that Custom network indicators is enabled in Microsoft Defender Security Center > Settings > Advanced features. For more information, see Advanced features.
Important:
Only external IPs can be added to the indicator list.
For web protection scenarios, we recommend using the built-in capabilities in Microsoft Edge. Microsoft Edge leverages Network Protection to inspect network traffic and allows blocks for TCP, HTTP, and HTTPS (TLS).
For all other processes, web protection scenarios leverage Network Protection for inspection and enforcement:
NOTE:
- Full URL path blocks can be applied on the domain level and all unencrypted URLs
- There may be up to 2 hours latency (usually less) between the time the action is taken, and the URL and IP being blocked.
- There may be a couple of minutes of latency between the time the action is taken and the actual file being blocked.
Create an indicator for IPs, URLs, or domains from the settings page
- In the navigation pane, select Settings > Indicators.
- Select the IP addresses or URLs/Domains tab.
- Select Add indicator.
- Specify the following details:
- Indicator – Specify the entity details and define the expiration of the indicator.
- Action – Specify the action to be taken and provide a description.
- Scope – Define the scope of the machine group.
- Review the details in the Summary tab, then click Save.
Import a list of IoCs
You can also choose to upload a CSV file that defines the attributes of indicators, the action to be taken, and other details.
Download the sample CSV to know the supported column attributes.
- In the navigation pane, select Settings > Indicators.
- Select the tab of the entity type you’d like to import indicators for.
- Select Import > Choose file.
- Select Import. Do this for all the files you’d like to import.
- Select Done.
- Make sure the setting for Cusotm Network Indicator setting was turned on if we have IoC items configured by IP addresses, Url, Domain Name:

Threat & Vulnerability Management dashboard
You can use the Threat & Vulnerability Management capability in Microsoft Defender Security Center to:
- View exposure and configuration scores side-by-side with top security recommendations, software vulnerability, remediation activities, and exposed machines
- Correlate EDR insights with endpoint vulnerabilities and process them
- Select remediation options, triage and track the remediation tasks
- Select exception options and track active exceptions
|
See the current state of your organization’s device exposure to threats and vulnerabilities. Several factors affect your organization’s exposure score: weaknesses discovered in your devices, likelihood of your devices to be breached, value of the devices to your organization, and relevant alerts discovered with your devices. The goal is to lower the exposure score of your organization to be more secure. To reduce the score, you need to remediate the related security configuration issues listed in the security recommendations. |
|
|
See the security posture of the operating system, applications, network, accounts and security controls of your organization. The goal is to remediate the related security configuration issues to increase your configuration score. Selecting the bars will take you to the Security recommendation page. |
|
|
Weakness |
The Weaknesses page lists down the vulnerabilities found in the infected software running in your organization by listing the Common Vulnerabilities and Exposures (CVE) ID, the severity, Common Vulnerability Scoring System (CVSS) rating, prevalence in your organization, corresponding breach, and threat insights. |
|
Indicator of compromise (IoCs) |
Indicator of compromise (IoCs) matching is an essential feature in every endpoint protection solution. This capability gives SecOps the ability to set a list of indicators for detection and for blocking (prevention and response).
Create indicators that define the detection, prevention, and exclusion of entities. You can define the action to be taken as well as the duration for when to apply the action as well as the scope of the machine group to apply it to. |
To Group Machines based on OS, Name Prefix, …
- Settings
- PermissionsDevice Groups
- Add New Device Group
- ….

- User Access
- Assign Azure AD User Group to Role
- Apply change
Adding Custom Role for ATP Service:
You could add multiple different custom roles based on different permission sets:
- View Data
- Active Remediation Action
- Alert investigation
- Live response.
To Add a Role:
- Settings
- PermissionsRoles
- Add item, …


- Add Azure AD User Group to Roles:

- Save
I hope the information is useful to your daily operation of ATP
Cheers!
Brought to you by Dr. Ware, Microsoft Office 365 Silver Partner, Charleston SC.

Recent Comments