This article is contributed. See the original author and article here.
Overview
When deploying the SAP application layer of NetWeaver or S/4HANA, one of the requirements is to have directories like /sapmnt/SID, saptrans shared in the environment. Additionally, when deploying highly-available SAP system, file systems like /sapmnt/SID, usr/sap/SID/ASCS, also need to be protected and highly available.
On Azure, you have several different options for deploying “sap shared directories”. You may be asking yourself, what are the differences and when should I use which option? In this blog we explore the options and describe how to deploy highly available SAP system, using Azure Files NFS v4.1 shares, which recently entered public preview.
What are the options for SAP shared directories?
So far, when deploying highly available SAP ASCS/ERS instance on Linux VMs in Azure, you could deploy the sap shared directories on:
- NFS volumes on ANF
- Highly available NFS cluster: either Pacemaker cluster with DRBD replication on SLES, or GlusterFS cluster on RHEL
When using highly-available NFS cluster, you are responsible for deploying and configuring these NFS clusters, including the HA configuration. Once built, you are also responsible of all aspects of maintaining and operating the NFS cluster. That means that the TCO goes well beyond the cost of the Azure infrastructure components for such an NFS cluster. On the other hand, because no specialized Azure components are required, such a solution can be deployed in any Azure region. If the SAP system is in a zonal deployment, the NFS cluster itself can also be deployed across Availability zones. Cross-region replication for Disaster Recovery(DR) across availability zones is also to be configured and operated by you as a customer.
When using NFS volumes on ANF, there is no need to deploy, configure and maintain NFS clusters. ANF clusters have built in redundancy (within a single zone), and ANF comes with 99.99% availability SLA. Cross-region replication (in public preview) is a new ANF feature, based on SnapMirror, which allows cross-region replication of ANF volumes for DR purposes. ANF can deliver sub-milliseconds latency, and while this is not the topic of the blog, it is worth mentioning, that ANF is an excellent choice for deploying HANA DB as its latency and throughput characteristics meet SAP’s requirements for HANA deployments. If you are considering zonal deployment, keep in mind that ANF is not zone-aware, and data is not automatically replicated across Availability zones. The minimum capacity pool size for ANF is 4 TiB, and such entry point is relatively high for customers with smaller requirements: for instance customers with smaller SAP Landscapes, only interested in using ANF for the SAP shared directories of the SAP application layer.
What about the new option Azure Files NFS v4.1 shares? This is a new Azure offering that is in a public preview stage. As the name implies, it is based on Azure Files – Premium. Like ANF, Azure Files NFS eliminates the need to deploy, configure and maintain NFS clusters. The minimum size for a single NFS share on Azure Files is 100GB. You only pay for the capacity of the deployed shares. Expectation on delivered storage latency is that it does not meet the level necessary for SAP databases. But that the storage latencies are sufficient for hosting SAP application layer shares in a very cost-effective manner.
Two choices for data redundancy are offered: LRS (local, in zone synchronous data replication) and ZRS (synchronous replication of your data across all 3 availability zones). If using ZRS, in the case of a zonal failure, the NFS sessions are automatically redirected to a healthy zone, if using Private Endpoint to access the shares in the storage account. It is not necessary to re-mount the NFS shares to your Azure VMs after a zonal failure. While the storage layer fails over, the SAP application may experience “disturbance”, depending on how long it takes for the NFS sessions to be redirected to a healthy zone. For instance, the SAP workload may experience higher than usual latency. Or SAP work processes may restart. As usual, single point of failure components, like SAP ASCS/ERS, should be protected with clustering technology (Pacemaker cluster), so that the cluster can automatically restart or fail-over the instances. In the case of a VM failure – the Pacemaker cluster will failover to the healthy cluster node, as usual.
Automatic cross-region replication for DR scenarios is currently not offered with NFS on Azure Files. Cross-region replication can be achieved, using tools like rsync.
If you are considering a zonal deployment for your SAP Application workload, and looking for a simplified, cost effective option for the SAP shared directories, that also offers cross-zone resilient, read on – NFS on Azure Files could be a good fit and you can try it now. Azure Files NFS v4.1 shares is not suitable for production workloads at this point in time, as it is in a public preview stage.
To summarize the features of the different options:
| NFS – Azure Files | NFS – ANF | NFS Cluster | |
| SAP use case |
(SAP shared directories) |
(SAP shared directories)
|
(SAP shared directories) |
High Availability/ Redundancy | Built-in (LRS or ZRS) | Built-in (within a single zone) | Custom |
| Cross-Zonal replication | Yes (with ZRS) | No | Yes, if the cluster is deployed across zones |
| Cross-Region Replication | Custom (rsync) | Yes (SnapMirror) | Custom (rsync) |
| Minimum requirements | 100 GB / individual share | 4TiB / capacity pool | N/A |
| TOC considerations | Cost of the NFS shares | Cost of the ANF capacity pool | Cost of the VMs and disks for the NFS cluster, plus effort/cost to configure and maintain the cluster |
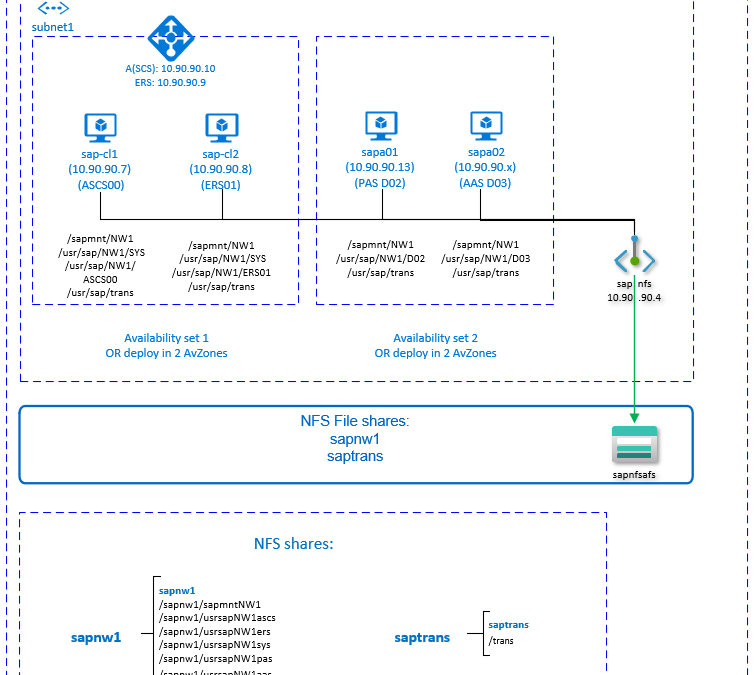
Now, let’s go back and take a look at the example in this blog:
- We will be deploying SAP system NW1, HANA S/4 1809, with instance numbers: ASCS(00), ERS(01), PAS(02), AAS(03).
- All SAP file systems are placed on NFS shares on Azure Files in a single storage account, accessed via private endpoint. The storage account has two NFS shares: sapnw1 and saptrans. NFS share sapnw1 contains all directories for SAP system NW1.
- SAP ASCS/ERS are in a Pacemaker cluster and STONITH is based on Azure Fence agent (SBD works as well)
- All VMs are deployed with SLES 12 SP5

Prepare Infrastructure
We are assuming that the Virtual networks, subnets, resource groups are already deployed.
- Deploy your VMs. You can deploy them in Availability sets, or in Availability zones, if the Azure region supports it. If you need additional IPs to your VMs, deploy and attach second NIC. Don’t add secondary IP to the primary NIC, as this scenario is not supported with floating IP in the Azure LB.
- Deploy and configure an Azure load balancer – it is best to deploy standard SKU Azure LB.
- You will need two front IPs: one for ASCS (10.90.90.10) and one for ERS (10.90.90.9).
- Create a backend pool and add both VMs, which will be clustered.
- Create the health probes for ASCS (probe port: 62000) and ERS (probe port 62101). The probe ports must match the ports that you will use later in the Pacemaker resource configuration.
- Configure the load balancing rules for ASCS and ERS, being careful to select the corresponding front IPs, health probes and the backend pool. Select HA ports, make sure to increase the idle timeout to 30 minutes and enable floating IP.
For more detailed instructions, reference Deploy Azure Load Balancer via Azure portal.
The Azure Fence agent requires outbound connectivity to the Azure ARM public end point and that is not the case by default for VMs in the backend pool of Standard Azure LB. Several scenarios how to achieve outbound connectivity for these VMs are covered here.
Deploy Azure Files Storage Account and NFS shares
Now, let’s look at the steps to deploy Azure Files NFS shares (we will use ZRS replication). If you are curious to learn more about Azure Files NFS shares, the documentation can be found here.
First, you will need to deploy Premium Storage Account of type file. You will be accessing the Storage account via Private end point, deployed in the same VNET as the VMs for your SAP application layer. That means that the traffic from your SAP system never leaves the virtual network security boundaries. SAP systems often contain sensitive and business critical data and staying within the boundaries of the VNET is important security consideration for many customers.
If you need to access the storage account from a different VNET (Network topology often varies across customers), then you can use Azure VNET peering.
- First, Deploy the FileStorage storage account sapafsnfs . In Azure portal select Create a resource –> Storage –> Storage Account.
- Basics: Select Subscription, Resource Group, Region
- Basics: Enter the storage account name, i.e. sapafsnfs
- Basics: Make sure to select Premium as performance tier.
- Basics: select FileStorage as account kind.
- Basics: select replication Zone-redundant storage (ZRS)
- Click Next
- Networking: select Private endpoint as connectivity method. The private end point will be used to access the storage form within the configured VNETs.
- Create PrivateEndpoint, while creating the Storage Account
- While still in Networking, Click on Add in the Private endpoint section.
- Select/verify the Subscription, Resource Group and Region.
- Enter Name of the Private endpoint: sapafsnfs_pe
- Storage sub-resource: file
- Virtual Network/subnet: select the virtual network/subnet, where the SAP VMs are deployed.
- Accept the default (Yes) for Integrate with private DNS zone
- Make sure to select your Private DNS Zone from the drop down.
- Click OK, to go back to the Network tab in Create storage Account.
- Continue with the creation of storage account
- Click Next
- Data protection: accept the defaults
- Click Next
- Advanced: Set Secure transfer required to Disabled
- Proceed and create the storage account
For details on how to create storage account see Create FileStorage Storage Account.
- Next, you will need to deploy your NFS shares in the storage account you just created. In this example we will need two NFS shares:
- sapnw1 (128GB). All NW1 file systems, except saptrans are nested mount points
- saptrans (128GB)
The only supported protocol is NFSv4.1. Navigate to the storage account (sapafsnfs) and click on File shares
- Enter the name of the share, i.e. sapnw1, saptrans
- Size: 128GB
- Select NFS (preview) as protocol
- Make sure to select “No root Squash”. Otherwise, when you mount the shares on your VMs you will not see the file owner/group.
For details on how to deploy NFS shares, see Create NFS share.
Create Pacemaker cluster
Now that you have deployed the Azure infrastructure components for your SAP system, you can proceed with the configuration of the system.
The SAP ASCS instance is a single point of failure in an SAP system. To achieve highly available deployment, configure a Pacemaker cluster for the ASCS/ERS VMs.
Follow the instructions here to build the Pacemaker cluster. You can choose to use either Azure Fence Agent or SBD for fencing.
SAP ASCS/ERS installation
The following items are prefixed with either [A] – applicable to all nodes, [1] – only applicable to node 1 or [2] – only applicable to node 2.
- [A] Install the latest version of the SAP SUSE cluster connector
sudo zypper in sap-suse-cluster-connector - [A] Set up host name resolution. Insert in /etc/hosts:
10.90.90.7 sap-cl1 10.90.90.8 sap-cl2 10.90.90.10 sapascs 10.90.90.9 sapers - [1] Create the SAP directories on the NFS share: temporarily mount NFS share sapnw1, and create the directories that will be used as nested mount points:
sudo mkdir -p /saptmp sudo mount -t nfs sapnfs.file.core.windows.net:/sapnfsafs/sapnw1 /saptmp -o vers=4,minorversion=1,sec=sys sudo mkdir -p /saptmp/sapmntNW1 sudo mkdir -p /saptmp/usrsapNW1ascs sudo mkdir -p /saptmp/usrsapNW1ers sudo mkdir -p /saptmp/usrsapNW1sys sudo mkdir -p /saptmp/usrsapNW1pas sudo mkdir -p /saptmp/usrsapNW1aas sudo umount /saptmp - [A] Create the SAP shared directories
sudo mkdir -p /sapmnt/NW1 sudo mkdir -p /usr/sap/trans sudo mkdir -p /usr/sap/NW1/SYS sudo mkdir -p /usr/sap/NW1/ASCS00 sudo mkdir -p /usr/sap/NW1/ERS01 sudo chattr +i /sapmnt/NW1 sudo chattr +i /usr/sap/trans sudo chattr +i /usr/sap/NW1/SYS sudo chattr +i /usr/sap/NW1/ASCS00 sudo chattr +i /usr/sap/NW1/ERS01 - [A] Mount the file systems, that will not be controlled by the Pacemaker cluster. In this example we use /etc/fstab.
sapnfs.file.core.windows.net:/sapnfsafs/saptrans /usr/sap/trans nfs vers=4,minorversion=1,sec=sys 0 0 sapnfs.file.core.windows.net:/sapnfsafs/sapnw1/sapmntNW1 /sapmnt/NW1 nfs vers=4,minorversion=1,sec=sys 0 0 sapnfs.file.core.windows.net: /sapnfsafs/sapnw1/usrsapNW1sys/ /usr/sap/NW1/SYS nfs vers=4,minorversion=1,sec=sys 0 0 # Mount the file systems mount -a - [A] Configure the SWAP file and restart the agent to activate the changes
sudo vi /etc/waagent.conf # Set the property ResourceDisk.EnableSwap to y # Create and use swapfile on resource disk. ResourceDisk.EnableSwap=y # Set the size of the SWAP file with property ResourceDisk.SwapSizeMB # The free space of resource disk varies by virtual machine size. Make sure that you do not set a value that is too big. You can check the SWAP space with command swapon # Size of the swapfile. ResourceDisk.SwapSizeMB=2000 #restart the agent to activate the changes sudo service waagent restart - [1] Create the VIP and the health probe resource for ASCS
sudo crm node standby afs-cl2 sudo crm configure primitive fs_NW1_ASCS Filesystem device=' sapnfs.file.core.windows.net:/sapnfsafs/sapnw1/usrsapNW1ascs' directory='/usr/sap/NW1/ASCS00' fstype='nfs' options='sec=sys,vers=4.1' op start timeout=60s interval=0 op stop timeout=60s interval=0 op monitor interval=20s timeout=40s sudo crm configure primitive vip_NW1_ASCS IPaddr2 params ip=10.90.90.10 cidr_netmask=24 op monitor interval=10 timeout=20 sudo crm configure primitive nc_NW1_ASCS azure-lb port=62000 sudo crm configure group g-NW1_ASCS fs_NW1_ASCS nc_NW1_ASCS vip_NW1_ASCS meta resource-stickiness=3000Before proceeding with the SAP ASCS installation, make sure all cluster resources are started:
Full list of resources:
 rsc_st_azure   (stonith:fence_azure_arm):      Started afs-cl1
 Resource Group: g-NW1_ASCS
     fs_NW1_ASCS        (ocf::heartbeat:Filesystem):    Started afs-cl1
     nc_NW1_ASCS        (ocf::heartbeat:azure-lb):      Started afs-cl1
     vip_NW1_ASCS       (ocf::heartbeat:IPaddr2):       Started afs-cl1
- [1] Install the SAP ASCS instance – use the virtual hostname, associated with the IP address of the load balancer frontend configuration for ASCS. In this case, sapascs.
sudo <swpm>/sapinst SAPINST_REMOTE_ACCESS_USER=sapadmin SAPINST_USE_HOSTNAME=ASCS_virtual_hostnameIf the installation fails to create a subfolder in /usr/sap/NW1/ASCS00, try setting the owner and group of the ASCS00 folder to sidadm and retry.
- [1] Create the VIP and the health-probe for the ERS instance.
sudo crm node online afs-cl2 sudo crm node standby afs-cl1 sudo crm configure primitive fs_NW1_ERS Filesystem device=' sapnfs.file.core.windows.net:/sapnfsafs/sapnw1/usrsapNW1ers' directory='/usr/sap/NW1/ERS01' fstype='nfs' options='sec=sys,vers=4.1' op start timeout=60s interval=0 op stop timeout=60s interval=0 op monitor interval=20s timeout=40s sudo crm configure primitive vip_NW1_ERS IPaddr2 params ip=10.90.90.9 cidr_netmask=24 op monitor interval=10 timeout=20 sudo crm configure primitive nc_NW1_ERS azure-lb port=62101 sudo crm configure group g-NW1_ERS fs_NW1_ERS nc_NW1_ERS vip_NW1_ERS
Verify that the cluster resources have started, before proceeding with the SAP ERS installation:
Full list of resources: rsc_st_azure (stonith:fence_azure_arm): Started afs-cl2 Resource Group: g-NW1_ASCS fs_NW1_ASCS (ocf::heartbeat:Filesystem): Started afs-cl2 nc_NW1_ASCS (ocf::heartbeat:azure-lb): Started afs-cl2 vip_NW1_ASCS (ocf::heartbeat:IPaddr2): Started afs-cl2 Resource Group: g-NW1_ERS fs_NW1_ERS (ocf::heartbeat:Filesystem): Started afs-cl2 nc_NW1_ERS (ocf::heartbeat:azure-lb): Started afs-cl2 vip_NW1_ERS (ocf::heartbeat:IPaddr2): Started afs-cl2 - [2] Install SAP ERS on the second cluster node, using the virtual name associated with the IP address of the load balancer frontend configuration for ERS. In this case, sapers.
sudo <swpm>/sapinst SAPINST_REMOTE_ACCESS_USER=sapadmin SAPINST_USE_HOSTNAME=ERS_virtual_hostname
If the installation fails to create a subfolder in /usr/sap/NW1/ERS01, try setting the owner and group of the ERS01 folder to sidadm and retry.
- [1] Adapt the ASCS and ERS SAP profiles
- ASCS profile
# Add the following lines service/halib = $(DIR_CT_RUN)/saphascriptco.so service/halib_cluster_connector = /usr/bin/sap_suse_cluster_connector - ERS profile
# Add the following lines service/halib = $(DIR_CT_RUN)/saphascriptco.so service/halib_cluster_connector = /usr/bin/sap_suse_cluster_connector #Make sure Autostart is not activated in the profile # Autostart = 1
- ASCS profile
- [A] Configure Keep Alive: make sure that the keepalive OS parameters are set as described in SAP note #1410736 on all VMs, running SAP instances (including the VMs running SAP PAS and AAS).
- [A] Add sidadm to the Pacemaker cluster group
# Add sidadm to the haclient group sudo usermod -aG haclient nw1adm - [1] Add the ASCS and ERS SAP services to the sapservices file
cat /usr/sap/sapservices | grep ASCS00 | sudo ssh afs-cl2 "cat >>/usr/sap/sapservices" sudo ssh afs-cl2 "cat /usr/sap/sapservices" | grep ERS01 | sudo tee -a /usr/sap/sapservices - [1] Create the SAP cluster resources. This example is based on ENSA2:
sudo crm configure property maintenance-mode="true" sudo crm configure primitive rsc_sap_NW1_ASCS00 SAPInstance operations $id=rsc_sap_NW1_ASCS00-operations op monitor interval=11 timeout=60 on-fail=restart params InstanceName=NW1_ASCS00_nw1ascs START_PROFILE="/sapmnt/NW1/profile/NW1_ASCS00_nw1ascs" AUTOMATIC_RECOVER=false meta resource-stickiness=5000 sudo crm configure primitive rsc_sap_NW1_ERS01 SAPInstance operations $id=rsc_sap_NW1_ERS01-operations op monitor interval=11 timeout=60 on-fail=restart params InstanceName=NW1_ERS01_nw1ers START_PROFILE="/sapmnt/NW1/profile/NW1_ERS01_nw1ers" AUTOMATIC_RECOVER=false IS_ERS=true sudo crm configure modgroup g-NW1_ASCS add rsc_sap_NW1_ASCS00 sudo crm configure modgroup g-NW1_ERS add rsc_sap_NW1_ERS01 sudo crm configure colocation col_sap_NW1_no_both -5000: g-NW1_ERS g-NW1_ASCS sudo crm configure order ord_sap_NW1_first_start_ascs Optional: rsc_sap_NW1_ASCS00:start rsc_sap_NW1_ERS01:stop symmetrical=false sudo crm node online afs-cl1 sudo crm configure property maintenance-mode="false"
Once you have configured the SAP resources in the cluster, make sure all resources have started and that the cluster status is OK:
Online: [ afs-cl1 afs-cl2 ]
Full list of resources:
 rsc_st_azure   (stonith:fence_azure_arm):      Started afs-cl1
 Resource Group: g-NW1_ASCS
     fs_NW1_ASCS        (ocf::heartbeat:Filesystem):    Started afs-cl1
     nc_NW1_ASCS        (ocf::heartbeat:azure-lb):      Started afs-cl1
     vip_NW1_ASCS       (ocf::heartbeat:IPaddr2):       Started afs-cl1
     rsc_sap_NW1_ASCS00 (ocf::heartbeat:SAPInstance):   Started afs-cl1
 Resource Group: g-NW1_ERS
     fs_NW1_ERS (ocf::heartbeat:Filesystem):    Started afs-cl2
     nc_NW1_ERS (ocf::heartbeat:azure-lb):      Started afs-cl2
     vip_NW1_ERS        (ocf::heartbeat:IPaddr2):       Started afs-cl2
     rsc_sap_NW1_ERS01  (ocf::heartbeat:SAPInstance):   Started afs-cl2
Complete the SAP system installation
The following items are prefixed with either [A] – applicable to both PAS and AAS, [P] – only applicable to PAS or [S] – only applicable to AAS.
- [A] Set up host name resolution
10.90.90.7 sap-cl1 10.90.90.8 sap-cl2 10.90.90.10 sapascs 10.90.90.9 sapers 10.90.90.12 sapa01 10.90.90.13 sapa02 - [A] Create the SAP directories
sudo mkdir -p /sapmnt/NW1 sudo mkdir -p /usr/sap/trans sudo chattr +i /sapmnt/NW1 sudo chattr +i /usr/sap/trans - [P] Create the PAS directories and mount the NFS shares
sudo mkdir -p /usr/sap/NW1/D02 sudo chattr +i /usr/sap/NW1/D02 sapnfs.file.core.windows.net:/sapnfsafs/saptrans /usr/sap/trans nfs vers=4,minorversion=1,sec=sys 0 0 sapnfs.file.core.windows.net:/sapnfsafs/sapnw1/sapmntNW1 /sapmnt/NW1 nfs vers=4,minorversion=1,sec=sys 0 0 sapnfs.file.core.windows.net: /sapnfsafs/sapnw1/usrsapNW1pas/ /usr/sap/NW1/D02 nfs vers=4,minorversion=1,sec=sys 0 0 # Mount the file systems mount -a - [S] Create the AAS directories and mount the NFS shares
sudo mkdir -p /usr/sap/NW1/D03 sudo chattr +i /usr/sap/NW1/D03 sapnfs.file.core.windows.net:/sapnfsafs/saptrans /usr/sap/trans nfs vers=4,minorversion=1,sec=sys 0 0 sapnfs.file.core.windows.net:/sapnfsafs/sapnw1/sapmntNW1 /sapmnt/NW1 nfs vers=4,minorversion=1,sec=sys 0 0 sapnfs.file.core.windows.net: /sapnfsafs/sapnw1/usrsapNW1aas/ /usr/sap/NW1/D03 nfs vers=4,minorversion=1,sec=sys 0 0 # Mount the file systems mount -a - [A] Configure SWAP file
sudo vi /etc/waagent.conf # Set the property ResourceDisk.EnableSwap to y # Create and use swapfile on resource disk. ResourceDisk.EnableSwap=y # Set the size of the SWAP file with property ResourceDisk.SwapSizeMB # The free space of resource disk varies by virtual machine size. Make sure that you do not set a value that is too big. You can check the SWAP space with command swapon # Size of the swapfile. ResourceDisk.SwapSizeMB=2000 #restart the agent to activate the changes sudo service waagent restart - [P] Run the SAP database installation as root, using the virtual name for your database scenario (we are assuming the database layer is in HA configuration as well).
sudo <swpm>/sapinst SAPINST_REMOTE_ACCESS_USER=sapadmin - [P] Install the SAP primary application server as root
sudo <swpm>/sapinst SAPINST_REMOTE_ACCESS_USER=sapadmin - [S] Install one or more additional application server(s) as root. In this example we installed one PAS and one AAS SAP instance.
Next, make sure that you thoroughly test your Pacemaker cluster. You want to make sure that when you need it, your HA solution will deliver. You can find the typical set of failover tests to execute here .
Brought to you by Dr. Ware, Microsoft Office 365 Silver Partner, Charleston SC.

Recent Comments