This article is contributed. See the original author and article here.
The Service Broker component of Azure SQL Managed Instance allows you to compose applications from independent services, by providing native support for reliable and secure message exchange between the databases attached to the services.
Thanks to the support for cross-instance message exchange, which is in preview as of March 2021, Azure SQL Managed Instance can host a data tier of applications that distribute work across multiple instances that may reside in different Azure regions.
Establishing trust between instances
For two instances to be able to send messages to each other using Service Broker, you must exchange public keys of the certificates linked to their local Service Broker endpoints first. Installing a certificate with public key by authorized person constitutes a statement of trust in the other instance that holds the corresponding private key.
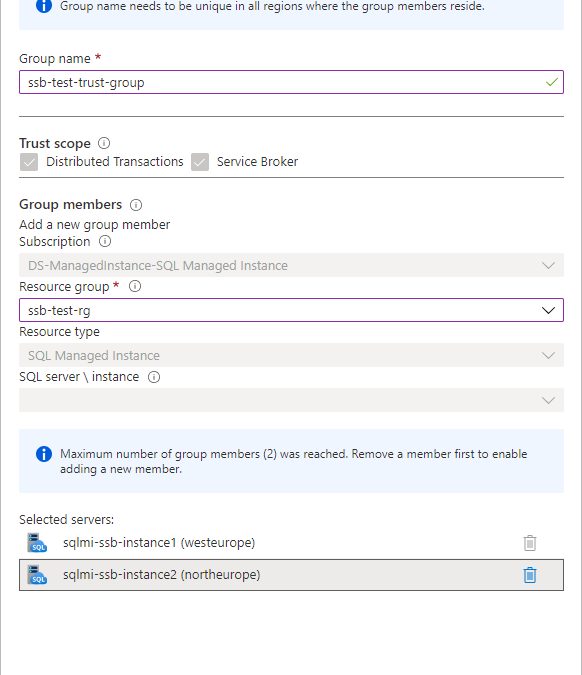
Traditionally, exchanging certificates between the instances of SQL Server was a manual operation that consisted of extracting the public key, providing it to the other instance in a secure way, and installing it on the other instance. With Managed Instance this process has been significantly simplified thanks to the Server Trust Groups.
You establish the trust between the instances by creating server trust group starting from one instance and adding another instance to the group. It’s as simple as that.

To establish trust among multiple instances, create new server trust group for each pair of instances. During the preview of server trust group feature, maximum number of members of group is limited to two.
Allowing network traffic between the instances
If your instances reside in the same virtual network subnet, there are no actions needed to allow the Service Broker traffic between them. If they are placed in different virtual network subnets, you need to enable both the inbound and outbound traffic between the subnets on a set of ports.
Service Broker connections always use redirect connection policy regardless of the connection type configured on the managed instance. Instance initiating the connection reaches to the gateway within the target instance’s subnet to obtain actual IP address and port of the target instance, and subsequent traffic flows directly to the target instance bypassing the gateway.
Gateway listens for incoming Service Broker connections on port 4022 which is default port for Service Broker endpoints. Connection is routed to gateway because the DNS name of managed instance from the Service Broker route resolves to the IP address of the gateway. Gateway then redirects connection to the actual IP address of instance and its automatically assigned port from the range 11000-11999. You cannot change the port used by gateway or instance for service broker traffic. To allow Service Broker traffic between the instances, port 4022 and port range 11000-11999 must be allowed both for the inbound and outbound traffic in both subnets.
Creating Service Broker objects
If you are working with Service Broker for the first time, you may be surprised by how many different objects you must create to be able to send a message. No worries, the entire concept is intuitive, and you will quickly adopt it. If you’d like to explore specific aspects of the feature, I’d strongly recommend you to start from here.
In this article we will cover the simplest case of message exchange between two instances that have trust relation already established and network traffic allowed.
Let’s start from creating the necessary objects on the first instance sqlmi-ssb-instance1:
--Create the message types
CREATE MESSAGE TYPE [//BothDB/2InstSample/RequestMessage]
       VALIDATION = NONE;
CREATE MESSAGE TYPE [//BothDB/2InstSample/ReplyMessage]
       VALIDATION = NONE;
GO

--Create the contract
CREATE CONTRACT [//BothDB/2InstSample/SimpleContract]
      ([//BothDB/2InstSample/RequestMessage]
         SENT BY INITIATOR,
       [//BothDB/2InstSample/ReplyMessage]
         SENT BY TARGET
      );
GO

--Create the initiator queue and service
CREATE QUEUE SQLMIQueue1;

CREATE SERVICE [//SQLMIDB1/2InstSample/SQLMIService]
       ON QUEUE SQLMIQueue1
       ([//BothDB/2InstSample/SimpleContract]);
GO

--Grant the access to the service to a specific user, or public for quick testing:
GRANT SEND
      ON SERVICE::[//SQLMIDB1/2InstSample/SQLMIService]
      TO [public]
GO

--Create route:
CREATE ROUTE SQLMIRoute1
WITH SERVICE_NAME = N'//SQLMIDB2/2InstSample/SQLMIService',
     ADDRESS = N'TCP://sqlmi-ssb-instance2.50d0d943a5ad.database.windows.net:4022';
Create the corresponding objects on the second instance sqlmi-ssb-instance2:
--Create the message types
CREATE MESSAGE TYPE [//BothDB/2InstSample/RequestMessage]
       VALIDATION = NONE;
CREATE MESSAGE TYPE [//BothDB/2InstSample/ReplyMessage]
       VALIDATION = NONE;
GO

--Create the contract
CREATE CONTRACT [//BothDB/2InstSample/SimpleContract]
      ([//BothDB/2InstSample/RequestMessage]
         SENT BY INITIATOR,
       [//BothDB/2InstSample/ReplyMessage]
         SENT BY TARGET
      );
GO

--Create the initiator queue and service
CREATE QUEUE SQLMIQueue2;

CREATE SERVICE [//SQLMIDB2/2InstSample/SQLMIService]
       ON QUEUE SQLMIQueue2
       ([//BothDB/2InstSample/SimpleContract]);
GO

--Grant send to [public] - because there is no remote service binding
GRANT SEND
      ON SERVICE::[//SQLMIDB2/2InstSample/SQLMIService]
      TO [public]
GO


--Create route
CREATE ROUTE SQLMIRoute2
WITH SERVICE_NAME = N'//SQLMIDB1/2InstSample/SQLMIService',
     ADDRESS = N'TCP://sqlmi-ssb-instance1.50d0d943a5ad.database.windows.net:4022';
Sending and receiving messages
Now we can finally send the message from the first instance:
--Send message:
DECLARE @InitDlgHandle UNIQUEIDENTIFIER;
DECLARE @RequestMsg NVARCHAR(100);

BEGIN TRANSACTION;

BEGIN DIALOG @InitDlgHandle
     FROM SERVICE [//SQLMIDB1/2InstSample/SQLMIService]
     TO SERVICE N'//SQLMIDB2/2InstSample/SQLMIService'
     ON CONTRACT [//BothDB/2InstSample/SimpleContract]
     WITH
         --ENCRYPTION = ON;
		 ENCRYPTION = OFF;
SELECT @RequestMsg = N'<RequestMsg>Hello other world!</RequestMsg>';

SEND ON CONVERSATION @InitDlgHandle
     MESSAGE TYPE [//BothDB/2InstSample/RequestMessage]
     (@RequestMsg);

SELECT @RequestMsg AS SentRequestMsg;

COMMIT TRANSACTION;
GO
Receive message on the second instance and reply to the first instance:
DECLARE @RecvReqDlgHandle UNIQUEIDENTIFIER;
DECLARE @RecvReqMsg NVARCHAR(100);
DECLARE @RecvReqMsgName sysname;

BEGIN TRANSACTION;

WAITFOR
( RECEIVE TOP(1)
    @RecvReqDlgHandle = conversation_handle,
    @RecvReqMsg = message_body,
    @RecvReqMsgName = message_type_name
  FROM SQLMIQueue2
), TIMEOUT 1000;

SELECT @RecvReqMsg AS ReceivedRequestMsg;

IF @RecvReqMsgName = N'//BothDB/2InstSample/RequestMessage'
BEGIN
     DECLARE @ReplyMsg NVARCHAR(100);
     SELECT @ReplyMsg =
        N'<ReplyMsg>Hello from the other world!</ReplyMsg>';

     SEND ON CONVERSATION @RecvReqDlgHandle
          MESSAGE TYPE [//BothDB/2InstSample/ReplyMessage]
          (@ReplyMsg);
END

SELECT @ReplyMsg AS SentReplyMsg;

COMMIT TRANSACTION;
GO
Specificities and limitations of Service Broker in SQL Managed Instance
Service Broker endpoint is automatically enabled on every Azure SQL Managed Instance and cannot be disabled.
Message forwarding cannot be enabled.
Port specified on every route created needs to be 4022
Route address cannot specify ‘TRANSPORT’
Remote service binding cannot be created
Resources
Brought to you by Dr. Ware, Microsoft Office 365 Silver Partner, Charleston SC.

Recent Comments