This article is contributed. See the original author and article here.
Azure Batch:
You can use Batch to run large-scale parallel and high-performance computing (HPC) applications efficiently in the cloud. It’s a platform service that schedules compute-intensive work to run on a managed collection of virtual machines (VMs). It can automatically scale compute resources to meet the needs of your jobs.
With the Batch service, you define Azure compute resources to execute your applications in parallel, and at scale. You can run on-demand or scheduled jobs. You don’t need to manually create, configure, and manage an HPC cluster, individual VMs, virtual networks, or a complex job and task-scheduling infrastructure.
Azure Data Factory:
Data Factory is a cloud-based data integration service that orchestrates and automates the movement and transformation of data. You can use Data Factory to create managed data pipelines that move data from on-premises and cloud data stores to a centralized data store. An example is Azure Blob storage. You can use Data Factory to process/transform data by using services such as Azure HDInsight and Azure Machine Learning. You also can schedule data pipelines to run in a scheduled manner (for example, hourly, daily, and weekly). You can monitor and manage the pipelines at a glance to identify issues and take action.
Configure Batch job with ADF:
In this article, we will be looking into the steps involved in configuring a simple batch job with Azure data factory using the Azure portal.
We will be using an *.exe file and execute it in Azure data factory pipeline using Azure Batch.
This example does not require any additional tools or application to be pre-installed for the execution.
Create a Batch account:
- In the Azure portal, select Create a resource > Compute > Batch Service.
- In the Resource group field, select Create new and enter a name for your resource group.
- Enter a value for Account name. This name must be unique within the Azure Location selected. It can contain only lowercase letters and numbers, and it must be between 3-24 characters.
- Under Storage account, select an existing storage account or create a new one.
- Do not change any other settings. Select Review + create, then select Create to create the Batch account.
When the Deployment succeeded message appears, go to the Batch account that you created.
Public documentation for creating a Batch account.
Create a Pool with compute nodes:
- In the Batch account, select Pools > Add.
- Enter a Pool ID called mypool.
- In Operating System, select the following settings (you can explore other options).
Setting | Value |
Image Type | Marketplace |
Publisher | microsoftwindowsserver |
Offer | windowsserver |
Sku | 2019-datacenter-core-smalldisk |
- Scroll down to enter Node Size and Scale settings. The suggested node size offers a good balance of performance versus cost for this quick example.
Setting | Value |
Node pricing tier | Standard A1 |
Target dedicated nodes | 2 |
- Keep the defaults for remaining settings, and select OK to create the pool.
Batch creates the pool immediately, but it takes a few minutes to allocate and start the compute nodes. During this time, the pool’s Allocation state is Resizing. You can go ahead and create a job and tasks while the pool is resizing.
After a few minutes, the allocation state changes to Steady, and the nodes start. To check the state of the nodes, select the pool and then select Nodes. When a node’s state is Idle, it is ready to run tasks.
Public documentation for creating a Batch pool.
Create Azure Data Factory:
- Go to the Azure portal.
- From the Azure portal menu, select Create a resource.
- Select Integration, and then select Data Factory.
- On the Create Data Factory page, under Basics tab, select your Azure Subscription in which you want to create the data factory.
- For Resource Group, take one of the following steps:
- Select an existing resource group from the drop-down list.
- Select Create new, and enter the name of a new resource group.
- For region, select the same region as the Batch account to avoid additional charges due to communication between different datacenters.
- For Name, provide a name for your ADF and kindly note that the name must be universally unique.
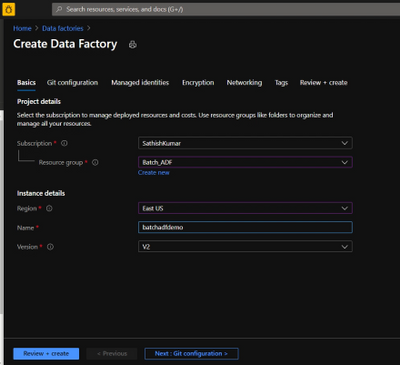
- For version, select v2.
- Select Next: Git configuration, and then select Configure Git later check box.
- Select Review + create and select Create after the validation is passed. After the creation is complete, select Go to resource to navigate to the Data Factory page.
- Below is an example of how a Azure Data Factory overview page looks like.
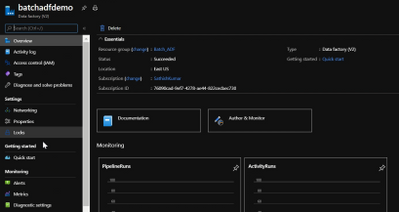
- Now click on ‘Author & Monitor’ to open the ADF workspace.
- Before the next step, download the helloworld.exe file from the here and upload it to one of the containers in your storage account which is being used with the Batch account.
Public documentation for creation of Azure Data Factory.
Configure a pipeline in ADF:
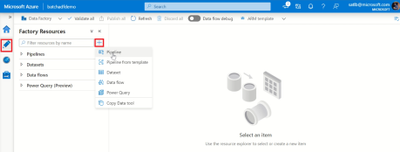
- In the left-hand side options, click on ‘Author’.
- Now click on the ‘+’ icon next to the ‘Filter resource by name’ and select ‘Pipeline’.
- Now select ‘Batch Services’ under the ‘Activities’.
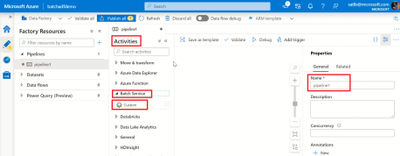
- Change the name of the pipeline to the desired one.
- Drag and drop the custom activity in the work area.
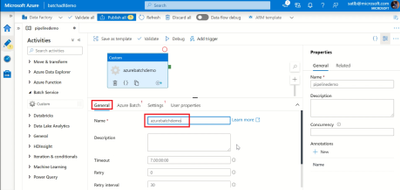
- Under the General section, enter a Name.
- Next, select Azure Batch and select the existing Azure Batch Linked Service or create a new one.
- To create an Azure Batch Linked Service, click on the + New. Enter the details as provided in the below screenshot.
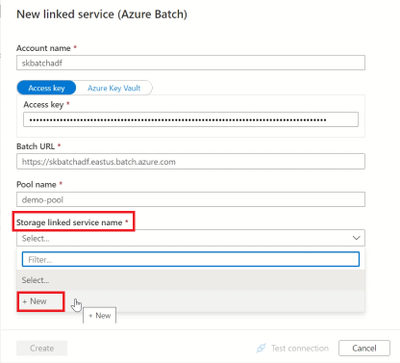
- Create a Storage Linked service name too, by selecting the + New in the dropdown.
- Enter the required details to create a storage linked service name, test the connection to check if it succeeds and click on create.
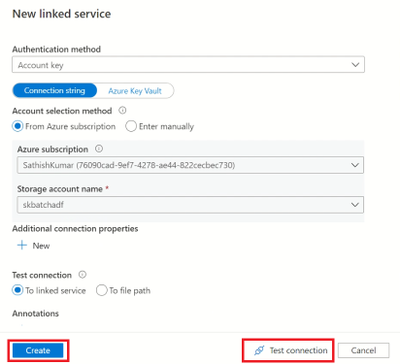
- Now, select the storage linked service name in the Azure Batch linked service and click on create.
- Next, click on settings and enter the command you want to execute (in this example, we will execute a simple helloworld.exe file which will print ‘Hello World’).
- So, in the command line type ‘(filename).exe’
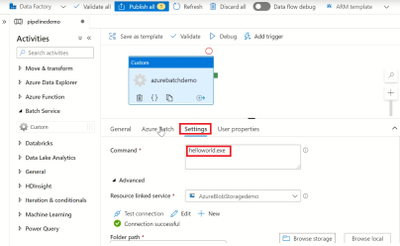
- Select the storage account linked service which we created, under the Resource Linked service.
- Under the Folder path, select the location of the container where the ‘helloworld.exe’ file is present by clicking on Browse storage.
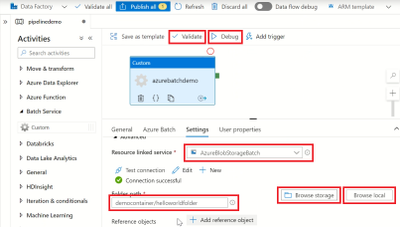
- Then click on Validate to check for any errors in the configuration.
- Finally, click on Debug to run the pipeline while will create a job in the Azure batch pool and execute the command line as a task.
Note: We are currently checking the pipeline without publishing it. So once the pipeline succeeds make sure to click on Publish All else all these configuration will be lost.
Check the Job status in Azure Batch:
- Navigate to the corresponding Batch account and click on Jobs.
- Click on the recently created Job and open the task which had run under it.
- Check for the successful Job completion by opening the stdout.txt file which will contain the output.
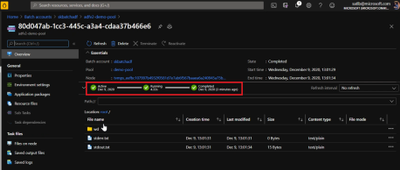
- The output is displayed in the stdout.txt file for us.
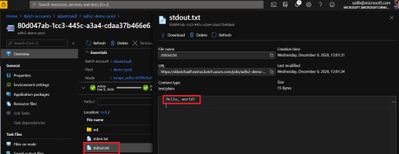
- We have now configured a simple Batch job using ADF pipeline and verified the output successfully.
Thank you for following the steps, I hope the blog was useful and kindly provide any comments based on your view or if any additional information needs to be included.
You can also try out a different execution of Azure batch with Azure Data Factory using a python script file.
Brought to you by Dr. Ware, Microsoft Office 365 Silver Partner, Charleston SC.


Recent Comments