This article is contributed. See the original author and article here.
Howdy folks!
Michele Ferrari here from the Premier Field Engineer- Azure Team in San Francisco, here today to talk about how to use the famous ClaimsXRay application with AzureAD to troubleshoot problems with SAML single sign-on for 3rd party tool applications.
Why you might want to read this blog:
You have an Application that you want to integrate with AzureAD providing the Single Sign-on experience for your users. This Application supports a SAML-based protocol but requires some ad-hoc claims to work properly, for example it expects specific Claims to identify your users, attributes that only exist in your on-premises Active Directory and not in Azure Active Directory (yet).
If you have been working in AD FS, you probably came across this awesome tool called: Claims X-Ray (https://adfshelp.microsoft.com/ClaimsXray/TokenRequest) to debug and troubleshoot problems with claims issuance in AD FS. Today, we’re going to re-use this tool with AzureAD !
At the end of this blog you will be able to:
- Integrate ClaimsXRay with an AzureAD application to test SAML claims issuance
- Understand how to use Directory Schema Extension Attributes for sending user data to applications in token claims
- rfc1274 – did you know there is an attribute called ‘drink’ in Microsoft’s Active Directory?
- Learn about the Tenant Schema Extension App in your tenant
Ready? Let’s do it, follow me!
- Integrate AD FS Help ClaimsXRay with AzureAD
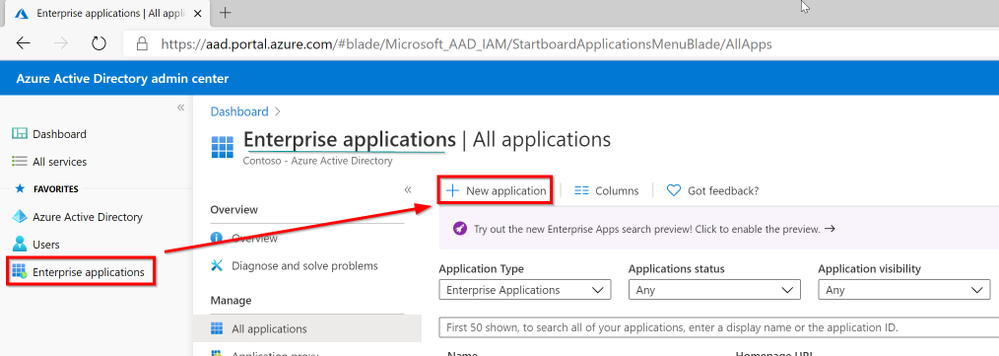
Open AzureAD Admin Center https://aad.portal.azure.com/ and then click on Enterprise Application

Add a Non-Gallery Application:

Choose the name for your application:

Click on Single-Sign-On

Click on the pencil to Edit the Basic SAML Configuration

As Identifier we are going to use urn:microsoft:adfs:claimsxray
As a Reply URL: https://adfshelp.microsoft.com/ClaimsXray/TokenResponse
|
Identifier (Entity ID) |
Uniquely identifies the application. Azure AD sends the identifier to the application as the Audience parameter of the SAML token. The application is expected to validate it. |
|
Reply URL |
Specifies where the application expects to receive the SAML token. The reply URL is also referred to as the Assertion Consumer Service (ACS) URL |
Since we are re-using the ADFS ClaimsXRay published by Microsoft, we need to use the Identifier it is expecting and, tell our application where to send/redirect the SAML token.
Note: ClaimsXRay does not enforce the validation of the Identifier. This means that you could potentially have multiple ClaimsXRay applications in your tenant:
If you use different identifiers, you can register multiple versions of ClaimsXRay for various tests (example, one with and one without MFA required, one with session controls, etc.)

At this point Save the configuration.

Click on No, I’ll test later as there is still something we need to configure

Click on Users and groups and then Add User

Search for an User Account and assign it to this Application. This will allow that user to “consume” this app and at the same time, this app will be visible into the myapplications portal

Open a new tab in your favorite browser and go to https://myapplications.microsoft.com/
Search for the name of the application you have just created:

And here the SAML claims with all of its claims:

Now, let’s move into the Claims customizations.
My Application requires the On-premises User Drink attribute to be passed within the SAML assertion to my Application and the onPremisesSamAccountName.
Following this documentation https://docs.microsoft.com/en-us/azure/active-directory/hybrid/how-to-connect-sync-feature-directory-extensions#customize-which-attributes-to-synchronize-with-azure-ad
We’re going to configure ADConnect to synchronize the Drink attribute since the onPremisesSamAccountName is already available in AzureAD.
Connect to your ADConnect server and lunch the Azure AD Connect app. Remember that you must remember to close this application at the end, as this is going to pause the sync engines for the time you work on it.

Click on Configure

Click on Customize synchronization options and click Next

Authenticate with your AzureAD Global Admin user

Click Next

Click Next

Select Directory extension attribute sync and then Next

Search and select Drink and add it to the Selected Attributed and then click Next
Did you know that there is an attribute called ‘drink’ in Microsoft’s Active Directory?
The drink (Favorite Drink) attribute type specifies the favorite drink of an object (or person).
It’s been RFC since 1991! :smiling_face_with_smiling_eyes:

Click on Configure

Click Exit to complete the configuration

I’m going to initiate a Delta Synchronization to avoid waiting until the next sync cycle:
Start-ADSyncSyncCycle -PolicyType Delta

Now, let’s confirm that the Drink attribute flowed into Azure AD. Open the Synchronization Service app

You will notice that as a result of a directory extension change, ADConnect choses to perform a Full Import that, in big environment can take even hours so, always test where possible and plan accordingly as it wont be able to do any other sync operation until it completes the import.
This configuration creates an Inbound Sync Rule to Import the Description attribute From the Connector Space into the Metaverse “In from AD – User DirectoryExtension” and an Outbound SyncRule to export it from the Metaverse into the AzureAD Connector Space where then the object is exported and in AzureAD “Out to AAD – User DirectoryExtension”.
The interesting thing it’s how the Object is named in AzureAD: extension_180973d8aa5f4e049c25bb863c66de18_department

What’s is 180973d8aa5f4e049c25bb863c66de18?
It’s nothing more than the ApplicationId of our Tenant Schema Extension App in our Tenant. Every customer gets a different AppId so do not try to search mine into your tenant.

Directory Schema Extension Attributes provide a way to store additional data in Azure Active Directory on user objects and other directory objects such as groups, tenant details, service principals BUT only extension attributes on user objects can be used for emitting claims to applications and those attributes are always associated with an application in the tenant and are referenced by the application’s applicationId in their name: Tenant Schema Extension App.
As you can see the Identifier for a Directory Schema Extension Attribute is of the form of Extension_xxxxxxxxx_AttributeName, where xxxxxxxxx is the applicationId of the application the extension was defined for.
Once a directory extension attribute created via AD Connect is in the directory, it will show in the SAML SSO claims configuration UI.
Let’s go back to our ClaimsXRay Enterprise Application in the AAD Portal

Then click on Single sign-on

Click on the pencil to edit User Attributes & Claims

Click on Add new claim

Type a Name for your new claim and select the user.drink extension we just created and then click on Save

Open a new tab in your favorite browser and go to https://myapplications.microsoft.com/
And click on your ClaimsXRay application

And we can see the new Favorite_Drink claim we just created, which is a synced attribute from our on-premises AD Department attribute:

This concludes this Blog Post. I want to thank you for your time and I’ll see you soon here!
Michele Ferrari
Brought to you by Dr. Ware, Microsoft Office 365 Silver Partner, Charleston SC.

Recent Comments