This article is contributed. See the original author and article here.
Introduction
Azure Virtual Network provides a logical, isolated and secure network boundary inside Azure. As more and more workloads start to get deployed in Azure Virtual Networks, enabling network connectivity across them starts to become challenging. There are multiple options to address these challenges. These options include Virtual Network (VNet) Peering, using VPN gateway between 2 virtual networks, etc.
To address common VNet connectivity challenges, a pattern has evolved over the years. This pattern is referred as “Hub and spoke” network topology in Azure.
Hub and spoke network topology pattern bring multiple benefits and simplifies network connectivity in Azure. Azure has another service called as Azure Virtual WAN (vWAN). Azure vWAN provides *managed hub and spoke topology* facilitating any-to-any connectivity.
This post will compare and contrast Hub and spoke network topology and Azure vWAN to help customers make informed decision.
Scenario
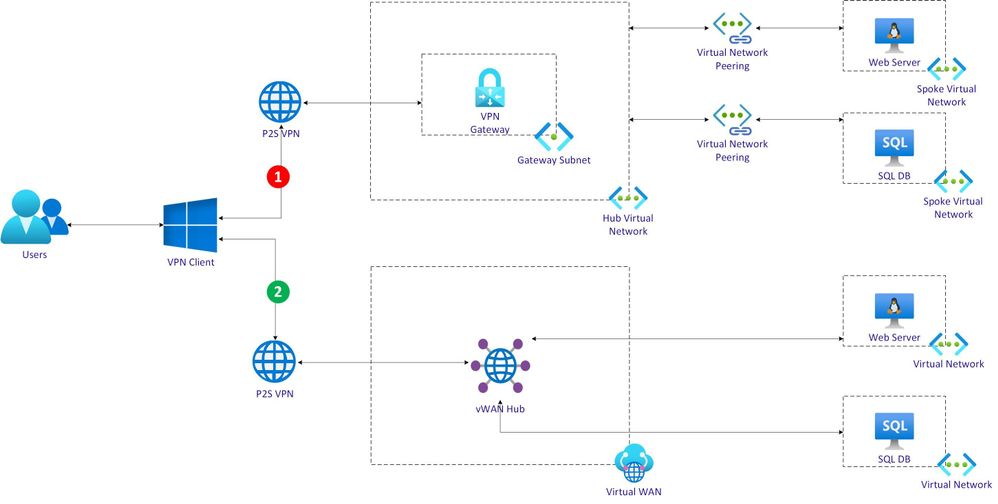
This post will evaluate Hub and spoke network topology and Azure vWAN using a scenario with 2 workflow as depicted below.

Each workflow is described at a high-level as below.
Hub VNet workflow:
- An user uses a Point to Site (P2S) VPN client.
- VPN client connects to Azure VPN Gateway deployed in Hub VNet.
- Hub VNet is peered with a spoke VNet running a web server Virtual Machine (VM).
- Hub VNet is also peered with another spoke VNet running database server VM.
- Web server VM will need to fetch data from database server VM.
- User will invoke web application running on web server VM.
vWAN hub workflow:
- Azure Virtual WAN is deployed with a hub.
- An user uses a Point to Site (P2S) VPN client to connect with vWAN hub.
- A VNet running web server VM is connected with vWAN hub.
- Another VNet running database server VM is also connected with vWAN hub.
- Web server VM will need to fetch data from database server VM.
- User will invoke web application running on web server VM.
Hub VNet workflow
Create Hub VNet and configure it with VPN gateway
"apiVersion": "2018-04-01",
"type": "Microsoft.Network/virtualNetworks",
"name": "[parameters('hubVnetName')]",
"location": "[resourceGroup().location]",
"properties": {
"addressSpace": {
    "addressPrefixes": [
    "[parameters('hubVnetAddressPrefix')]"
    ]
}
"subnets": [
    {
        "name": "GatewaySubnet",
        "properties": {
            "addressPrefix": "[parameters('gatewaySubnetPrefix')]"
                }
    }
]# Create a self-signed root certificate
$rootcert = New-SelfSignedCertificate -Type Custom -KeySpec Signature `
-Subject "CN=makshP2SRootCert" -KeyExportPolicy Exportable `
-HashAlgorithm sha256 -KeyLength 2048 `
-CertStoreLocation "Cert:CurrentUserMy" -KeyUsageProperty Sign -KeyUsage CertSign
# Generate a client certificate
$clientCert = New-SelfSignedCertificate -Type Custom -DnsName makshP2SChildCert -KeySpec Signature `
-Subject "CN=makshP2SChildCert" -KeyExportPolicy Exportable `
-HashAlgorithm sha256 -KeyLength 2048 `
-CertStoreLocation "Cert:CurrentUserMy" `
-Signer $rootcert -TextExtension @("2.5.29.37={text}1.3.6.1.5.5.7.3.2")
# Export client certificate
$myclientpwd = ConvertTo-SecureString -String "<super-secret-password>" -Force -AsPlainText
Export-PfxCertificate -Password $myclientpwd -Cert (get-item -Path Cert:CurrentUserMy$($clientCert.Thumbprint)) -FilePath myp2svpnclientCert.pfx
# Get Base64 encoded raw certificate data to be used in ARM Template
$([Convert]::ToBase64String($rootcert.Export('Cert')))"clientRootCertData": {
"value": "<base64-encoded-raw-certificate-data-obtained-above>"
}{
"apiVersion": "2018-04-01",
"type": "Microsoft.Network/publicIPAddresses",
"name": "[parameters('gatewayPublicIPName')]",
"location": "[resourceGroup().location]",
"properties": {
"publicIPAllocationMethod": "Dynamic"
}
}{
"apiVersion": "2018-04-01",
"type": "Microsoft.Network/virtualNetworkGateways",
"name": "[parameters('gatewayName')]",
"location": "[resourceGroup().location]",
"dependsOn": [
...
]
}"ipConfigurations": [
{
"properties": {
"privateIPAllocationMethod": "Dynamic",
"subnet": {
"id": "[variables('gatewaySubnetRef')]"
},
"publicIPAddress": {
"id": "[resourceId('Microsoft.Network/publicIPAddresses',parameters('gatewayPublicIPName'))]"
}
},
"name": "vnetGatewayConfig"
}
]"vpnClientConfiguration": {
"vpnClientAddressPool": {
"addressPrefixes": [
"[parameters('vpnClientAddressPoolPrefix')]"
]
},
"vpnClientRootCertificates": [
{
"name": "[parameters('clientRootCertName')]",
"properties": {
"PublicCertData": "[parameters('clientRootCertData')]"
}
}
]
}Create Web Server VNet and VM
{
    "apiVersion": "2018-04-01",
    "type": "Microsoft.Network/virtualNetworks",
    "name": "[parameters('spoke1VnetName')]",
    "location": "[resourceGroup().location]",
    "dependsOn": [
       ...
    ],
    "properties": {
    "addressSpace": {
        "addressPrefixes": [
        "[parameters('spoke1VnetAddressPrefix')]"
        ]
    },
}"subnets": [
{
"name": "default",
"properties": {
"addressPrefix": "[parameters('spoke1SubnetAddressPrefix')]",
"networkSecurityGroup": {
"id": "[resourceId('Microsoft.Network/networkSecurityGroups', 'spoke-vnet1-subnet-nsg')]"
}
}
}
]{
"apiVersion": "2017-03-30",
"type": "Microsoft.Compute/virtualMachines",
"name": "[parameters('spoke1Vm1Name')]",
"location": "[resourceGroup().location]",
"dependsOn": [
...
],
"properties": {
"hardwareProfile": {
"vmSize": "Standard_A2_v2"
},
"osProfile": {
"computerName": "[parameters('spoke1Vm1Name')]",
"adminUsername": "spoke1vm1-uid",
"adminPassword": "<super-secret-password>"
},
"storageProfile": {
"imageReference": {
"publisher": "MicrosoftWindowsServer",
"offer": "WindowsServer",
"sku": "2012-R2-Datacenter",
"version": "latest"
},
"osDisk": {
"name": "[concat(parameters('spoke1Vm1Name'),'_OSDisk')]",
"caching": "ReadWrite",
"createOption": "FromImage"
}
},
"networkProfile": {
"networkInterfaces": [
{
"id": "[resourceId('Microsoft.Network/networkInterfaces', parameters('vm1-spoke1-nic'))]"
}
]
}
}
}Create Network Peering between Hub VNet and Web Server VNet
{
    "apiVersion": "2020-05-01",
    "type": "virtualNetworkPeerings",
    "name": "[variables('SpokevNet1toHubvNetPeeringName')]",
    "location": "[resourceGroup().location]",
    "dependsOn": [
        ...
    ],
    "comments": "Peering from Spoke vNet 1 to Hub vNet",
    "properties": {
        "allowVirtualNetworkAccess": true,
        "allowForwardedTraffic": false,
        "allowGatewayTransit": false,
        "useRemoteGateways": true,
        "remoteVirtualNetwork": {
            "id": "[resourceId('Microsoft.Network/virtualNetworks',parameters('hubVnetName'))]"
        }
    }
}{
"apiVersion": "2020-05-01",
"type": "virtualNetworkPeerings",
"name": "[variables('HubvNettoSpokevNet1PeeringName')]",
"location": "[resourceGroup().location]",
"dependsOn": [
...
],
"comments": "Peering from Hub vNet to Spoke vNet 1",
"properties": {
"allowVirtualNetworkAccess": true,
"allowForwardedTraffic": false,
"allowGatewayTransit": true,
"useRemoteGateways": false,
"remoteVirtualNetwork": {
"id": "[resourceId('Microsoft.Network/virtualNetworks',parameters('spoke1VnetName'))]"
}
}
}Create Database Server VNet and VM
Create Network Peering between Hub VNet and Database Server VNet
Validate connectivity between Web and Database Servers
az network vnet-gateway vpn-client generate -n hubvnetGateway `
    --processor-architecture Amd64 `
    -g $rgName


Connectivity in Hub and spoke network topology
vWAN hub workflow
Create vWAN and vWAN hub
{
    "type": "Microsoft.Network/virtualWans",
    "name": "[parameters('vwanName')]",
    "apiVersion": "2020-05-01",
    "location": "[resourceGroup().location]",
    "properties": {
        "allowVnetToVnetTraffic": true,
        "type": "Standard"
    }
}{
"type": "Microsoft.Network/virtualHubs",
"name": "[parameters('vWanHubName')]",
"apiVersion": "2020-04-01",
"location": "[resourceGroup().location]",
"dependsOn": [
"[resourceId('Microsoft.Network/virtualWans/', parameters('vwanName'))]",
...
]
}Create P2S VPN Gateway and associate it with vWAN hub
{
    "type": "Microsoft.Network/vpnServerConfigurations",
    "apiVersion": "2020-05-01",
    "name": "vwan-p2s-vpn-config",
    "location": "[resourceGroup().location]",
    "properties": {
        "vpnProtocols": [
            "IkeV2"
        ],
        "vpnAuthenticationTypes": [
            "Certificate"
        ],
        "vpnClientRootCertificates": [
            {
                "name": "[parameters('clientRootCertName')]",
                "publicCertData": "[parameters('clientRootCertData')]"
            }
        ],
        ...
    }
}{
"type": "Microsoft.Network/virtualHubs/hubRouteTables",
"apiVersion": "2020-05-01",
"name": "[concat(parameters('vWanHubName'), '/defaultRouteTable')]",
"dependsOn": [
"[resourceId('Microsoft.Network/virtualHubs', parameters('vWanHubName'))]"
]
...
}{
"type": "Microsoft.Network/p2sVpnGateways",
"apiVersion": "2020-05-01",
"name": "[parameters('vwanP2SVpnGatewayName')]",
"location": "uksouth",
"dependsOn": [
...
],
"properties": {
"virtualHub": {
"id": "[resourceId('Microsoft.Network/virtualHubs', parameters('vWanHubName'))]"
},
"vpnServerConfiguration": {
"id": "[resourceId('Microsoft.Network/vpnServerConfigurations', 'vwan-p2s-vpn-config')]"
},
...
"vpnClientAddressPool": {
"addressPrefixes": [
"10.10.8.0/24"
]
}
}
}{
"type": "Microsoft.Network/virtualHubs",
"name": "[parameters('vWanHubName')]",
"apiVersion": "2020-04-01",
"location": "[resourceGroup().location]",
"dependsOn": [
...
],
"properties": {
...
},
"p2SVpnGateway": {
"id": "[resourceId('Microsoft.Network/p2sVpnGateways', parameters('vwanP2SVpnGatewayName'))]"
},
...
}Create Web Server and Database Server VNets and VMs
Connect Web Server and Database Server VNets with vWAN hub
{
    "type": "Microsoft.Network/virtualHubs",
    "name": "[parameters('vWanHubName')]",
    "apiVersion": "2020-04-01",
    "location": "[resourceGroup().location]",
    "dependsOn": [
        ...
    ],
    "properties": {
       ...
        "virtualNetworkConnections": [
            {
                "name": "vhub-to-web-server-vnet",
                "properties": {
                    "remoteVirtualNetwork": {
                        "id": "[resourceId('Microsoft.Network/virtualNetworks', parameters('spoke3VnetName'))]"
                    },
                    "allowHubToRemoteVnetTransit": true,
                    "allowRemoteVnetToUseHubVnetGateways": true,
                    "enableInternetSecurity": true
                }
            },
            {
                "name": "vhub-to-database-server-vnet",
                "properties": {
                    "remoteVirtualNetwork": {
                        "id": "[resourceId('Microsoft.Network/virtualNetworks', parameters('spoke4VnetName'))]"
                    },
                    "allowHubToRemoteVnetTransit": true,
                    "allowRemoteVnetToUseHubVnetGateways": true,
                    "enableInternetSecurity": true
                }
            }
        ],
        "sku": "Standard"
    }
}{
"type": "Microsoft.Network/virtualHubs/hubRouteTables",
"apiVersion": "2020-05-01",
"name": "[concat(parameters('vWanHubName'), '/defaultRouteTable')]",
"dependsOn": [
"[resourceId('Microsoft.Network/virtualHubs', parameters('vWanHubName'))]"
],
"properties": {
"routes": [
{
"name": "spoke3route",
"destinationType": "CIDR",
"destinations": [
"192.168.251.0/24"
],
"nextHopType": "ResourceId",
"nextHop": "[resourceId('Microsoft.Network/virtualHubs/hubVirtualNetworkConnections', parameters('vWanHubName'), 'vhub-to-spoke3')]"
},
{
"name": "spoke4route",
"destinationType": "CIDR",
"destinations": [
"192.168.252.0/24"
],
"nextHopType": "ResourceId",
"nextHop": "[resourceId('Microsoft.Network/virtualHubs/hubVirtualNetworkConnections', parameters('vWanHubName'), 'vhub-to-spoke4')]"
}
],
"labels": [
"default"
]
}
}Validate connectivity between Web and Database Servers in vWAN


Connectivity in vWAN Hub topology
Summary
- Need for cross-VNet transitive connectivity in *default* configuration.
- Need for *any-to-any* connectivity between multiple on-premise sites/branches and Azure.
- Need for supporting large number of VPN clients/branches/sites connectivity with Azure.
- Need for higher aggregated throughput for connectivity with Azure.
Additional resources
- Choose between virtual network peering and VPN gateways in Azure
- Hub-spoke network topology in Azure
- Azure Virtual WAN
- Transitive Spoke connectivity
- Virtual WAN FAQ
- VPN Gateway FAQ
- Gateway SKUs by tunnel, connection, and throughput
Brought to you by Dr. Ware, Microsoft Office 365 Silver Partner, Charleston SC.

Recent Comments