This article is contributed. See the original author and article here.
Today, we got a service request that our customer using DataSync to transfer data from OnPremise to Azure SQL Database they got the following error message: Sync failed with the exception ‘An unexpected error occurred when applying batch file sync_aaaabbbbcccddddaaaaa-bbbb-dddd-cccc-8825f4397b31.batch.
See the inner exception for more details.Inner exception: Failed to execute the command ‘BulkUpdateCommand‘ for table ‘dbo.Table1’; the transaction was rolled back.
Ensure that the command syntax is correct.Inner exception: SqlException Error Code: -2146232060 – SqlError Number:2629, Message: String or binary data would be truncated in object ID ‘-nnnnn’. Truncated value: ”.
SqlError Number:8061, Message: The data for table-valued parameter ‘@changeTable’ doesn’t conform to the table type of the parameter. SQL Server error is: 2629, state: 1 SqlError Number:3621, Message: The statement has been terminated.
We reviewed the object ID exposed in the error and we found that a column that belongs to the table1 in OnPremise has been changed of data type from NCHAR(100) to NVARCHAR(255). Once the sync started again there is not possible to update the data in the subscribers of DataSync.
In this case, our recomendations was: 1. Remove the affected table from the sync group. 2. Trigger a sync. 3. Re-add the affected table to the sync group. 4. Trigger a sync. 5. The sync of Step 2 would remove the metadata for the affected table, and would re-add it correctly on Step 4.
This article is contributed. See the original author and article here.
In March, we introduced Microsoft 365 Copilot—your copilot for work. Today, we’re announcing that we’re bringing Microsoft 365 Copilot to more customers with an expanded preview and new capabilities.
This article is contributed. See the original author and article here.
This blog post has been co-authored by Microsoft and Dhiraj Sehgal, Reza Ramezanpur from Tigera.
Container orchestration pushes the boundaries of containerized applications by preparing the necessary foundation to run containers at scale. Today, customers can run Linux and Windows containerized applications in a container orchestration solution, such as Azure Kubernetes Service (AKS).
This blog post will examine how to set up a Windows-based Kubernetes environment to run Windows workloads and secure them using Calico Open Source. By the end of this post, you will see how simple it is to apply your current Kubernetes skills and knowledge to rule a hybrid environment.
Container orchestration at scale with AKS
After creating a container image, you will need a container orchestrator to deploy it at scale. Kubernetes is a modular container orchestration software that will manage the mundane parts of running such workloads, and AKS abstracts the infrastructure on which Kubernetes runs, so you can focus on deploying and running your workloads.
In this blog post, we will share all the commands required to set up a mixed Kubernetes cluster (Windows and Linux nodes) in AKS – you can open up your Azure Cloud Shell window from the Azure Portal and run the commands if you want to follow along.
If you don’t have an Azure account with a paid subscription, don’t worry—you can sign up for a free Azure account to complete the following steps.
Resource group
To run a Kubernetes cluster in Azure, you must create multiple resources that share the same lifespan and assign them to a resource group. A resource group is a way to group related resources in Azure for easier management and accessibility. Keep in mind that each resource group must have a unique name.
The following command creates a resource group named calico-win-container in the australiaeast location. Feel free to adjust the location to a different zone.
az group create --name calico-win-container --location australiaeast
Cluster deployment
Note: Azure free accounts cannot create any resources in busy locations. Feel free to adjust your location if you face this problem.
A Linux control plane is necessary to run the Kubernetes system workloads, and Windows nodes can only join a cluster as participating worker nodes.
az aks create --resource-group calico-win-container --name CalicoAKSCluster --node-count 1 --node-vm-size Standard_B2s --network-plugin azure --network-policy calico --generate-ssh-keys --windows-admin-username
Windows node pool
Now that we have a running control plane, it is time to add a Windows node pool to our AKS cluster.
Note: Use `windows` as the value for the ‘–os-type’ argument.
az aks nodepool add --resource-group calico-win-container --cluster-name CalicoAKSCluster --os-type Windows --name calico --node-vm-size Standard_B2s --node-count 1
Calico for Windows
Calico for Windows is officially integrated into the Azure platform. Every time you add a Windows node in AKS, it will come with a preinstalled version of Calico. To check this, use the following command to ensure EnableAKSWindowsCalico is in a Registered state:
az feature list -o table --query "[?contains(name, 'Microsoft.ContainerService/EnableAKSWindowsCalico')].{Name:name,State:properties.state}"
Expected output:
Name                                               State
-------------------------------------------------  ----------
Microsoft.ContainerService/EnableAKSWindowsCalico  Registered
If your query returns a Not Registered state or no items, use the following command to enable AKS Calico integration for your account:
az feature register --namespace "Microsoft.ContainerService" --name "EnableAKSWindowsCalico"
After EnableAKSWindowsCalico becomes registered, you can use the following command to add the Calico integration to your subscription:
az provider register --namespace Microsoft.ContainerService
Exporting the cluster key
Kubernetes implements an API Server that provides a REST interface to maintain and manage cluster resources. Usually, to authenticate with the API server, you must present a certificate, username, and password. The Azure command-line interface (Azure CLI) can export these cluster credentials for an AKS deployment.
Use the following command to export the credentials:
az aks get-credentials --resource-group calico-win-container --name CalicoAKSCluster
After exporting the credential file, we can use the kubectl binary to manage and maintain cluster resources. For example, we can check which operating system is running on our nodes by using the OS labels.
kubectl get nodes -L kubernetes.io/os
You should see a similar result to:
NAME                                STATUS   ROLES   AGE     VERSION   OS
aks-nodepool1-64517604-vmss000000   Ready    agent   6h8m    v1.22.6   linux
akscalico000000                     Ready    agent   5h57m   v1.22.6   windows
Windows workloads
If you recall, Kubernetes API Server is the interface that we can use to manage or maintain our workloads.
We can use the same syntax to create a deployment, pod, service, or Kubernetes resource for our new Windows nodes. For example, we can use the same OS selector that we previously used for our deployments to ensure Windows and Linux workloads are deployed to their respective nodes:
Since our workload is a web server created by Microsoft’s .NET technology, the deployment YAML file also packages a service load balancer to expose the HTTP port to the Internet.
Use the following command to verify that the load balancer successfully acquired an external IP address:
kubectl get svc win-container-service -n win-web-demo
You should see a similar result:
NAME                    TYPE           CLUSTER-IP     EXTERNAL-IP    PORT(S)        AGE
win-container-service   LoadBalancer   10.0.203.176   20.200.73.50   80:32442/TCP   141m
Use the “EXTERNAL-IP” value in a browser, and you should see a page with the following message:
Perfect! Our pod can communicate with the Internet.
Securing Windows workloads with Calico
The default security behavior for the Kubernetes NetworkPolicy resource permits all traffic. While this is a great way to set up a lab environment in a real-world scenario, it can severely impact your cluster’s security.
First, use the following manifest to enable the API server:
Use the following command to get the API Server deployment status:
kubectl get tigerastatus
You should see a similar result to:
NAME        AVAILABLE   PROGRESSING   DEGRADED   SINCE
apiserver   True        False         False      10h
calico      True        False         False      10h
Calico offers two security policy resources that can cover every corner of your cluster. We will implement a global policy since it can restrict Internet addresses without the daunting procedure of explicitly writing every IP/CIDR in a policy.
If you go back to your browser and click the Try again button, you will see that the container is isolated and cannot initiate communication to the Internet.
Note: The source code for the workload is available here.
Clean up If you have been following this blog post and did the lab section in Azure, please make sure that you delete the resources, as cloud providers will charge you based on usage.
Use the following command to delete the resource group:
Conclusion
While network policy is not relevant for lab scenarios, production workloads have a different level of security requirements to meet. Calico offers a simple and integrated way to apply network policies to Windows workloads on Azure Kubernetes Service. In this blog post, we covered the basics for implementing a network policy to a simple web server. You can check out more information on how Calico works with Windows on AKS in our documentation page.
This article is contributed. See the original author and article here.
We are pleased to announce the security review for Microsoft Edge, version 113!
We have reviewed the new settings in Microsoft Edge version 113 and determined that there are no additional security settings that require enforcement. The Microsoft Edge version 112 security baseline continues to be our recommended configuration which can be downloaded from the Microsoft Security Compliance Toolkit.
Microsoft Edge version 113 introduced 3 new computer settings and 3 new user settings. We have included a spreadsheet listing the new settings in the release to make it easier for you to find them.
As a friendly reminder, all available settings for Microsoft Edge are documented here, and all available settings for Microsoft Edge Update are documented here.
This article is contributed. See the original author and article here.
DAX is now your Friend
Learning and understanding DAX in Power BI can come with some challenges especially for Beginners. What if you can write DAX with just natural language, Isn’t that awesome?
Yes, DAX is now your friend.
Let’s analyze the magic happening in the image below.
1. Write what you want to achieve in natural language and the AI automatically generate the DAX function to achieve it
2. If you notice, I intentionally misspelt “Total” by writing “Toal” yet, it understood what I am trying to do.
Now imagine what you will learn going through this live session with us.
This session focuses on helping you to improve your DAX knowledge and skill.
We will do this by working on a full Power BI Report project and use the new AI capabilities in DAX to get this done.
About the Session
Are you ready to witness the latest and greatest capabilities of Power BI’s DAX language, now infused with Artificial Intelligence? In this session, we will take you through an exhilarating journey of building a complete Power BI report project, utilizing the powerful DAX language and its new AI capabilities.
Our expert presenters will showcase how to leverage the DAX suggestions feature to optimize your data model and make your report building process faster and more efficient. You will learn how to use DAX to create custom calculations and measure your data, while also harnessing the power of AI to enhance the accuracy and intelligence of your reports.
Throughout the session, you will get an inside look at how DAX suggestions can simplify and streamline your data analysis process, allowing you to focus on creating valuable insights and visualizations for your audience.
Whether you are a seasoned Power BI user or just starting out, this live session will provide you with valuable insights and practical tips to help you master the art of building end-to-end Power BI projects with DAX suggestions.
Join us for an exciting and informative Power BI live session that is sure to leave you inspired and equipped with the latest tools and techniques to take your data analysis and reporting to the next level.
This article is contributed. See the original author and article here.
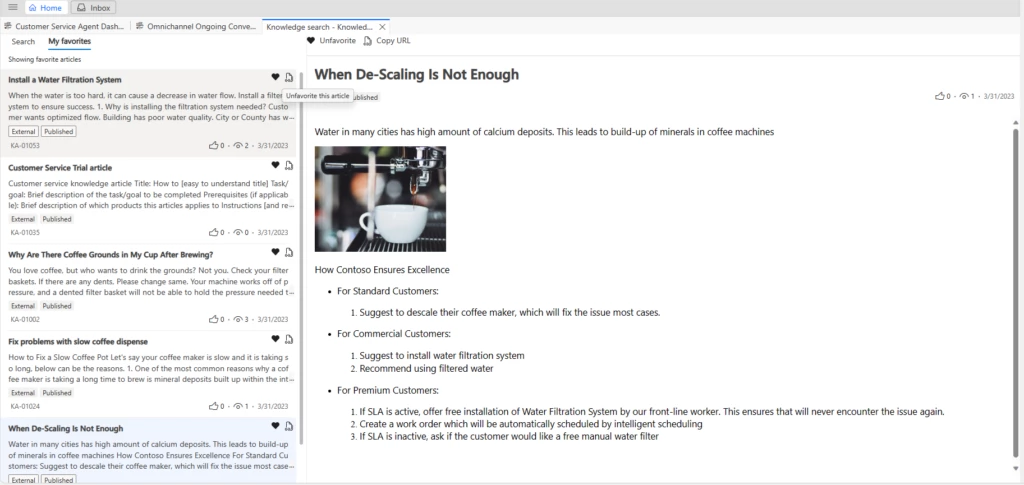
Are you tired of constantly searching for the same knowledge articles in Dynamics 365 Customer Service? Say goodbye to wasting precious time and hello to the new favorite feature!
We are excited to announce a new knowledge management feature in Dynamics 365 Customer Service that allows you to mark knowledge articles as favorites.
With this new feature, you can easily save up to 50 knowledge articles that you frequently use as favorites. This allows you to access them quickly while you’re working on a case, without having to search for them every time.
To use this feature, your administrator will need to enable it and provide privileges to specific roles. Once enabled, you can easily mark an article as a favorite by selecting the heart icon next to it in the search results.
Using your favorite knowledge articles
When administrators enable favorites, agents can
Select an article from the list of search results.
Click on the favorite (heart) icon to add the article to your favorites.
Remove an article from the favorites list by clearing the favorite (heart) icon.
All of your saved articles will appear in the My favorites tab. You can access this tab from various places within the app, including the app side pane, standalone search control, form-embedded control, and the reference pane.
The best part? The article you last marked as a favorite will appear first in your list of favorites. When you delete an article, it will no longer appear on your favorites list. Additionally, your favorite articles are saved in the language in which you viewed them when you marked them as a favorite. If you view a translated version of a favorite article, it won’t appear as a favorite. Also, when a favorite article has multiple versions, the new version appears as a favorite and replaces the earlier version.
If you’re using the Customer Service workspace or Omnichannel for Customer Service, selecting a favorite article will open it in an app tab.
We hope this feature makes it easier to access the knowledge articles you use most in Dynamics 365 Customer Service.


Recent Comments