This article is contributed. See the original author and article here.
The Breakthru app in Teams is available to more than 300 million potential monthly active users in 500,000 organizations. Finding the right audience is critical for independent software vendors (ISVs), and just three years after launching on Teams, Breakthru reaches more than 45,000 organizations worldwide, with a growing customer base.
This article is contributed. See the original author and article here.
This week I had a service request where our customer didn’t have a connection retry logic implemented in their application code in the event of a connection failure to Azure SQL. I would like to share an example about how to implement it.
First the C# code using ODBC API:
using System;
using System.Collections.Generic;
using System.Linq;
using System.Text;
using System.Threading.Tasks;
using System.Runtime.InteropServices;
using System.Diagnostics;

namespace DotNetExample
{
    class ClsODBCAPI
    {
        // Import the ODBC API functions using P/Invoke
        [DllImport("odbc32.dll")]
        private static extern short SQLAllocHandle(short handleType, IntPtr inputHandle, out IntPtr outputHandle);

        [DllImport("odbc32.dll")]
        private static extern short SQLSetEnvAttr(IntPtr environmentHandle, int attribute, IntPtr valuePtr, int stringLength);

        [DllImport("odbc32.dll")]
        private static extern short SQLConnect(IntPtr connectionHandle, string serverName, short nameLength1, string userName, short nameLength2, string password, short nameLength3);

        [DllImport("odbc32.dll")]
        private static extern short SQLExecDirect(IntPtr statementHandle, string query, int textLength);

        [DllImport("odbc32.dll")]
        private static extern short SQLFetch(IntPtr statementHandle);

        [DllImport("odbc32.dll")]
        private static extern short SQLGetData(IntPtr statementHandle, short columnIndex, short targetType, IntPtr targetValue, int bufferLength, out int indicatorValue);

        [DllImport("odbc32.dll")]
        private static extern short SQLDisconnect(IntPtr connectionHandle);

        [DllImport("odbc32.dll")]
        private static extern short SQLFreeHandle(short handleType, IntPtr handle);

        [DllImport("odbc32.dll")]
        private static extern short SQLGetDiagRec(
            short handleType,
            IntPtr handle,
            short recordNumber,
            IntPtr sqlState,
            out int nativeError,
            IntPtr messageText,
            short bufferLength,
            out short textLength
        );

        public void Main()
        {
            // Initialize ODBC environment handle
            IntPtr environmentHandle = IntPtr.Zero;
            SQLAllocHandle(1, IntPtr.Zero, out environmentHandle);
            SQLSetEnvAttr(environmentHandle, 200, (IntPtr)3, 0);

            // Initialize ODBC connection and statement handles
            IntPtr connectionHandle = IntPtr.Zero;
            IntPtr statementHandle = IntPtr.Zero;
            short retcode;
            retcode = SQLAllocHandle(2, environmentHandle, out connectionHandle);

            try
            {
                // Connect to the database
                retcode = RetryLogicUsingODBCAPI(connectionHandle);

                if( retcode != 1  )
                    {
                        return;
                    }

                retcode = SQLAllocHandle(3, connectionHandle, out statementHandle);
                // Prepare and execute a query
                SQLExecDirect(statementHandle, "SELECT top 200 TextToSearch FROM PerformanceVarcharNVarchar", 60);

                // Fetch and display the result set
                int id = 0;
                while (SQLFetch(statementHandle) == 0)
                {
                    // Retrieve data for each column
                    id = id + 1;
                    int nameLength = 200;
                    IntPtr namePtr = Marshal.AllocHGlobal(nameLength);
                    SQLGetData(statementHandle, 1, 1, namePtr, nameLength, out nameLength);
                    string name = Marshal.PtrToStringAnsi(namePtr);

                    Console.WriteLine("ID: " + id);
                    Console.WriteLine("Name: " + name);

                    Marshal.FreeHGlobal(namePtr);
                }
            }
            catch (Exception ex)
            {
                // Handle any errors that occur
                Console.WriteLine("Error: " + ex.Message);
            }
            finally
            {
                // Disconnect and free resources
                SQLDisconnect(connectionHandle);
                SQLFreeHandle(3, statementHandle);
                SQLFreeHandle(2, connectionHandle);
                SQLFreeHandle(1, environmentHandle);
            }

        }

        private short RetryLogicUsingODBCAPI(IntPtr connectionHandle)
        {
            int maxRetryAttempts = 5;
            int retryIntervalSeconds = 10;
            int retryCount = 0;
            short retcode = 0;

            TimeSpan ts;
            string elapsedTime;

            Stopwatch oConnTime = new Stopwatch();

            while (retryCount < maxRetryAttempts)
            {
                try
                {
                    retryCount++;
                    retcode = SQLConnect(connectionHandle, "DSNName", 7, "username", 8, "Password", 8);

                    if (retcode == 1)
                    {
                        ts = oConnTime.Elapsed;
                        elapsedTime = String.Format("{0:00}:{1:00}:{2:00}.{3:00}", ts.Hours, ts.Minutes, ts.Seconds, ts.Milliseconds / 10);
                        Console.WriteLine("Connected to the database. Time Spent:" + elapsedTime);
                        return retcode;
                    }
                    else
                    {
                        Console.WriteLine("SQLConnect failed with retcode: " + retcode);
                        GetODBCErrorDetails(connectionHandle);
                        Console.WriteLine("Retrying connection...in...{0} ms", (1000 * retryIntervalSeconds));
                        System.Threading.Thread.Sleep(1000 * retryIntervalSeconds);
                        retryIntervalSeconds = Convert.ToInt32(retryIntervalSeconds * 1.5);
                    }

                }
                catch (Exception ex)
                {
                    Console.WriteLine("Error: " + ex.Message);
                }
            }
            return -1;
        }

        static void GetODBCErrorDetails(IntPtr handle)
        {
            const int SQL_HANDLE_ENV = 1;
            const int SQL_HANDLE_DBC = 2;

            IntPtr sqlStatePtr = Marshal.AllocHGlobal(6);
            IntPtr messageTextPtr = Marshal.AllocHGlobal(1024);
            int nativeError;
            short textLength;

            short retcode = SQLGetDiagRec(
                SQL_HANDLE_DBC,
                handle,
                1,
                sqlStatePtr,
                out nativeError,
                messageTextPtr,
                1024,
                out textLength
            );

            if (retcode == 0)
            {
                string sqlState = Marshal.PtrToStringAnsi(sqlStatePtr);
                string messageText = Marshal.PtrToStringAnsi(messageTextPtr, textLength);
                Console.WriteLine("ODBC Error Details:");
                Console.WriteLine("SQLState: " + sqlState);
                Console.WriteLine("Native Error: " + nativeError);
                Console.WriteLine("Message: " + messageText);
            }
            else
            {
                Console.WriteLine("Failed to retrieve ODBC error details.");
            }

            Marshal.FreeHGlobal(sqlStatePtr);
            Marshal.FreeHGlobal(messageTextPtr);
        }
    }

}
This first of the code declares and imports the required functions from the odbc32.dll library using P/Invoke. These functions are used to interact with the ODBC API.
In the Main method, the ODBC environment handle is initialized using SQLAllocHandle function. The SQLSetEnvAttr function is used to set the environment attribute. Then, the ODBC connection and statement handles are initialized using SQLAllocHandle.
Inside the try block, the RetryLogicUsingODBCAPI method is called to establish a connection to the database. If the connection is successful (retcode = 1), a query is executed using SQLExecDirect. The result set is fetched using SQLFetch, and the data is displayed.
In case of any errors, the catch block handles and displays the exception message. The finally block is used to disconnect from the database and free the allocated resources.
The RetryLogicUsingODBCAPI method is responsible for implementing the connection retry logic. It attempts to connect to the database using SQLConnect within a while loop. If the connection is successful (retcode = 1), it returns the retcode. Otherwise, it displays the failure details, waits for a specified interval, and increases the interval for subsequent retries.
The GetODBCErrorDetails method retrieves ODBC error details using SQLGetDiagRec function. It takes the handle as input and retrieves the SQLState, native error code, and message text associated with the error.
This article is contributed. See the original author and article here.
Hi!
Ready to meet your new best friend? Say hello to GitHub Copilot, the AI pair programmer that’s about to change the way you code. It’s like having a super-smart friend who’s always ready to help. No matter the scenario, writing code, fixing bugs, or just trying to remember that one command you always forget.
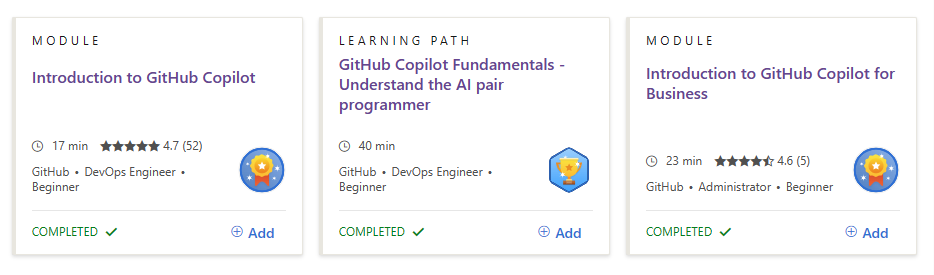
We’ve got a brand-new GitHub Copilot Fundamentals Learning Path all about GitHub Copilot. What’s a Learning Path, you may ask? Well, it’s a sequence of courses that guides you step-by-step to learn new skills and discover the power of Microsoft products. You can find all sorts of Learning Paths on Microsoft Learn.
Our new Learning Path is split into two parts: “Introduction to GitHub Copilot” and “Introduction to GitHub Copilot for Business“.
In the first part, you’ll get to know GitHub Copilot and all its cool features. It’s like having a ChatGPT friend right in your editor, helping you out with code, error messages, and even generating unit tests. Plus, it’s got your back when you’re working on pull requests or need help with documentation. And let’s not forget about the command line – GitHub Copilot CLI is like the ultimate cheat sheet!
The second part is all about GitHub Copilot for Business. (Spoiler: this is where things get serious). We’re going to review business scenarios like: AI-based security vulnerability filtering, VPN proxy support, and a super simple sign-up process. Imagine having a complete squad of Coding experts ready to help your business code faster and smarter.
This article is contributed. See the original author and article here.
‘Offline-first’ with the Dynamics 365 Field Service Mobile application offers many advantages for frontline workers. The offline-enabled application will allow frontline workers to perform functions while they are in the field, without depending on an internet connection. This keeps them productive even in environments without high quality network coverage, which can be a common problem in rural locations or even remote urban areas where network coverage is poor.
In this blog post we will share details on recent enhancements to the Dynamics 365 ‘Offline-first’ as well as some new capabilities to help your organization debug customizations with the offline application. Let’s go!
Wave 1 2023 enhancements
With the release of Wave 1 2023, frontline workers will have a faster sync experience and better visibility into the sync status of their offline-enabled Field Service Mobile application.
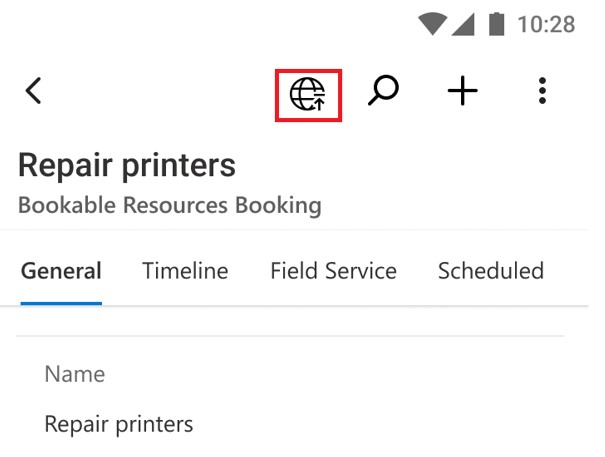
The offline sync icon is now moved from the sitemap to the header of the application providing an ever-present status of their offline app.
Based on states of the icon, the offline-enabled frontline worker can see if their application is connected to Dataverse, a sync is actively running, an up-sync in pending, or if the previous sync resulted in an error. This will allow the user to make informed decisions while in the field. For example, if an up-sync is pending after a period of being without network access, they will know to connect and allow that sync to complete so all their changes can be viewed by the back office.
The offline status page is also enhanced with more details on the sync, the size on disk and app connectivity status.
In addition to offline-related interface update, the sync experience is faster and more reliable. This includes optimizations to intelligently sync table or metadata changes, and improved parallelization to bring down data faster – including when the application is accessed in a way which forces a record sync such as launching the app via push notification.
Debugging the offline application
Debugging on a mobile application can be a difficult task, which is made more challenging when introducing unique aspects of ‘Offline’ mode. To help support customers who require customizations and enhancements while working offline we have introduced debugging capabilities for the model driving applications running on Android and Windows platforms, iOS platform compatibility is coming soon.
This article is contributed. See the original author and article here.
Since Azure Stack HCI 21H2, customers have used Network ATC to:
Reduce host networking deployment time, complexity, and errors
Deploy the latest Microsoft validated and supported best practices
Ensure configuration consistency across the cluster
Eliminate configuration drift
Network ATC has led to HUGE reductions in customer support cases which means increased uptime for your business applications and less headaches for you! But what if you already deployed your cluster? How do you take advantage now that you’re travelled through that trepidatious train of thought against taking on new technology?
With minimal alliteration, this article will show you how to migrate an existing cluster to Network ATC so you can take advantage of all the benefits mentioned above. Once completed, you could easily cookie-cut this configuration across all new deployments using our previous blog; so this would be a one-time migration, and all new clusters will gain the benefits!
Before you begin
Since this is a live cluster with running VMs, we’ll take some precautions to ensure we’re never working on a host with a running VM on it. If you don’t have running workloads on these nodes, you don’t need these instructions. Just add your intent command as if this was a brand-new cluster.
As some background, Network ATC stores information in the cluster database which is then replicated to other nodes in the cluster. The Network ATC service on the other nodes in the cluster see the change in the cluster database and implements the new intent. So we setup the cluster to receive a new intent, but we can also control the rollout of the new intent by stopping or disabling the Network ATC service on nodes that have virtual machines on them.
Procedure
Step 1: Install the Network ATC feature
First, let’s install Network ATC on EVERY node in the cluster using the following command. This does not require a reboot.
Install-WindowsFeature -Name NetworkATC
Step 2: Pause one node in the cluster
Pause one node in the cluster. This node will be migrated to Network ATC. We’ll repeat this step later for other nodes in the cluster too. As a result of this pause, all workloads will migrate to other nodes in the cluster leaving this machine available for changes. To do this, you can use the command:
Suspend-ClusterNode
Step 3: Stop the Network ATC service
For all nodes that are not paused, stop and disable the Network ATC service. As a reminder, this is to prevent Network ATC from implementing the intent while there are running virtual machines. To do this, you can use the commands:
Next, we’ll remove any previous configurations that might interfere with Network ATC’s ability to implement the intent. An example of this might be a Data Center Bridging (NetQos) policy for RDMA traffic. Network ATC will also deploy this, and if it sees a conflicting policy, Network ATC is wise enough not to interfere with it until you make it clear which policies you want to keep. While Network ATC will attempt to “adopt” the existing configuration if the names match (whether it be NetQos or other settings) it’s far simpler to just remove the existing configuration and let Network ATC redeploy.
Network ATC deploys a lot more than these items, but these are the items that need to be resolved before implementing the new intent.
VMSwitch
If you have more than one VMSwitch on this system, ensure you specify the switch attached to the adapters that will be used in this intent.
If you accidentally deployed an LBFO team, we’ll need to remove that as well. As you might have read, LBFO is not supported on Azure Stack HCI at all. Don’t worry, Network ATC will prevent these types of accidental oversights in the future as it will never deploy a solution that we do not support.
If the nodes were configured via VMM, these configuration objects may need to be removed from VMM as well.
Step 5: Add the Network ATC intent
It’s now time to add a Network ATC intent. You’ll only need to do this once since Network ATC intents are implemented cluster wide. However, we have taken some precautions to control the speed of the rollout. In step 2, we paused this node so there are no running workloads on it. In step 3, we stopped and disabled the Network ATC service on nodes where there are running workloads.
If you stopped and disabled the Network ATC service, you should start this service on this node only. To do this, run the following command:
Now, add your Network ATC intent(s). There are some example intents listed on our documentation here.
Step 6: Verify deployment on one node
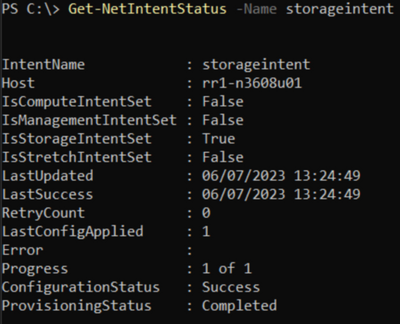
To verify that the node has successfully deployed the intent submitted in step 5, use the Get-NetIntentStatus command as shown below.
Get-NetIntentStatus -Name
The Get-NetIntentStatus command will show the deployment status of the requested intents. Eventually, there will be one object per intent returned from each node in the cluster. As a simple example, if you had a 3-node cluster with 2 intents, you would see 6 objects returned by this command, each with their own status.
Before moving on from this step, ensure that each intent you added has an entry for the host you’re working on, and the ConfigurationStatus shows Success. If the ConfigurationStatus shows “Failed” you should look to see if the Error message indicates why it failed. We have some quick resolutions listed in our documentation here.
Step 7: Rename the VMSwitch on other nodes
Now that one node is deployed with Network ATC, we’ll get ready to move on to the next node. To do this, we’ll migrate the VMs off the next node. This requires that the nodes have the same VMSwitch name as the node deployed with Network ATC. This is a non-disruptive change and can be done on all nodes at the same time.
Why don’t we change the Network ATC VMSwitch? Two reasons, the first is that Network ATC ensures that all nodes in the cluster have the same name to ensure live migrations and symmetry. The second is that you really shouldn’t need to worry about the VMSwitch name. This is simply a configuration artifact and just one more thing you’d need to ensure is perfectly deployed. Instead of that, Network ATC implements and controls the names of configuration objects.
Step 8: Resume the cluster node
This node is now ready to re-enter the cluster. Run this command to put it back into service:
Resume-ClusterNode
Step 9: Rinse and Repeat
Each node will need to go through the procedure outlined above. To complete the migration to Network ATC across the cluster, repeat steps 1 – 4, 6 and 8.
Summary
Migrating your existing clusters to Network ATC can be a game-changer for your cluster infrastructure and management. By automating and simplifying your network management, Network ATC can help you save time, increase efficiency, improve overall performance and avoid cluster downtime.
If you have any further questions or would like to learn more about Network ATC, please don’t hesitate to reach out to us!
This article is contributed. See the original author and article here.
Customer service agents in a digital contact center interact with multiple customers daily through live chat, phone calls, and social media channels. During customer interactions, often they find themselves searching for relevant information on various screens or other systems, resulting in increased wait time for the end customer. Also, they want to quickly capture or update the information about their conversation, in real time without having to create or link a case to a conversation. Recent enhancements to the Active Conversation form allow agents to access and edit relevant information without any screen switching.
Now, agents have all the relevant information at their fingertips, so that they spend less time looking for information on different screens or systems and help customers quickly. This leads to a reduction in average wait time and better customer satisfaction.
Customize the Active Conversation form
This feature allows administrators to add custom fields on the conversation form and embed canvas apps to display the information from external sources. To ensure agents can capture information quickly, it offers agents the flexibility to view pre-filled information and update it as needed while interacting with the customer. They can view the records related to the conversation on the sub-grids.
Access the enhanced Active Conversation form
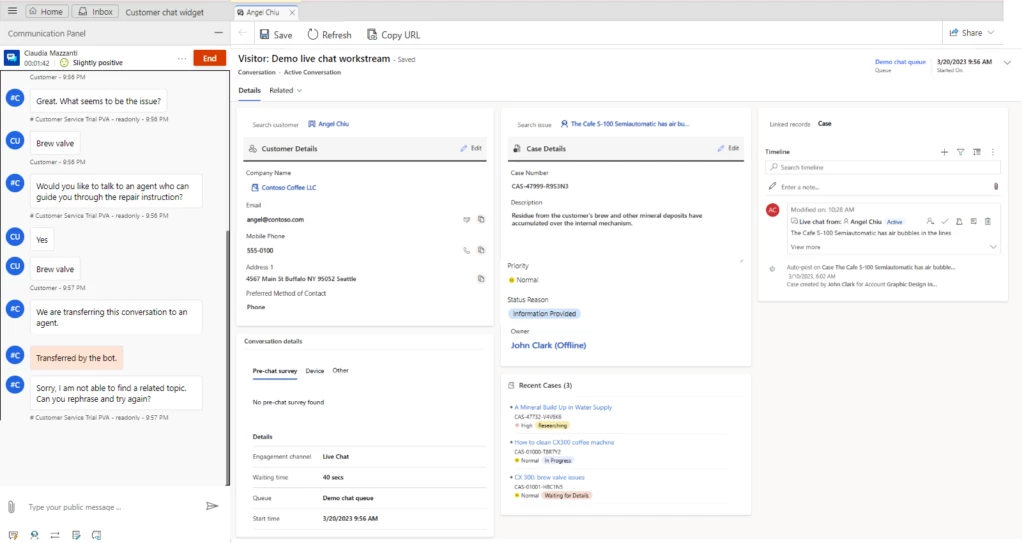
The Active Conversation form now displays the Customer 360 card. This allows agents to view information related to the customer. They can also make inline edits without having to navigate to contact or account form. Similarly, it shows case details with information related to the case linked to the conversation and allows agents to make inline edits as needed. Administrators can configure the fields they want to show on both these cards.
Additionally, the form includes the configurable recent cases card. This shows the color-coded priority and case status for easy discoverability by the agents. Moreover, switching from the active to the closed conversation form is restricted when the conversation is still active. The reverse is true as well.
Administrators can enable these enhancements in the Customer Service workspace application by navigating to the Customer Service Admin center > Workspaces > Active Conversation form settings.


Recent Comments