This article is contributed. See the original author and article here.
Since released from July last year, AlphaFold2 protein folding algorithm is often used by more researchers and companies to drive more innovations for molecular analysis, drug discovery & etc. To build an AlphaFold2 computing cluster rapidly on the cloud will be the necessary step to leverage agility of cloud computing without CAPEX ahead.
Azure HPC stack has complete portfolio suitable for running AlphaFold2 in large scale, including GPU, storage and orchestrator service. This blog brings detailed steps of building AlphaFold2 HPC cluster on Azure to fasten your process.
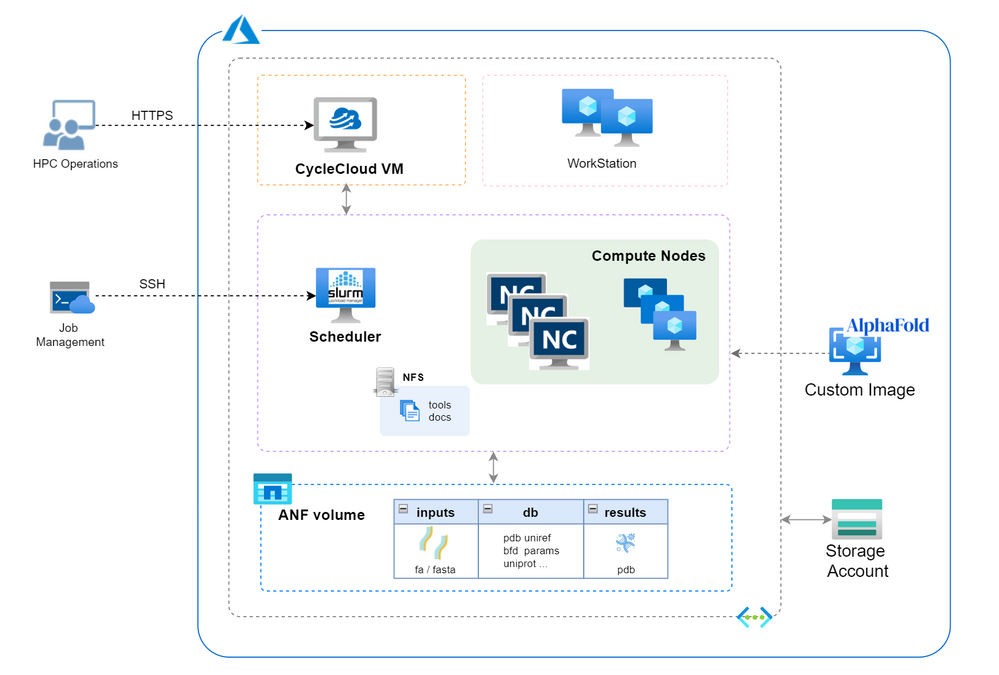
Architecture

Build Steps
- Prerequisites
- Check GPU quota and Azure NetApp Files(ANF) quota. SKU of NCsv3_T4 will be used in this building and NV_A10_v5 SKU (in preview) will also be suitable in the next.
- Create a storage account with unique name (eg. saAlphaFold2 ) for CycleCloud using.
- Prepare a SSH key pair in Azure portal.
- Determine your working region with consideration of ANF service availability (eg. Southeast Asia).
- Create a resource group in selected region (eg. rgAlphaFold).
- Set Azure Cloud Shell ready for use.
- Build CycleCloud environment following ARM template method. Set the VNet name as “vnetprotein“. Use the “saAlphaFold2” as the related storage account. After all the resources are built, you can find the CycleCloud UI portal address in console “Home->Virtual Machines->cyclecloud->Overview->DNS name”. Go through the first login process using your username and password.
- Config ANF storage. Follow the steps to set up an ANF volume. Consider the dataset size of AlphaFold2, suggest to set the capacity pool and volume size as 4TB at least. Set the volume name as “volprotein” and create a dedicate subnet with CIDR “10.0.2.0/24” in Visual Network “vnetprotein“. In “Protocol” settings, set file path also as “volprotein” and select “NFSv4.1”. After volume is ready, remember the “Mount path” info like “10.0.2.4:/volprotein“.
- Prepare the VM image.
- Boot a VM using the “CentOS-based 7.9 HPC – x64 Gen2” marketplace image and change the OS disk size as 128GB.
- Connect the VM by SSH and install AlphaFold2 components using below commands.
sudo yum install epel-release python3 -y sudo yum install aria2 -y sudo yum-config-manager --add-repo=https://download.docker.com/linux/centos/docker-ce.repo sudo yum repolist -v sudo yum install -y https://download.docker.com/linux/centos/7/x86_64/stable/Packages/containerd.io-1.4.3-3.1.el7.x86_64.rpm sudo yum install docker-ce -y sudo systemctl --now enable docker distribution=$(. /etc/os-release;echo $ID$VERSION_ID) && curl -s -L https://nvidia.github.io/libnvidia-container/$distribution/libnvidia-container.repo | sudo tee /etc/yum.repos.d/nvidia-container-toolkit.repo sudo yum clean expire-cache sudo yum install -y nvidia-docker2 sudo systemctl restart docker sudo usermod -aGdocker $USER newgrp docker docker run --rm --gpus all nvidia/cuda:11.0-base nvidia-smi sudo su cd /opt git clone https://github.com/deepmind/alphafold.git cd alphafold/ sudo docker build -f docker/Dockerfile -t alphafold . sudo pip3 install -r docker/requirements.txtCheck the “docker images” to confirm the “alphafold:latest” is ready in the list.
- Build the custom image. Keep in the same SSH window and execute as below and go ahead with a ‘y’ confirmation.
sudo waagent -deprovision+userBack to Cloud Shell. Execute these commands to produce the custom image.
export myVM=vmImgAlpha export myImage=imgAlphaFold2 export myResourceGroup=Rampup-study az vm deallocate --resource-group $myResourceGroup --name $myVM az vm generalize --resource-group $myResourceGroup --name $myVM az image create --resource-group $myResourceGroup --name $myImage --source $myVM --hyper-v-generation V2After accomplished, find the image’s “Resource ID” in console “Home->Images->Properties” page and remember it for further usage, which the form is as “/subscriptions/xxxx-xxxx-x…/resourceGroups/…/providers/Microsoft.Compute/images/imgAlphaFold2“.
- Create HPC cluster for Alphafold2.
- Create a new cluster in CycleCloud and select “Slurm” as the scheduler type. Set parameter as below with other as is. Save the configuration then.
- “Require setting” page – HPC VM Type: Standard_NC8as_T4_v3, Max HPC Cores: 24, Subnet ID: vnetprotein-compute.
- “Network Attached Storage” page – Add NFS Mount: clicked, NFS IP: 10.0.2.4, NFS Mount point: /volprotein, NFS Export Path: /volprotein.
- “Advanced Settings” page – Scheduler & HPC OS both with “Custom image” option clicked and stuff with custom image resource ID string in step 4.
- Start the cluster and wait several minutes to wait cluster in ready.
- Login scheduler. Below steps aim to prepare dataset. Total size of the Alphafold2 dataset is ~2.2TB. Suggest to execute each download sentence in download_all_data.sh if you want to save some time, such as download_pdb70.sh, download_uniref90.sh & etc.. Dataset preparation may need several hours as expected.
mkdir /volprotein/AlphaFold2 mkdir /volprotein/AlphaFold2/input mkdir /volprotein/AlphaFold2/result sudo chmod +w /volprotein/AlphaFold2 /opt/alphafold/scripts/download_all_data.sh /volprotein/AlphaFold2/
- Create a new cluster in CycleCloud and select “Slurm” as the scheduler type. Set parameter as below with other as is. Save the configuration then.
- Run samples
- A sample Slurm job script is as below. Save it as run.sh.
#!/bin/bash #SBATCH -o job%j.out #SBATCH --job-name=AlphaFold #SBATCH --nodes=1 #SBATCH --cpus-per-task=4 #SBATCH --gres=gpu:1 INPUT_FILE=$1 WORKDIR=/opt/alphafold INPUTDIR=/volprotein/AlphaFold2/input OUTPUTDIR=/volprotein/AlphaFold2/result DATABASEDIR=/volprotein/AlphaFold2/ sudo python3 $WORKDIR/docker/run_docker.py --fasta_paths=$INPUTDIR/$INPUT_FILE --output_dir=$OUTPUTDIR --max_template_date=2020-05-14 --data_dir=$DATABASEDIR --db_preset=reduced_dbs - Now we can submit the AlphaFold2 computing jobs! Submit this job with a test sample (*.fa or *.fasta) in /volprotein/AlphaFold2/input. At the first running, cluster need several minutes waiting compute nodes get ready. Parallel jobs can be submitted and will be running on different compute node according Slurm’s allocation. Then we can use “squeue” to check the Slurm queue status. Meanwhile, there are resource monitoring graphic in CycleCloud UI to grasp the performance status of this AlphaFold2 cluster. After certain job is done, check the info in .out file and the pdb result file in /volprotein/AlphaFold2/result.
sbatch run.sh input.fa sbatch run.sh P05067.fasta - Tear down. When no need to use this cluster, directly delete the resource group “rgAlphaFold” will tear down the related resources in it.
- A sample Slurm job script is as below. Save it as run.sh.


Reference links
deepmind/alphafold: Open source code for AlphaFold. (github.com)
Azure CycleCloud Documentation – Azure CycleCloud | Microsoft Docs
Azure NetApp Files documentation | Microsoft Docs
Brought to you by Dr. Ware, Microsoft Office 365 Silver Partner, Charleston SC.

Recent Comments