This article is contributed. See the original author and article here.
Introduction
Are you moving from OnPremises to Azure SQL? Using Managed Identity may help with your legacy applications authentication.
In a previous post, we saw how to use SSO with your current domain by leveraging AD Connect synchronization of your Active Directory with AAD.
But if your AD is not yet synchronized and your application connects with a domain service account? Use SQL authentication? Use AAD authentication with password?
Following the great post from Sergio Fonseca, Using Managed Service Identity (MSI) to authenticate on Azure SQL DB, explaining in details how Managed Service Identity works with Azure SQL, here’s how to set a sandbox and try them in 15 minutes.
Subscriptions
In this example, we’ll use a MSDN subscription, providing an Azure Active Directory Free license.
If using a different subscription, ensure that you’ll have sufficient administration rights at the Azure Active Directory level.
If you don’t have a subscription, you can create a free account here
Provisioning Resources
We’ll start by creating the resources required for this sandbox. The following AzCli commands can be executed in your Azure Shell or with Windows Terminal
- Create a Windows Server virtual machine Client1. (link)
LOCATION=westeurope
RESOURCEGROUP=ManagedIdentityRG
ADMINNAME=AzureUser
ADMINPWD=<StrongPasswordRequired>

# Resource Group Creation
az group create --name $RESOURCEGROUP --location $LOCATION

# Client1 VM Creation
az vm create --resource-group $RESOURCEGROUP --name Client1 --image win2016datacenter --size Standard_B4ms --admin-username $ADMINNAME --admin-password $ADMINPWD --no-wait
- Create a Windows Server virtual machine Client2
# Client2 VM Creation
az vm create --resource-group $RESOURCEGROUP --name Client2 --image win2016datacenter --size Standard_B4ms --admin-username $ADMINNAME --admin-password $ADMINPWD --no-wait
- Create an Azure SQL Database
SERVER="server-$RANDOM"
DATABASE="AdventureWorksLT"
ALLOWAZURESERVICE=0.0.0.0

# Azure SQL DB logical server Creation
az sql server create --name $SERVER --resource-group $RESOURCEGROUP --location $LOCATION --admin-user $ADMINNAME --admin-password $ADMINPWD

# Allow Azure Service to access Azure SQL
az sql server firewall-rule create --resource-group $RESOURCEGROUP --server $SERVER -n AllowAZServices --start-ip-address $ALLOWAZURESERVICE --end-ip-address $ALLOWAZURESERVICE

# Azure SQL DB Creation
az sql db create --resource-group $RESOURCEGROUP --server $SERVER --name $DATABASE --sample-name $DATABASE --service-objective Basic

echo "Server Name : $SERVER"
- If you want to add your public IP
MYIP=X.X.X.X

az sql server firewall-rule create --resource-group $RESOURCEGROUP --server $SERVER -n MyIP --start-ip-address $MYIP --end-ip-address $MYIP
- Add an Azure Active Directory admin to the Azure SQL
AADADMIN="XXXXXX@XXXXXXXX.onmicrosoft.com"
AADADMINOBJECTID=$(az ad user show --id $AADADMIN --query objectId -o tsv)

# Set AAD admin for Azure SQL
az sql server ad-admin create --display-name $AADADMIN --object-id $AADADMINOBJECTID --resource-group $RESOURCEGROUP --server $SERVER
- And finally configure Client1 and Client2
Managed Identities can be used starting with the ODBC driver 17.6, JDBC driver 7.2, OLEDB 18.3
https://docs.microsoft.com/en-us/sql/connect/odbc/windows/release-notes-odbc-sql-server-windows?view=sql-server-ver15
https://docs.microsoft.com/en-us/sql/connect/jdbc/release-notes-for-the-jdbc-driver?view=sql-server-ver15
https://docs.microsoft.com/en-us/sql/connect/oledb/release-notes-for-oledb-driver-for-sql-server?view=sql-server-ver15
Installing Visual C++ 2017 Redistributable for Visual Studio 2017 is also required.
https://support.microsoft.com/en-us/help/2977003/the-latest-supported-visual-c-downloads
# Install VSC++ Redist, ODBC 17.6 Driver on Client1
az vm run-command invoke --command-id RunPowerShellScript --name Client1 --resource-group $RESOURCEGROUP --scripts "New-Item -Path C:Install -ItemType Directory"
"cd /Install"
"Invoke-WebRequest -Uri 'https://aka.ms/vs/16/release/vc_redist.x64.exe' -OutFile 'vc_redist.x64.exe'"
".vc_redist.x64.exe /install /quiet /norestart | Out-Null"
"Invoke-WebRequest -Uri 'https://go.microsoft.com/fwlink/?linkid=2137027' -OutFile 'msodbcsql.msi'"
".msodbcsql.msi /quiet /norestart IACCEPTMSODBCSQLLICENSETERMS=YES"


# Install VSC++ Redist, ODBC 17.6 Driver on Client2
az vm run-command invoke --command-id RunPowerShellScript --name Client2 --resource-group $RESOURCEGROUP --scripts "New-Item -Path C:Install -ItemType Directory"
"cd /Install"
"Invoke-WebRequest -Uri 'https://aka.ms/vs/16/release/vc_redist.x64.exe' -OutFile 'vc_redist.x64.exe'"
".vc_redist.x64.exe /install /quiet /norestart | Out-Null"
"Invoke-WebRequest -Uri 'https://go.microsoft.com/fwlink/?linkid=2137027' -OutFile 'msodbcsql.msi'"
".msodbcsql.msi /quiet /norestart IACCEPTMSODBCSQLLICENSETERMS=YES"
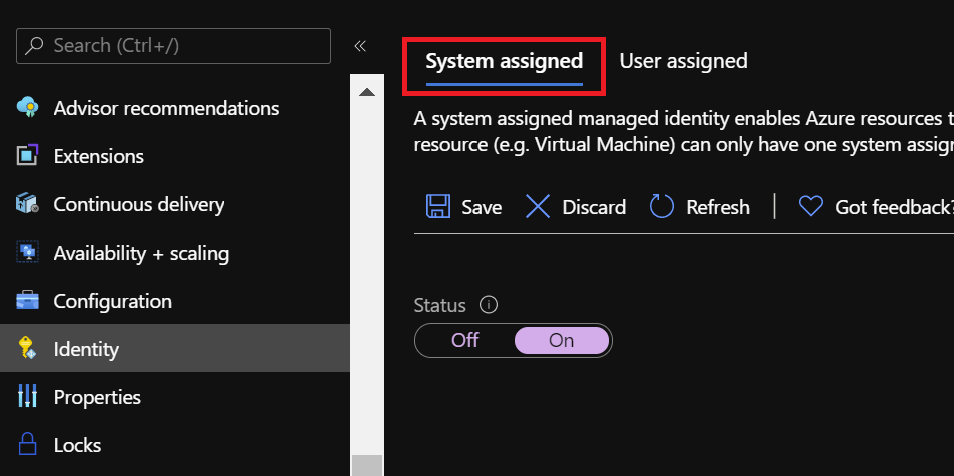
Activating System Assigned Managed Identity
To activate System Assigned Managed identity, navigate to your Client1 VM and click on the Identity in the left pane. On the System Assigned, Set the Status to ON and Save.

az vm identity assign --resource-group $RESOURCEGROUP --name Client1
You’ll now see the identity assigned to the Client1 VM.

In your AAD, a new identity has been created

This identity is correlated with your VM lifecycle. If you delete the VM, this identity will be deleted too.
At this point, your VM Client1 has now its own identity and we need to give access to the Azure SQL DB. To do so :
- Connect to your Azure SQL DB with your AAD admin account to create a user for your VM Client1.
sqlcmd -S "$SERVER.database.windows.net" -G -U $AADADMIN -d master -Q "CREATE USER Client1 FROM EXTERNAL PROVIDER"

sqlcmd -S  "$SERVER.database.windows.net" -G -U $AADADMIN -d $DATABASE -Q "CREATE USER Client1 FROM EXTERNAL PROVIDER; ALTER ROLE db_datareader ADD MEMBER Client1"
- From Client1 VM, you can test using Powershell
$AzServerName = “”

$AzSqlCn = New-Object System.Data.Odbc.OdbcConnection
$AzSqlCn.ConnectionString = "DRIVER={ODBC Driver 17 for SQL Server};Server=$AzServerName;Database=AdventureWorksLT;Authentication=ActiveDirectoryMsi;"
$AzSqlCn.Open()
$Query = "SELECT @@SERVERNAME AS AzureSQLSrv, DB_NAME() AS AzureSQLDB, HOST_NAME() AS RemoteClient, SYSTEM_USER AS CurrentIdentity”
$OdbcCmd = New-object System.Data.Odbc.OdbcCommand($Query,$AzSqlCn)
$Ds = New-Object System.Data.DataSet
$Da = New-Object System.Data.Odbc.OdbcDataAdapter
$Da.SelectCommand = $OdbcCmd
$Da.Fill($Ds)
$AzSqlCn.Close()
$Ds.Tables[0]
- If you prefer to continue using Azure Shell
# Create Powershell script
cat <<'EOF'> script.ps1
param(
    [Parameter(Mandatory=$true)][string]$AzServerName
    )

$AzSqlCn = New-Object System.Data.Odbc.OdbcConnection
$AzSqlCn.ConnectionString = "DRIVER={ODBC Driver 17 for SQL Server};Server=$AzServerName;Database=AdventureWorksLT;Authentication=ActiveDirectoryMsi;"
$AzSqlCn.Open()
$Query = "SELECT @@SERVERNAME AS AzureSQLSrv, DB_NAME() AS AzureSQLDB, HOST_NAME() AS RemoteClient, SYSTEM_USER AS CurrentIdentity"
$OdbcCmd = New-object System.Data.Odbc.OdbcCommand($Query,$AzSqlCn)
$Ds = New-Object System.Data.DataSet
$Da = New-Object System.Data.Odbc.OdbcDataAdapter
$Da.SelectCommand = $OdbcCmd
$Da.Fill($Ds)
$AzSqlCn.Close()
$Ds.Tables[0]
EOF

# Remotely execute Powershell script on Client1
az vm run-command invoke --command-id RunPowerShellScript --name Client1 --resource-group $RESOURCEGROUP --scripts @script.ps1 --parameters "AzServerName=$SERVER.database.windows.net" --query 'value[0].message' -o tsv
*Using Run Command increases the execution time, but using it is more convenient here than RDP.
Note, that you don’t have to specify Login/Password in the connection string. The authentication option is ActiveDirectoryMsi
The driver will acquire accessToken for establishing a secure connection to the Azure SQL DB
If your application required a user datasource, or if you are not familiar with Powershell, you can try to connect via the ODBC driver UI.
- Test using the ODBC driver UI. (Create a User Data Source via odbcad32.exe)


Login ID must be empty.

- Now, Remove the user on Azure SQL DB, on master and AdventureWorksLT.
sqlcmd -S "$SERVER.database.windows.net" -G -U $AADADMIN -d master -Q "DROP USER Client1"

sqlcmd -S "$SERVER.database.windows.net" -G -U $AADADMIN -d $DATABASE -Q "DROP USER Client1"
Activating User Assigned Managed Identity
Another possibility is to create a User Assigned Managed Identity. This lifecycle of this kind of identity is not correlated with your resources.
- Select Managed Identity in the search bar

- Add one named Client-UAMI

az identity create --name Client-UAMI --resource-group $RESOURCEGROUP --location $LOCATION
- Click Review and Create
Once done, you’ll see the newly created identity in your AAD. Client1 is still present as we don’t have remove the System Assigned Identity yet

We’ll now update the Client1 identity.
- Go to the Client1 on your Azure portal and Click on the Identity on the left pane.
- On System Assigned, set Status to Off. Then Save. The System Assigned managed Identity will be removed and deleted in your AAD.

az vm identity remove --resource-group $RESOURCEGROUP -n Client1
- Then on User Assigned block, you’ll be able to select Client-UAMI. Select it and Click Add

az vm identity assign --resource-group $RESOURCEGROUP --name Client1 --identities Client-UAMI
- Connect to your Azure SQL DB with your AAD admin account to create a user for your VM Client1.
sqlcmd -S "$SERVER.database.windows.net" -G -U $AADADMIN -d master -Q "CREATE USER [Client-UAMI] FROM EXTERNAL PROVIDER"

sqlcmd -S  "$SERVER.database.windows.net" -G -U $AADADMIN -d $DATABASE -Q "CREATE USER [Client-UAMI] FROM EXTERNAL PROVIDER; ALTER ROLE db_datareader ADD MEMBER [Client-UAMI]"
But as this identity is User Managed, you can use it on another client as well.
So, you can assign it to Client2
az vm identity assign --resource-group $RESOURCEGROUP --name Client2 --identities Client-UAMI
and you can now try to connect to your database from Client1 and Client2
# Remotely execute Powershell script on Client1
az vm run-command invoke --command-id RunPowerShellScript --name Client1 --resource-group $RESOURCEGROUP --scripts @script.ps1 --parameters "AzServerName=$SERVER.database.windows.net" --query 'value[0].message' -o tsv

# Remotely execute Powershell script on Client2
az vm run-command invoke --command-id RunPowerShellScript --name Client2 --resource-group $RESOURCEGROUP --scripts @script.ps1 --parameters "AzServerName=$SERVER.database.windows.net" --query 'value[0].message' -o tsv
Hope this helps.
Ryad B
Customer Engineer – Data & AI
Brought to you by Dr. Ware, Microsoft Office 365 Silver Partner, Charleston SC.

Recent Comments