This article is contributed. See the original author and article here.
Getting started with Azure Speech and Batch Ingestion Client
Batch Ingestion Client is as a zero-touch transcription solution for all your audio files in your Azure Storage. If you are looking for a quick and effortless way to transcribe your audio files or even explore transcription, without writing any code, then this solution is for you. Through an ARM template deployment, all the resources necessary to seamlessly process your audio files are set-up and set in motion.
Why do I need this?
Getting started with any API requires some amount of time investment in learning the API, understanding its scope, and getting value through trial and error. In order to speed up your transcription solution, for those of you that do not have the time to invest in getting to know our API or related best practices, we created an ingestion layer (a client for batch transcription) that will help you set-up a full blown, scalable and secure transcription pipeline without writing any code.
This is a smart client in the sense that it implements best practices and optimized against the capabilities of the Azure Speech infrastructure. It utilizes Azure resources such as Service Bus and Azure Functions to orchestrate transcription requests to Azure Speech Services from audio files landing in your dedicated storage containers.
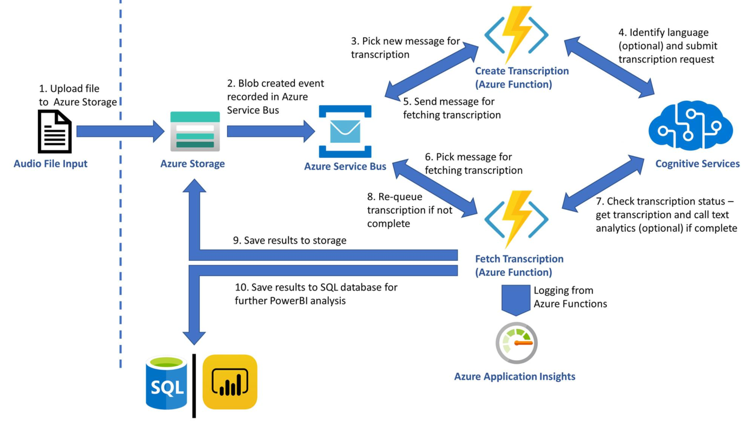
Before we delve deeper into the set-up instructions, let us have a look at the architecture of the solution this ARM template builds.
The diagram is simple and hopefully self-explanatory. As soon as files land in a storage container, the Grid Event that indicates the complete upload of a file is filtered and pushed to a Service bus topic. Azure Functions (time triggered by default) pick up those events and act, namely creating Tx requests using the Azure Speech Services batch pipeline. When the Tx request is successfully carried out an event is placed in another queue in the same service bus resource. A different Azure Function triggered by the completion event starts monitoring transcription completion status and copies the actual transcripts in the containers from which the audio file was obtained. This is it. The rest of the features are applied on demand. Users can choose to apply analytics on the transcript, produce reports or redact, all of which are the result of additional resources being deployed through the ARM template. The solution will start transcribing audio files without the need to write any code. If -however- you want to customize further this is possible too. The code is available in this repo.
The list of best practices we implemented as part of the solution are:
- Optimized the number of audio files included in each transcription with the view of achieving the shortest possible SAS TTL.
- Round Robin around selected regions in order to distribute load across available regions (per customer request)
- Retry logic optimization to handle smooth scaling up and transient HTTP 429 errors
- Running Azure Functions economically, ensuring minimal execution cost
Setup Guide
The following guide will help you create a set of resources on Azure that will manage the transcription of audio files.
Prerequisites
An Azure Account as well as an Azure Speech key is needed to run the Batch Ingestion Client.
Here are the detailed steps to create a speech resource:
NOTE: You need to create a Speech Resource with a paid (S0) key. The free key account will not work. Optionally for analytics you can create a Text Analytics resource too.
- Go to Azure portal
- Click on +Create Resource
- Type Speech and
- Click Create on the Speech resource.
- You will find the subscription key under Keys
- You will also need the region, so make a note of that too.
To test your account, we suggest you use Microsoft Azure Storage Explorer.
The Project
Although you do not need to download or do any changes to the code you can still download it from GitHub:
git clone https://github.com/Azure-Samples/cognitive-services-speech-sdkcd cognitive-services-speech-sdk/samples/batch/transcription-enabled-storage
Make sure that you have downloaded the ARM Template from the repository.
Batch Ingestion Client Setup Instructions
- Click on +Create Resource on Azure portal as shown in the following picture and type ‘ template deployment ’ on the search box.

2. Click on Create Button on the screen that appears as shown below.
3. You will be creating the relevant Azure resources from the ARM template provided. Click on click on the ‘Build your own template in the editor’ link and wait for the new screen to load.
You will be loading the template via the Load file option. Alternatively, you could simply copy/paste the template in the editor.
Saving the template will result in the screen below. You will need to fill in the form provided. It is important that all the information is correct. Let us look at the form and go through each field.

NOTE: Please use short descriptive names in the form for your resource group. Long resource group names may result in deployment error
- First pick the Azure Subscription Id within which you will create the resources.
- Either pick or create a resource group. [It would be better to have all the resources within the same resource group so we suggest you create a new resource group].
- Pick a region [May be the same region as your Azure Speech key].
The following settings all relate to the resources and their attributes
- Give your transcription enabled storage account a name [you will be using a new storage account rather than an existing one]. If you opt to use existing one then all existing audio files in that account will be transcribed too.
The following 2 steps are optional. Omitting them will result in using the base model to obtain transcripts. If you have created a Custom Speech model using Speech Studio, then:
- Enter optionally your primary Acoustic model ID
- Enter optionally your primary Language model ID
If you want us to perform Language identification on the audio prior to transcription you can also specify a secondary locale. Our service will check if the language on the audio content is the primary or secondary locale and select the right model for transcription.
Transcripts are obtained by polling the service. We acknowledge that there is a cost related to that. So, the following setting gives you the option to limit that cost by telling your Azure Function how often you want it to fire.
- Enter the polling frequency [There are many scenarios where this would be required to be done couple of times a day]
- Enter locale of the audio [you need to tell us what language model we need to use to transcribe your audio.]
- Enter your Azure Speech subscription key and Locale information
The rest of the settings related to the transcription request. You can read more about those in our docs.
- Select a profanity option
- Select a punctuation option
- Select to Add Diarization [all locales]
- Select to Add Word level Timestamps [all locales]
Do you need more than transcription? Do you need to apply Sentiment to your transcript? Downstream analytics are possible too, with Text Analytics Sentiment and Redaction being offered as part of this solution too.
If you want to perform Text Analytics please add those credentials.
- Add Text analytics key
- Add Text analytics region
- Add Sentiment
- Add data redaction
If you want to further analytics we could map the transcript json we produce to a DB schema.
- Enter SQL DB credential login
- Enter SQL DB credential password
You can feed that data to your custom PowerBI script or take the scripts included in this repository. Follow this guide for setting it up.
Press Create to trigger the resource creating process. It typically takes 1-2 mins. The set of resources are listed below.
If a Consumption Plan (Y1) was selected for the Azure Functions, make sure that the functions are synced with the other resources (see this for further details).
To do so, click on your StartTranscription function in the portal and wait until your function shows up:
Do the same for the FetchTranscription function
Running the Batch Ingestion Client
Upload audio files to the newly created audio-input container (results are added to json-result-output and test-results-output containers). Once they are done you can test your account.
Use Microsoft Azure Storage Explorer to test uploading files to your new account. The process of transcription is asynchronous. Transcription usually takes half the time of the audio track to be obtained. The structure of your newly created storage account will look like the picture below.

There are several containers to distinguish between the various outputs. We suggest (for the sake of keeping things tidy) to follow the pattern and use the audio-input container as the only container for uploading your audio.
Customizing the Batch Ingestion Client
By default, the ARM template uses the newest version of the Batch Ingestion Client which can be found in this repository. If you want to customize this further clone the repo
To publish a new version, you can use Visual Studio, right click on the respective project, click publish and follow the instructions.
What to build next
Now that you’ve successfully implemented a speech to text scenario, you can build on this scenario. Take a look at the insights Text Analytics provides from the transcript like caller and agent sentiment, key phrase extraction and entity recognition. If you’re looking specifically to solve for Call centre transcription, review this docs page for further guidance
Brought to you by Dr. Ware, Microsoft Office 365 Silver Partner, Charleston SC.

Recent Comments