This article is contributed. See the original author and article here.
Voice activation enables your end-users to interact with your product completely hands-free. With products that are ambient in nature, like smart speakers, users can say a specific keyword to have the product respond with just their voice. This type of end-to-end voice-based experience can be achieved with keyword recognition technology, which is designed with multiple stages that span across the edge and cloud:

Custom Keyword allows you to create on-device keyword recognition models that are unique and personalized to your brand. The models will process incoming audio for your customized keyword and let your product respond to the end-user when the keyword is detected. When integrating your models with the Speech SDK, and Direct Line Speech or Custom Commands, you automatically get the benefits of the Keyword Verification service. Keyword Verification reduces the impact of false accepts from on-device models with robust models running on Azure.
When creating on-device models with Custom Keyword, there is no need for you to provide any training data. Our latest neural TTS can generate audio in life-like quality and in diverse speakers with multi-speaker base models. Neural TTS is available in 60 locales and languages. Custom Keyword makes use of this technology to generate training data specific to your keyword and specified pronunciations, eliminating the need for you to collect and provide training data.
The most common use case of keyword recognition is with voice assistants. For example, “Hey Cortana” is the keyword for the Cortana assistant. Frictionless user experiences for voice assistants often require the use of microphones that are always listening and keyword recognition acts as a privacy boundary for the end-user. Sensitive and personal audio data can be processed completely on-device until the keyword is believed to be heard. Once this occurs, the gate to stream audio to the cloud for further processing can be opened. Cloud processing often includes both Speech-to-Text and Keyword Verification.
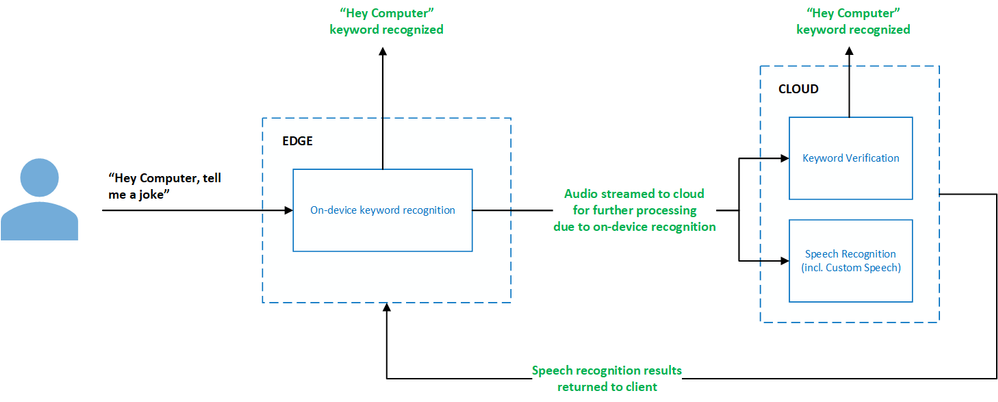
The Speech SDK provides seamless integration between the on-device keyword recognition models created using Custom Keyword and the Keyword Verification service such that you do not need to provide any configuration for the Keyword Verification service. It will work out-of-the-box.
Let’s walk through how to create on-device keyword recognition models using Custom Keyword, with some tips along the way:
- Go to the Speech Studio and Sign in or, if you do not yet have a speech subscription, choose Create a subscription.
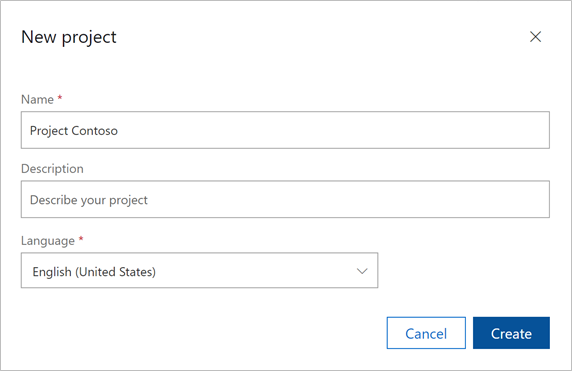
- On the Custom Keyword portal, click New project. Provide a name for your project with an optional description. Select the language which best represents what you expect your end-users to speak in when saying the keyword.
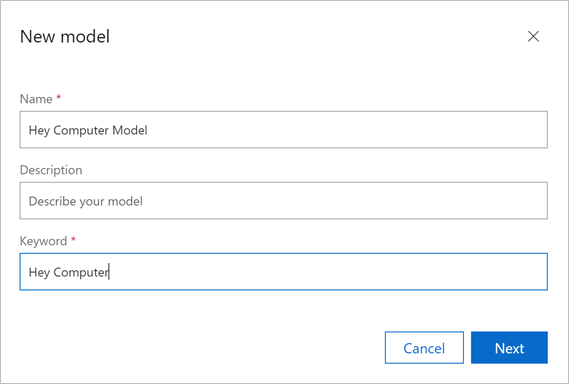
- Select your newly created project from the list and click Train model. Provide a name for your model with an optional description. For the keyword, provide the word or short phrase you expect your end-users to say to voice activate your product.
Below are a few tips for choosing an effective keyword:
- It should take no longer than two seconds to say.
- Words of 4 to 7 syllables work best. For example, “Hey Computer” is a good keyword. Just “Hey” is a poor one.
- Keywords should follow common pronunciation rules specific to the native language of your end-users.
- A unique or even a made-up word that follows common pronunciation rules might reduce false positives. For example, “computerama” might be a good keyword
- Custom Keyword will automatically create candidate pronunciations for your keyword. Listen to each pronunciation by clicking the play button next to it. Unselect any pronunciations that do not match the pronunciation you expect your end-users to say.
Tip: It is important to be deliberate about the pronunciations you select to ensure the best accuracy characteristics. For example, choosing more pronunciations than needed can lead to higher false accept rates. Choosing too few pronunciations, where not all expected variations are covered, can lead to lower correct accept rates.
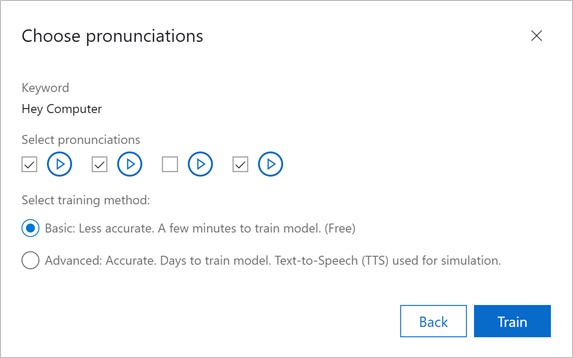
Choose the type of model you would like to generate. To make your keyword recognition journey as effortless as possible, Custom Keyword allows you to create two types of models, both of which do not require you to provide any training data:
Basic – Basic models are designed to be used for demo or rapid prototyping purposes and can be created within just 15 minutes.
Advanced – Advanced models are designed to be used for product integration with improved accuracy characteristics. These models can take up to 48 hours to be created. Remember, you do not need to provide any training data! Advanced models leverage our Text-to-Speech technology to generate training data specific to your keyword and improve the model’s accuracy.
Click Train, and your model will start training. Keep an eye out in your email as you will receive a notification once the model is trained. You can then download the model and integrate with the Speech SDK.
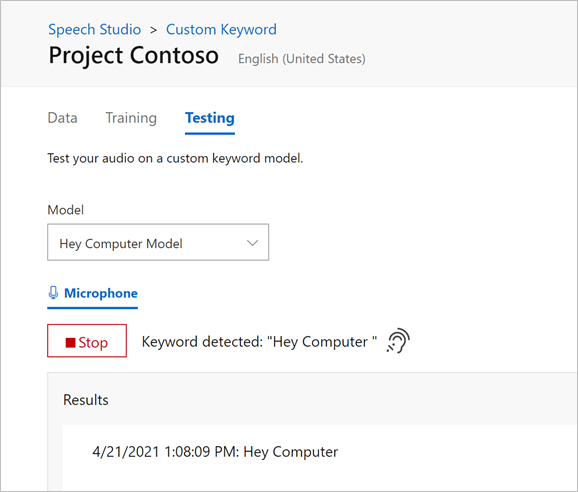
Tip: You can also test the model directly within the Custom Keyword portal in your browser by using the Testing tab. Choose your model and click Record. You may have to provide microphone access permissions. Now you can say the keyword and see when the model has recognized it!
For more information on how to use your newly created keyword recognition models with the Speech SDK, read Create Keyword quickstart – Speech service – Azure Cognitive Services | Microsoft Docs.
Brought to you by Dr. Ware, Microsoft Office 365 Silver Partner, Charleston SC.


Recent Comments