This article is contributed. See the original author and article here.
Hi IoT developers! We’ve refreshed the IoT Plug and Play Preview with new features and enhancements. You can get started today preparing your devices and applications for the next generation of IoT solutions enabled by IoT Plug and Play. Specifically, this release enables device developers and OEM’s to begin building devices they can certify for IoT Plug and Play ahead of the general availability launch. Furthermore, solution developers can begin creating IoT Plug and Play aware solutions using the latest SDKs with the updated IoT Plug and Play specifications that will seamlessly integrate with Azure IoT services and solutions from our partners.
The new IoT Plug and Play features dramatically enhances the developer experience for both device developers and solution builders. Device developers can declare their device model to IoT Hub at connection time using the open source SDKs that are production ready. Solution builders can develop solutions that automatically understand the device and start interacting with the devices, all without writing any embedded code.
Existing devices already connecting to and using Azure IoT communication patterns (Device Twins, Direct Methods, Telemetry) can be easily upgraded with minimal code changes. Device developers just need to describe the device capabilities in a model and include this model’s identifier in the connection string. On the solution side, developers can retrieve the model from its identifier and use it to make their applications dynamically recognize devices capabilities and adapt to these, delivering the next generation of IoT solutions.
IoT Plug and Play and Azure Digital Twins are both based on the Digital Twins Definition Language (DTDL) that is open source and is based on open W3C standards such as JSON-LD and RDF, which enables easier adoption across services and tooling.
IoT Plug and Play simplifies IoT solution development
Device interactions with an IoT solution can be described in terms of telemetry, properties, and commands using the Digital Twins Definition Language (DTDL) version 2, the same language used by Azure Digital Twins (more on this later). These communication patterns are implemented in the MQTT protocol that’s broadly used in the industry to connect IoT devices. With IoT Plug and Play we go one step further by modeling device communication patterns with an open language. Our goal is to improve IoT solutions development productivity by enabling Model-driven workflows such as code generation, automatic validation, and dynamic UI.
Developers can use the Azure IoT device SDKs available in C, .NET, Java, Python and Node, or any MQTT library to interact with IoT Hub in a secure and reliable way. All of these have been updated to support IoT Plug and Play.
Let’s dive into what’s new and how to get started!
New Azure IoT Hub features
Azure IoT Hub is a Cloud service that enables secure and scalable device connections, communication, and integration with IoT solutions. Think of it as your device gateway. IoT Hub handles authentication of devices, establishes bidirectional communication, and offers several types of interactions with devices such as telemetry, device twin state synchronization, and direct methods, all built on top of the IoT Hub communication protocol.
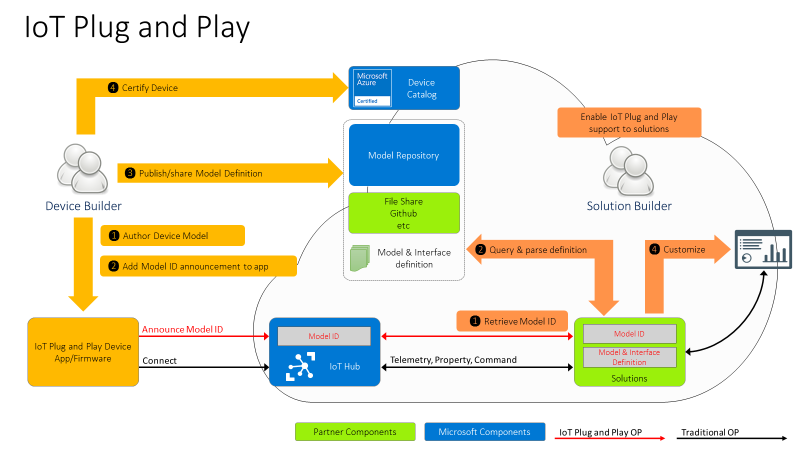
However, these patterns on their own aren’t defining a shared convention between device and cloud application. Device developers and solution developers need to agree on a convention defining what’s in the telemetry payload, what’s the data format, what commands are supported by devices, and what properties they expose. This is exactly what IoT Plug and Play does. Here is how this all comes together.

For the Device developer:
- Using latest enhanced tools and SDKs (more details below on what’s new), the Device developer will author a device model using DTDL.
- To enable Model ID registration, IoT Hub accepts a new parameter in the MQTT Connection packet with the Model ID sent by the device and makes this Model ID available to cloud applications. Once the model is defined, the device developer just needs to add the Model ID announcement in the connection message and ensure the device implementation matches the model. With this Model ID, IoT Hub will be able to identify devices that support IoT Plug and Play and enable to seamlessly integrate them into IoT Plug and Play enabled solutions (see below).
- Device developers can share their devices’ models with solution developers directly or through a public or private repository, with the corresponding Model IDs.
- Device builders can certify their devices for solution builders to get the guarantee that devices are indeed supporting Plug and Play and can seamlessly be integrated into next generation IoT solutions.
For the solution developer:
- Solution builders can retrieve devices’ Model ID from IoT hub.
- With the Model ID, they will acquire and parse the matching IoT Plug and Play model for the device from the model repository or other sharing mechanism agree upon with the device builder.
- With the IoT Plug and Play model, solutions can dynamically adjust their user interface depending on the devices connecting.
IoT Plug and Play Preview is currently available in Japan East, Central US, and North Europe.
Device SDKs are production ready
As of today, all Azure IoT Hub device SDKs are already updated, and support IoT Plug and Play. Here are the steps required to enable IoT Plug and Play on any device:
- Create the model describing the device interactions
- Implement the device model including sharing the Model ID during the connection and using the Azure IoT communication patterns (Device Twins, Direct Methods, Telemetry)
- Validate the device’s implementation of the model using a tool to interact with the device (Azure IoT Explorer, IoT Plug and Play CLI, REST APIs, Service SDKs)
We’ve got some good news for device developers: even though IoT Plug and Play is still in Preview, device builders can use these SDKs to build certification ready devices starting today. This means we won’t make any further breaking changes to the SDKs and all devices created today will work without any modification when IoT Plug and Play becomes generally available (GA).
New features for solution builders
To fulfill the promise of the Digital Twins vision, IoT Plug and Play offers APIs compatible with Azure Digital Twins (ADT), allowing any IoT Plug and Play device to seamlessly integrate into Digital Twins applications.
This new preview REST API can be consumed by the Azure Digital Twins Service SDKs, available for Node and Python. Support for Java and .NET will be added soon. Furthermore, Azure IoT Hub can produce Digital Twins change notifications.
These features enable the alignment of IoT Hub with ADT to accelerate the creation of modern smart environmental solutions.
Developer Experience
To create device models, developers can use the Visual Studio extensions for DTDL, available for VSCode and Visual Studio 2019, with all expected features such as Intellisense and automatic validation. Read more about this extension in this blog post announcement.
Because IoT Plug and Play exposes REST APIs, you can easily extend your own tooling, scripts, and development environments. In fact, the Azure IoT Explorer tool, the Visual Studio and Code extensions, and the Azure CLI IoT extension are all taking full advantage of the IoT Plug and Play REST APIs.
We have samples and docs for all languages available in our new released documentation on docs.microsoft.com/azure/iot-pnp to help you learn IoT Plug and Play concepts.
Hello IoT Plug and Play World !!
How about we walk you through how this all looks?
Let’s create a simple device using the .NET SDK, (other languages are available in the Quickstarts) that reports the current memory available as a telemetry data point, the frequency of this signal will be configurable by a writable property that can be set from the solution side.
First, we create the DTDL interface, applying a model-first approach, and then we implement a device in .NET that produces messages that are compatible with the IoT Plug and Play convention.
We’ll use the DTDL VSCode extension to create the interface using the command palette: DTDL: CreateInterface, and replace the default contents with the telemetry and property elements.
{
  "@context": "dtmi:dtdl:context;2",
  "@id": "dtmi:com:example:mydevice;1",
  "@type": "Interface",
  "displayName": "mydevice",
  "contents": [
    {
      "@type": "Telemetry",
      "name": "workingSet",
      "schema": "double"
    },
    {
      "@type": "Property",
      "name": "refreshInterval",
      "schema": "integer"
      "writable" : true
    }
  ]
}
To create the device code we use .NET and the Microsoft.Azure.Devices.Client/1.27.0 NuGet package.
To initialize the DeviceClient we need the Device Connection String and the Model Id
string modelId = "dtmi:com:example:mydevice;1";
string connectionString = "<deviceConnectionString>";
int    refreshInterval = 5;
var client = DeviceClient.CreateFromConnectionString(connectionString,
                      TransportType.Mqtt,
                      new ClientOptions() { ModelId = modelId });
Console.WriteLine("client connected");
Let’s start by reading the refreshInterval from the desired properties
var twin = await client.GetTwinAsync();
if (twin.Properties.Desired.Contains(nameof(refreshInterval)))
{
  JValue refreshIntervalProperty = twin.Properties.Desired[nameof(refreshInterval)];
  refreshInterval = refreshIntervalProperty.Value<int>();
  Console.WriteLine("Found refreshInterval:" + refreshInterval);
}
And sending the telemetry in a loop.
while (true)
{
  var serializedTelemetry = JsonConvert.SerializeObject(
    new { workingSet = Environment.WorkingSet }
  );
  var message = new Message(Encoding.UTF8.GetBytes(serializedTelemetry));
  message.ContentType = "application/json";
  message.ContentEncoding = "utf-8";
  await client.SendEventAsync(message);
  Console.WriteLine(serializedTelemetry);
  await Task.Delay(refreshInterval * 1000);
}
Finally, we want to subscribe to any desired property update. Note that the device must report back if the desired property was applied. The extra properties are described in the IoT Plug and Play Convention.
await client.SetDesiredPropertyUpdateCallbackAsync(async (desired, ctx) =>
{
  if (desired.Contains(nameof(refreshInterval)))
  {
    JValue refreshIntervalProp = desired[nameof(refreshInterval)];
    refreshInterval = refreshIntervalProp.Value<int>();
    Console.WriteLine("Received refreshInterval:" + refreshInterval);
    TwinCollection reportedProperties = new TwinCollection();
    TwinCollection ackProps = new TwinCollection();
    ackProps["value"] = refreshInterval;
    ackProps["ac"] = 200;
    ackProps["av"] = desired.Version;
    ackProps["ad"] = "desired property received";
    reportedProperties[nameof(refreshInterval)] = ackProps;

    await client.UpdateReportedPropertiesAsync(reportedProperties);
  }
}, null);
Use the service SDK to add IoT Plug and Play support in your solutions
Our service SDKs allow you to easily take advantage of IoT Plug and Play in your IoT solutions. Let us show you how.
IoT Solutions use the Azure SDK to interact with the devices using IoT Hub’s patterns (Telemetry, Device Twins and Direct Methods). The new Azure IoT Hub Digital Twins service SDKs lets you retrieve the Model Id announced by the device.
This time we are going to use the Node.js service SDK from NPM.
const dt = require('azure-iot-digitaltwins-service') // preview
const cs = '<HubConnectionString>'
const dtclient = new dt.DigitalTwinServiceClient(new dt.IoTHubTokenCredentials(cs))
dtclient.getDigitalTwin('mxchip1')
  .then(dtresp => {
    if (dtresp) {
      const twin = dtresp._response.parsedBody
      const modelId = twin.$metadata.$model
      console.log(modelId)
    }
  })
With the Model Id available, your custom solution can make smart decisions about how to interact with the device. If the device implements the model Id we know of, we can safely update the refreshInterval property using the new Digital Twins patch api.
if (modelId === 'dtmi:com:example:mydevice;1') {

  const patch = [{
      op: 'add',
      path: '/refreshInterval',
      value: 3
  }]

  dtclient.updateDigitalTwin(deviceId, patch, dtresp.eTag)
    .then(patchResp => {
      console.log(patchResp)
    })
}
If the .NET device simulator is still running you should see how the device reacts.
Full code and sample model available in this gist
Use Azure IoT Explorer to validate the device implementation
The last step is to validate the device implementation against its Model. For this, we use Azure IoT Explorer which has been updated to support IoT Plug and Play from version 0.11.1.
To connect the Azure IoT Explorer tool to IoT Hub, you need the admin IoT Hub connection string. When you’re connected, go to the devices section and add a new device. When you have the device id registered, you can grab the connection string and replace in the first code snippet we created before for the device.

Azure IoT Explorer can load your models from a local folder. In the main screen – Home, select IoT Plug and Play settings and set the source to a local folder where your DTDL model files are located.
Now, when you run the device code (remember to update the connection string), Azure IoT Explorer will populate the IoT Plug and Play view with a default UI built from the model.
See what happened here in the Azure IoT Explorer? Its UI adapted to the device model without any need for code change or configuration. Isn’t that convenient?

You can now inspect telemetry, properties and interact with the device.
Let’s update the refreshInterval value from the Azure IoT Explorer UI and see the bi-directional communication with the device in action.

IoT Central will use IoT Plug and Play
Integration with IoT Central is a key component of the IoT Plug and Play value proposition. By the time IoT Plug and Play becomes generally available, IoT Central will be updated to fully support the new capabilities and conventions in full alignment with DTDL v2, additionally all certified IoT Plug and Play devices will automatically work with Central. Stay tuned for more updates on this soon.
Next Steps
Our team is eager to see how you will take advantage of IoT Plug and Play in your IoT devices and solutions. We are also looking forward to getting your feedback. You can find us in our open source GitHub Repos for the SDKs, or you can simply engage in a conversation right here in the IoT Tech Community commenting below.
Brought to you by Dr. Ware, Microsoft Office 365 Silver Partner, Charleston SC.

Recent Comments