This article is contributed. See the original author and article here.
Storage accounts behind firewalls will not be accessible by Logic apps within the same region using Azure blob storage connector, because we can not add firewall rules to give access for the connector outgoing IP addresses; please check the following link for details: https://docs.microsoft.com/en-us/azure/connectors/connectors-create-api-azureblobstorage#access-storage-accounts-behind-firewalls
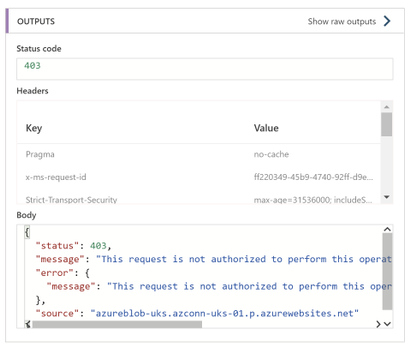
Azure blob storage connector will be returning 403 error, as shown below:
As a workaround, we use the HTTP action to call storage account REST API’s using managed identity; to do so, please follow the steps below:
- Enable your logic app managed identity:
- Go to your logic app.
- Go to Settings -> Identity.
- Select System assigned.
- Select Status -> On.
- Click Save.
- In your storage account, add role assignment for your logic app:
- Go to your storage account.
- Click on access Control (IAM).
- Click on Role assignments tab.
- Click Add and select Add role assignment:
- From the Role dropdown list, select Storage Blob Data Contributor.
- From Assign access to dropdown list, select Logic App.
- Under the Select field, type the name of your logic app to search for it and select it once it’s found, it will appear under the selected members list.
- Click Save.
- Connect your logic app to storage account using HTTP action to call storage account REST API:
- Go to your logic app
- Click on View in logic apps designer
- Add an action
- Search for and select HTTP action:
- From method dropdown list, select a method (GET, PUT, etc.).
- Enter the URI for the folder under your storage account (https://your account name.blob.core.windows.net/container name/file Name)
- Under headers, add the following key value pairs:
- Key: x-ms-blob-type, Value: BlockBlob.
- Key: x-ms-version, Value: 2019-07-07.
- In the body field, enter or select the variable or data token that holds your file content, in case of using PUT method.
- From add new parameter, select authentication:
- From Authentication type dropdown list, select Managed Identity.
- From Managed Identity dropdown list, select System Assigned Managed Identity.
- For audience, enter https://storage.azure.com


Brought to you by Dr. Ware, Microsoft Office 365 Silver Partner, Charleston SC.

Recent Comments