by Contributed | Dec 1, 2020 | Technology
This article is contributed. See the original author and article here.
As calls and online meetings have increased, Microsoft has worked on continually improving our features and services to help you collaborate across teams, create clarity and maintain the human connection that went from the hallways of work to digital spaces. To complement the calling experience in Teams is a robust portfolio of Teams phones designed for the places and ways you stay connected.
USB Solutions
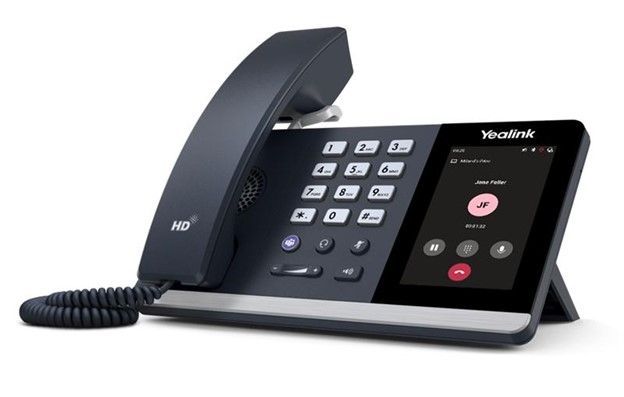
The first USB phone certified for Microsoft Teams will be available this month, the Yealink MP50. This PC peripheral gives users a phone experience with a dial pad and handset that is plugged directly into a PC or docking station without complicated set up. While connected to Teams, the USB phone frees up your PC screen for other tasks while the device can take on the call.
Affordable phones with hardware buttons – launching Q1 2021
We have teamed up with partners Audio Codes and Yealink to release a line of phones with a non-touch display and hardware buttons. These phones will provide support for core calling functionality in Teams at an affordable price point. They will be available for purchase in spring of2021.

Teams phones
Since the first Teams phones came to market in 2018, we have added various options to our product portfolio to expand form factors, features, and experiences our devices can deliver. The Microsoft Teams phone app is brought to life with our OEM partners, Yealink, Audiocodes, and Poly. Together we bring best in class user experiences like sidecar support, redesigned home screen UI, and enterprise grade security and management.

Teams Displays
The Teams display is the newest category of collaboration experiences brought to market by our first partner, Lenovo. Now available on the ThinkSmart View, the Teams display integrates Artificial Intelligence and Cortana into your collaboration experience, creating the first intelligent companion device in market. Leverage voice activated commands with Cortana to quickly place a video call to your collaboration partners and rely on an informative ambient display which brings to your attention your personalized notifications and alerts.

Device as a Service
We are excited to announce that Teams certified devices, including the phones above, will be available for monthly financing through the Teams devices marketplace in the US starting in November. Users can add products to their shopping cart and with qualifying orders, be eligible for two or three year payment plans. This way what would have been an initial high investment can be broken up into smaller payments and redirected to other priorities customers may have. Shop today at the marketplace! More countries to come in 2021.
by Contributed | Dec 1, 2020 | Technology
This article is contributed. See the original author and article here.
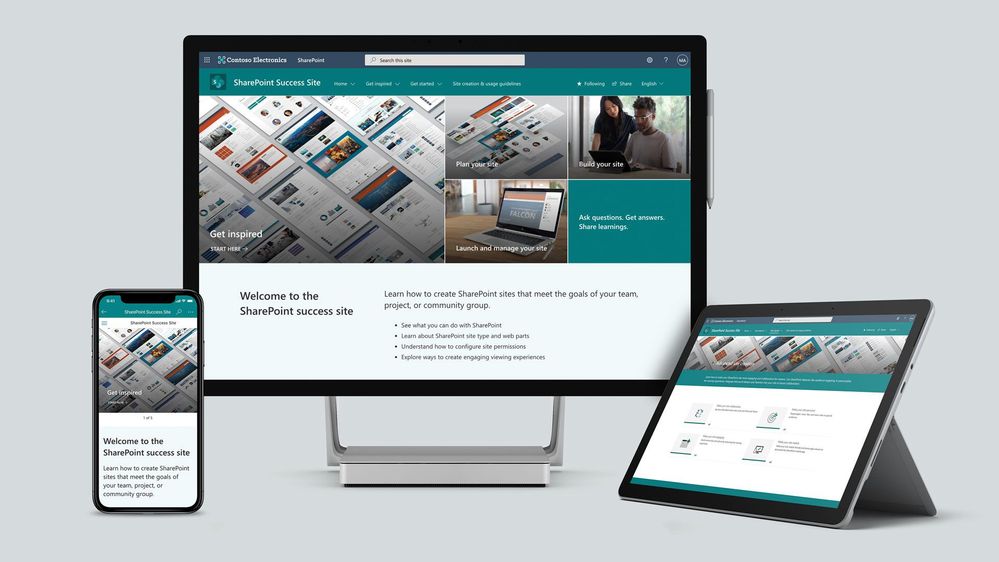
To help our customers drive adoption and get the most out of SharePoint, we are launching the new SharePoint Success Site. The SharePoint Success Site is a ready to deploy and customizable SharePoint communication site that helps your colleagues create high-impact sites to meet the goals of your organization. The SharePoint Success Site builds on the power of Microsoft 365 learning pathways which allows you to train end users via Microsoft-maintained playlists and custom playlists you create.
To help your colleagues get the most out of SharePoint, the SharePoint Success Site comes pre-populated with site creation inspiration and training on how to create high quality and purposeful SharePoint sites. The SharePoint Success Site is not just about creating high impact sites – organizations need users to meet their responsibilities as site owners and to adhere to your organization’s policies on how SharePoint is to be used. The SharePoint Success Site includes a page dedicated to site creation and usage policies that should be customized to fit the needs of your organization.
The SharePoint Success Site brings together all the critical elements that site owners need to know to create amazing SharePoint sites. Provision the SharePoint Success Site in your tenant to:
- Get more out of SharePoint – Help people understand the ways to work with SharePoint to achieve business goals. Then, show users how to utilize the power behind SharePoint’s collaboration capabilities with step-by-step guidance.
- Enable Site owners to create high-impact sites – Ensure Site owners have the right information and support to create purposeful sites that are widely adopted by the intended audience.
- Ensure Site owners follow site ownership policies – Customize the site creation and usage policies page in your SharePoint Success Site to ensure sites created in your organization are compliant with your policies.
- Provide the most up-to-date content – Equip Site owners with SharePoint training content that is maintained by Microsoft and published as SharePoint evolves.
What’s included?
To help accelerate your implementation of a SharePoint Success Site in your tenant the following highlights just some of the features included:
- A fully configured and customizable site owner SharePoint Communication Site: The SharePoint Success Site is a SharePoint communication site that includes pre-populated pages, pre-configured training, web parts, and site navigation. The site can be customized to incorporate your organization’s existing branding, support, and training content.
- Microsoft maintained SharePoint training content feed: The SharePoint Success Site’s up-to-date content feed includes a range of content that helps new users and existing Site owners plan, build, and manage SharePoint sites.
- Site inspiration: Content that helps users understand the different ways to leverage SharePoint to meet common business objectives.
- Success stories: A success stories gallery to showcase internal SharePoint site success stories that inspire others in the organization.
- Site creation guidelines: A starting point template to educate new Site owners about SharePoint site creation and usage policies for your organization. The customizable guidelines include suggested usage policy topics and questions to prompt consideration of usage policies within your organization.

Next steps
Learn more about the SharePoint Success Site. Provision the SharePoint Success Site to your tenant today and customize it to help your colleagues adopt SharePoint. Create custom learning paths to meet the unique needs of your environment. You can also create custom playlists by blending learning content from Microsoft’s online content catalog with your organization’s SharePoint specific process content.
We hope the SharePoint Success Site helps you and your colleagues get the most out of SharePoint. Share your feedback and experience with us in the Driving Adoption forum in the Microsoft Technical Community.
Frequently asked questions (FAQs)
Question: What are the requirements for installing the SharePoint Success Site into my tenant environment?
Answer:
- Ensure SharePoint Online is enabled in your environment.
- The individual that will provision the SharePoint Success Site must be the global admin (formerly called the Tenant admin) of the target tenant for install.
- The tenant where the site will be provisioned must have:
by Contributed | Dec 1, 2020 | Technology
This article is contributed. See the original author and article here.
High throughput streaming ingestion into Synapse SQL Pool is now available. Read the blog post here on the announcement.
Interestingly, I have been working with an enterprise customer which has streaming data in XML and produces close to 60GB/minute of streaming data. In this blog post, I will walk through the steps to implement a custom deserializer to stream XML events in .NET which will be deployed as Azure Stream Analytics (ASA) job. The data deserialized will be further ingested into Azure Synapse SQL Pool (provisioned data warehouse).
With custom deserializer programming, it is flexible to handle almost any types of data formats.
Create Azure Stream Analytics Application in Visual Studio
Launch Visual Studio 2019. Make sure you have Azure Stream Analytics tools for Visual Studio is installed. Follow the instruction here to install.
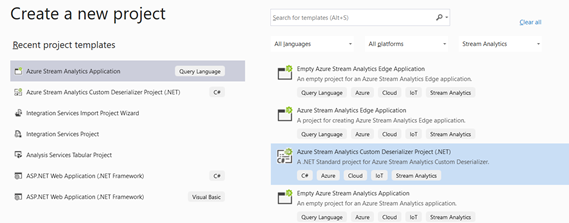
Click Create a new Project and select Azure Stream Analytics Custom Deserializer Project (.NET). Give the project a name and click Create.
Once the project is created, next is to create the deserializer class. Events that are parsed in certain formats, needs to be flatten into a tabular format. This is addressed as deserialization. Let’s create a new class that will be instantiated to deserialize the incoming events.
Right click the project > Add New Item > Class. Name the C# class as Grocery and click Add.

Once the C# class file is created, next is to create the class members which defines the properties of the object. In our example, the object is an XML event which captures the grocery transactions happening at Point of Sales.
Here is how the event records looks like in XML for each stream.

<Groceries>
<Grocery>
 <name>Roasting Pan</name>
 <storeId>1008</storeId>
 <category>Kitchen</category>
 <producttype>5</producttype>
 <price>17.99</price>
 <timestamp>1606185743.597676</timestamp></Grocery>
<Grocery>
 <name>Cutting Board</name>
 <storeId>1005</storeId>
 <category>Kitchen</category>
 <producttype>10</producttype>
 <price>12.99</price>
 <timestamp>1606185747.236039</timestamp>
</Grocery>
<Groceries>
Open the Grocery.cs file, and modify the class with the properties as below:
public class Grocery
    {
        public string storeId { get; set; }

        public string timestamp { get; set; }

        public string producttype { get; set; }

        public string name { get; set; }

        public string category { get; set; }

        public string price { get; set; }

    }
Check out the docs here for the Azure Stream Analytics supported data types.
Next, we just need to code the block that calls the Deserialize function of XmlSerializer class and specify the class that needs to be instantiated as a type of, in this case, as a type of Grocery.
Open the ExampleDeserializer.cs file, and replace the entire body of the Deserialize function with the code below:
XmlSerializer serializer = new XmlSerializer(typeof(List<Grocery>), new XmlRootAttribute("Groceries"));

List<Grocery> productList = (List<Grocery>)serializer.Deserialize(stream);

foreach (var Product in productList)
{
    yield return new Grocery()
    {
        category = Product.category,
        name = Product.name,
        price = Product.price,
        storeId = Product.storeId,
        producttype = Product.producttype,
        timestamp = Product.timestamp
    };
}
There are errors highlighted and this indicates that the reference to the XMLSerializer dll is yet to be referenced. Point over to the XMLSerializer class and press Ctrl + . (dot notation) in your keyboard and add the reference to System.XML.Serialization.

Repeat the same for Grocery.

Replace the return type of the Deserialize method from CustomEvent to Grocery. The method should like as below:

1. The code block above receives the incoming streaming events as a type of Stream.
2. New serializer object instantiated specifying the class of how each event records should be read as, in this case, as a type of Grocery.
3. Incoming stream input is being parsed as argument to the Deserializer method and a type cast to Grocery specifies that the object should be returned as a type of Grocery.
4. The deserialized object is instantiated as a type of Grocery and its attribute properties are initialized and the object is returned back to the caller. At this point, any customization such as discount calculations can be implemented if required. It is programming, almost anything can be programmed. :smiling_face_with_smiling_eyes:
Next, replace the return type from CustomEvent to the CustomCSVDeserializer class instantiation as shown below:

That’s all for the programming of the deserializer. We will need to build the project so that the DLL can be compiled. Right click on the project and click Build project.
Next, we will need to create an Azure Stream Analytics application which can then be deployed to as a Azure Stream Analytics job. Add new Project to the same solution. Right click on the solution > Add > New Project > Azure Stream Analytics Application. Give a name to the project and click Create.

Once the Azure Stream Analytics project is created, right click on References > Projects > select the only project shown.

With the deserializer project added as a reference, next is to specify the input and output for the Azure Stream Analytics job. We will first configure the input to the Azure Event Hub. This blog assumes that the application at the Point-Of-Sale machine has already been configured to stream its events to Azure Event Hub. Check out our documentation here to understand this configuration.
In the Azure Stream Analytics application, expand the Inputs folder and double click on the Input.json file. Ensure the Source Type is set to Data Stream and the Source is set to Event Hub. The rest of the configuration is just to specify the Azure Event Hub resource. I have specified as below:

Next, the Output needs to be configured. At present, Visual Studio does not support the Output option to Azure Synapse Analytics. However, this can be easily configured once the Azure Stream Analytics job is deployed to Azure. For now, let’s configure the output to Azure Data Lake Storage. Expand Output folder and double click Output.json file.
Select the Sink to Azure Data Lake Storage Gen2/Blob Storage. The remaining of the fields requires the container name (create one if there are none) in the Azure Data Lake Storage and the storage account key. Configure this as required. I have configured as below:

We are done configuration the Azure Stream Analytics project. Right click the project and click Build.
Once build succeeded with no errors, right click the project, and click on Publish to Azure. Select the option to create a job and configure the subscription and the resource group to deploy the ASA job.

Do note that custom deserializer currently only supports limited regions which includes West Central US, North Europe,East US, West US, East US 2 and West Europe. You can request support for additional regions. Please refer to our documentation here.
Once the project is successfully published, changing the output to Azure Synapse SQL Pool (provisioned data warehouse) will be the next step.
Configuring Output to Azure Synapse Analytics
With Visual Studio open, you can click the icon from the ASA job deployed summary pane itself as shown below.

In the Azure Portal, click on the Azure Stream Analytics job output. Click Add output and select Azure Synapse Analytics (formerly SQL DW).

Prior selecting the destination to Azure Synapse SQL data warehouse, please ensure the table is created in the provisioned SQL Pool.
The Output configuration specifies the destination table. I have configured as below:

Once the Output configured successfully, next we can configure the job to stream the output to Azure Synapse SQL data warehouse. The older Output to Azure Data Lake Storage Gen2 can be deleted if wanted to. Click on the job query, type in the query as below and click Save query.
SELECT
   category,
   name,
   price,
   storeId,
   producttype,
   timestamp
INTO
    [factgrocerysales]
FROM
    [Input]
The INTO clause above specifies the destination data warehouse with the alias named as above.
That’s all. We are now ready to run the job. Navigate back to the job page and click Start. This will resume the job.

As the job is running, I have triggered the event producer which simulates the Point-Of-Sales scenario which captures the transactions as XML events.
Querying the table in SSMS, shows the events are streamed and written to Azure Synapse Analytics data warehouse successfully.

by Contributed | Dec 1, 2020 | Azure, Microsoft, Technology
This article is contributed. See the original author and article here.
Fluent Bit and Azure Data Explorer have agreed to a collaboration and released a new output connector for Azure Blob Storage. Fluent Bit is an open source and multi-platform log processor tool, and the new Azure Blob output connector is released under the Apache License 2.0.
The new output connector can be used to output large volumes of data from Fluent Bit and ingest logs to Azure Blob Storage. From Azure Blob Storage, logs can be imported in near real-time to Azure Data Explorer using Azure Event Grid. The Azure Blob output plugin can be used with General Purpose v2 and Blob Storage accounts and is supported with Standard and Premium storage accounts. It also includes support for the Azurite emulator, allowing customers to test and validate the format of output logs locally.
The Azure Blob output connector can be quickly configured and once enabled logs will immediately begin flowing to the configured storage account and container. Once the logs are in Azure Blob Storage, they can be ingested to Azure Data Explorer using one-click ingestion and Event Grid notifications. The connector can output both block blobs and append blobs to an Azure storage account. However, only block blobs are supported by Azure Data Explorer for ingestion.
Learn more about how to configure the Azure Blob output connector from Fluent Bit and get started ingesting your logs to Azure Data Explorer from Azure Blob Storage today.
by Contributed | Dec 1, 2020 | Technology
This article is contributed. See the original author and article here.
Hello Folks,
We live in a cloud world. That is clear… However, most of us in the REAL world know that we’ll have to manage and maintain our servers on-prem or in multiple clouds for the foreseeable future. Therefore, it’s imperative that we find the right management solution to allow us to manage and maintain ALL our machines regardless of where they live. Azure, On-prem or other clouds.
During a private chat in our Discord Server (aka.ms/itopstalk-discord) with a community member it became clear that there may be some confusion out there with the growing number of managing solutions we offer that are labeled “hybrid management”. So, I decided to do a quick round-up to see if I could shed some light.
Today I will look at the following solutions:
- Log Analytics
- Azure Monitor
- Azure Automation
- Azure Arc
Log Analytics
Log Analytics is a tool to query data in Log Analytics Workspace. A Log Analytics Workspace is an Azure resource and a container where data is collected, aggregated, and serves as an administrative boundary. In essence, it’s a logical storage unit where your log data (from your servers and other sources) is collected and stored.
Can write very a simple query that returns a set of records and then use features of Log Analytics to sort, filter, and analyze the results. Or maybe you need to write more involved queries and perform statistical analysis and visualize the results in a chart to identify a particular trend. Ether way, Log Analytics is the tool that you’re going to use write and test them.
Log Analytics is also the foundation of most of the management tools we have in the list above. So much so that we even changed the term Log Analytics in many places to Azure Monitor logs. Apparently, this better reflects the role of Log Analytics and provides better consistency with metrics in Azure Monitor. Azure Monitor log data is still stored in a Log Analytics workspace and is still collected and analyzed by the same Log Analytics service.
The term log analytics now primarily applies to the page in the Azure portal used to write and run queries and analyze log data. It’s the functional equivalent of metrics explorer, which is the page in the Azure portal used to analyze metric data.
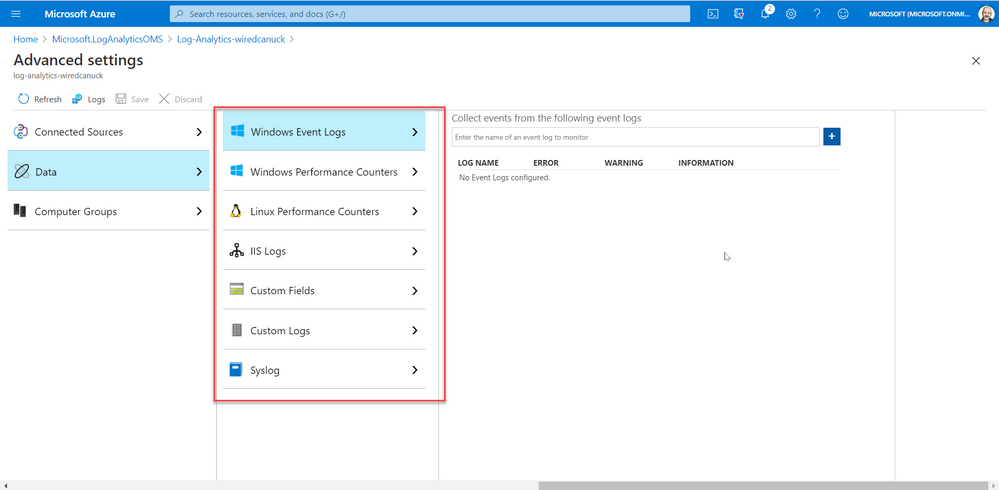
And since I started this article stating that I was looking at hybrid solutions, I must touch on the fact that you can deploy the Log Analytics Agent on machines (Windows or Linux) on-prem or in other cloud manually or scripted by using the Agent management pane in the portal. By selecting your OS, downloading the agent, and installing it while providing the Workspace ID and access key.

Azure Monitor
Azure Monitor is the service we most refer to when we are looking to monitor availability and performance of our apps and services. Log Analytics and Metrics Explorer (which we will not discuss today) collect the data from your cloud and on-premises environments. That data is then analyzed and acted upon to helps you understand how your environments are performing. Azure Monitor can also proactively identify issues affecting your resources.
Here are a few examples of what you can use Azure Monitor to help with:
However, Azure Monitor starts collecting data from Azure resources the moment that they’re created. And you can see it in the portal for every resource. For example, in the image below you can see that once a VM is created the Overview and Activity Log panes in the left side of the portal provides you with info on the health of your resources. You just can’t query all that data until you have created a log analytic workspace.

You can also add monitoring solutions that provide analysis of the operation of a particular Azure application or service. They are specifically tuned using queries and metrics to provide you with enhanced monitoring of these specific services.

Azure Automation
Azure Automation provides a service that allows you to automate the creation, deployment, monitoring, and maintenance of resources in your Azure environment and across external systems. It uses a highly scalable and reliable workflow execution engine to simplify cloud management. Orchestrate time-consuming and frequently repeated tasks across Azure and third-party systems.
With Automation, you can connect into any system that exposes an API over typical Internet protocols. Azure Automation includes integration into many Azure services, including:
- Web Sites (management)
- Cloud Services (management)
- Virtual Machines (management and WinRM support)
- Storage (management)
- SQL Server (management and SQL support)
Azure Automation Accounts can help you automate configuration management in in your environment by enabling Change Tracking, inventory, state Configuration and update management. On top of providing the foundation for runbooks.
And just like Azure Monitor, this is also connected to your log analytics workspace and it can integrate with your on-prem or other cloud environments by deploying a Hybrid Runbook Worker. The Hybrid Runbook Worker feature of Azure Automation to run runbooks directly on the machine that’s hosting the role and against resources in the environment to manage those local resources.

Azure Arc
Last but not least on our list today is Azure Arc. It really is for those of you who want to simplify complex and distributed environments across clouds, datacenters, and edge.

Azure Arc facilitates the deployment of Azure services anywhere and extends Azure management to any infrastructure. It’s really a streamlined way of onboarding your machine in all the Azure management capabilities so you can leverage services like:
- Organize and govern all your servers – Azure Arc extends Azure management to physical and virtual servers anywhere. Govern and manage servers from a single scalable management pane. You can learn more about Azure Arc for servers here.
- Manage Kubernetes apps at scale – Deploy and configure Kubernetes applications consistently across all your environments with modern DevOps techniques.
- Run data services anywhere – Deploy Azure data services in moments, anywhere you need them. Get simpler compliance, faster response times, and better security for your data. You can learn more here.
- Adopt cloud technologies on-premises – Bringing cloud-native management to your hybrid environment.
Conclusion
All these services can be leveraged by you and your organization as you see fit. The capabilities are there and it’s really fairly straight forward to deploy the bits you need in the cloud, on multiple clouds and on-prem.
All you need now is to decide what you need.
Go ahead… take those services for a spin. You might even like them.
Cheers!
Pierre

Recent Comments